Understanding and Using NetInfo Includes information on setting up Mac OS X Server and NetInfo to increase the power of your Mac OS X network
K Apple Computer, Inc. © 2001 Apple Computer, Inc. All rights reserved. Under the copyright laws, this publication may not be copied, in whole or in part, without the written consent of Apple. The Apple logo is a trademark of Apple Computer, Inc., registered in the U.S. and other countries. Use of the “keyboard” Apple logo (Option-Shift-K) for commercial purposes without the prior written consent of Apple may constitute trademark infringement and unfair competition in violation of federal and state laws.
Contents Preface About This Document 7 What’s in This Document 7 Where to Find More Information 1 What Is NetInfo? 8 9 NetInfo: A Service for Mac OS X Processes 9 A Historical Perspective 10 Data Consolidation 10 Data Distribution 11 The Power of NetInfo: Software That Uses It 12 Folder and File Ownership 12 Home Directories 13 Mounts 14 Architectural Elements of NetInfo 14 Local Data 14 Shared Data 15 NetInfo Hierarchies 17 Binding 19 Replication 21 Inside NetInfo 22 Accessing and Manipulating NetInf
Viewing NetInfo Data 25 Using Command Line Utilities 27 The Importance of Planning 27 2 NetInfo Planning 29 General Planning Guidelines 29 Controlling NetInfo Data Visibility 31 Simplifying Changes to NetInfo Data 31 Identifying Computers for Hosting Shared Domains Devising a Binding Strategy 32 User Data Planning 32 Understanding the Login Environment 32 Contrasting Logging In and Connecting 35 Managing Names 35 Managing UIDs 38 Setting Up Home Directories 38 Group Data Planning 39 Ensuring Group Visibi
Creating Clones 54 Replacing a Master With a Clone 55 Setting Up Windows User Authentication 56 Simple Hierarchies With No Clones 56 Other Hierarchies 57 Disabling Authentication Manager 60 Populating Domains 60 Setting Up Mounts and Automounting 60 Defining Users and Groups 61 Sharing Printers 62 Contents 5
P R E F A C E About This Document What’s in This Document If you’re a system or network administrator whose responsibilities include Mac OS X administration, this document will help you understand and implement NetInfo. NetInfo is the directory system that is built into computers running Mac OS X and Mac OS X Server. NetInfo facilitates the management of administrative information used by Mac OS X computers.
Where to Find More Information The following information is available for Mac OS X Server administrators. Mac OS X Server is a powerful server platform that delivers a complete range of services to network users, including applications that help you set up and manage your NetInfo data: m Mac OS X Server Administrator’s Guide provides information about Mac OS X Server’s administrative applications and how to use them to set up your server.
C H A P T E R 1 1 What Is NetInfo? NetInfo is the built-in Mac OS X directory system. A directory system is software that system and application processes can use to store and find administrative information about resources and users. The Mac OS X login process, for example, consults user information in NetInfo to determine whether the name and password entered in the login window are those of a valid user.
No matter which application you use, the user information is stored in NetInfo. When a user attempts to log in to a Mac OS X computer, the login process consults the information in NetInfo to authenticate the user. NetInfo This chapter introduces NetInfo. It briefly describes how it evolved. It samples some of the common ways NetInfo is used, illustrating how it makes Mac OS X one of the world’s most advanced operating systems.
NetInfo consolidates administrative information, simplifying the interactions between processes and the administrative data they create and use. NetInfo Processes Processes no longer need to be aware of how and where administrative data is stored. NetInfo does that for them. If a process needs the home directory for a user, it simply retrieves it from NetInfo. NetInfo finds the requested information, then returns it, insulating the process from the details of how the information is stored.
Likewise, user or network information needed to be changed on the computer where it resided. Some changes, such as network settings, had to be made on multiple computers. As networks grew in size and complexity, it became unwieldy to maintain administrative information using this approach. NetInfo solves this problem by letting you store administrative data in such a way that it can be managed by a system administrator from one location.
If an administrator changes a user’s UID, the user may no longer be able to modify or even access files and directories she created. Likewise, if the user logs in as a user whose UID is different from the UID used to create the files and directories, the user will no longer have owner access privileges for them. When you define a user, the UID for the user is automatically assigned and stored in the user’s record in NetInfo.
Home directories are an example of how some Mac OS X processes collaborate to define and use NetInfo data. The Finder can display your home directory automatically because it retrieves its location from your NetInfo user record. But making home directories available is more complicated than simply adding data to a NetInfo user record. It involves such file system actions as creating folders with particular privileges on an available file server.
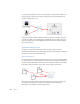
When the user logs in to a computer running Mac OS X, the login process on that computer consults the local NetInfo domain on that computer. If the user’s record is found, the user is granted access to the computer. Log in to Mac OS X Local NetInfo domain Connect to Mac OS X Server Local NetInfo domain After login, if the user chooses Connect To Server from the Go menu to access a computer running Mac OS X Server, the local domain on the server is consulted to authenticate the user.
Shared domains generally reside on Mac OS X Servers, because servers are equipped with tools such as Server Admin for managing network resources and network users. Similarly, you can make network resources such as printers visible to certain computers by setting up printer records in a shared domain accessed by those computers. For example, graphic artists in a company might need to access color printers and scanners, while copy center personnel need to use high-speed laser printers.
While some devices may need to be used only by specific departments, some resources, such as personnel forms, may need to be shared by all employees. You could make a directory of those forms visible to everybody by setting up a share point for the directory in a shared domain known as the root domain, which is always named “/”.
A hierarchy can be as simple as a local domain and a root domain, or it can contain one or more shared domains between the local and root domains, as in this education example. Students domain Undergraduates domain / domain Graduates domain Employees domain Faculty domain Each shared domain is called a parent domain, and the domain immediately below it in the hierarchy is called a child domain.
Domain visibility depends on the computer, not the user. So when a user logs in to a different computer, different NetInfo administrative data may be visible to that computer. In the educational scenario, an undergraduate can log in to a graduate student’s computer if the undergraduate’s user record resides in the Students domain. But the devices that are defined in the Undergraduates domain are not visible unless they are also defined in the Graduates, Students, or root domain.
There are three binding choices, each of which offers a different way for the computer hosting the child domain to locate a computer hosting its parent domain. The protocol you use to bind any two domains depends mainly on the topology of the network: m Broadcast binding. This protocol, which is the default, is best for binding domains on two computers on the same subnet or on a local area network (LAN) configured for IP broadcast forwarding.
Once binding has occurred, Mac OS X processes interact transparently with NetInfo. Rebinding occurs when any network location or settings change or when network connections are lost, then re-established. If a parent domain becomes unavailable for any reason, many local processes, even opening applications that reside locally, may be delayed. You can use replication to minimize the potential of such delays.
Inside NetInfo When a Mac OS X computer starts up and domain binding occurs, a NetInfo daemon called nibindd starts. The nibindd daemon starts another daemon—netinfod—for each domain on the computer. Then nibindd listens for requests from netinfod processes asking for parents, checking for the appropriate netinfod process and initiating binding as required. Both nibindd and netinfod run in the background. A third process related to NetInfo is called lookupd.
Each netinfod process manages interactions with a domain’s NetInfo database. Information in a NetInfo database is organized into directories, which are specific categories of NetInfo records, such as users, machines, and mounts. For example, the users directory contains a record for each user defined in the domain. Here is the record for a user with the short name “admin,” as viewed in NetInfo Manager: Each record is a collection of properties.
m homedirstyletype is used by Server Admin to distinguish among home directory styles none, local, and custom. m home is the absolute path to the user’s home directory. m home_loc is present if the home directory is on an Apple file server. Its value is a Mac OS X property list that contains the domain name of the AFP server where the home directory share point resides and the path, relative to the share point, to the home directory. m gid is the user’s primary group.
Setting Up Search Policies When a process requests NetInfo administrative data, the default search policy is to search the login hierarchy, starting with the local domain, then proceeding toward the root domain until the needed data is located. Binding determines the order in which parent domains are searched.
When the domain is open, select a directory. The illustration below shows the window for a domain called MyDomain. At the bottom of the window, you see the properties of the machines record of a computer named computer01. This computer has a record in the machines directory because it hosts a master or clone of the domain. There are usually three properties associated with a machines record. The name property is the computer’s host name. The ip_address property is the IP address of the computer.
m If the domain has a child on the same computer, the child’s tag is listed, preceded by the domain name and a /. In this example, computer01/local indicates that the domain has a child named computer01 that has the NetInfo tag “local.” While NetInfo Manager can be used to change NetInfo data, it is easy to make a mistake that can disable your computer.
C H A P T E R 2 2 NetInfo Planning The goal of NetInfo planning is to design a hierarchy of NetInfo domains that gives your Mac OS X users easy access to the network resources they need and minimizes the time you spend maintaining NetInfo data. This chapter provides information that will help you decide what your NetInfo hierarchy should look like. It presents some general planning considerations, then focuses on issues related to distributing user and group information among NetInfo domains.
If you want to share information among Mac OS X computers, you need to set up at least a root domain. / domain Log in to Mac OS X Local NetInfo domain Connect to Mac OS X Server Local NetInfo domain Hierarchies this simple may be completely adequate when all your network computer users share the same resources, such as printers or share points that contain home directories or applications. Larger, more complex organizations can benefit from a deeper NetInfo hierarchy.
Controlling NetInfo Data Visibility If you want certain NetInfo data to be visible to all computers in a NetInfo hierarchy, you’d store that data in the root domain of the hierarchy. To make NetInfo data visible only to a subset of computers, store it in a shared domain below the root domain. You might want to set up shared domains to support computers used by specific groups within an organization.
Select computers that will not be replaced frequently and that have adequate capacity for growing domains. While you can move a domain after it has been set up, you may need to reconfigure computers that bind to the shared domains to ensure that the login hierarchies you originally established remain intact. If a shared domain will support more than 100 Mac OS X computers, plan to clone the domain.
When a user logs in to the computer, all the user records in the login hierarchy are available for authenticating the user. NetInfo searches for a user record that contains the user name entered by the user in the login window, starting with the local domain and proceeding through the login hierarchy. If a user record that contains the login name is found, the password in the record is compared with the password entered by the user. If they match, the user is authenticated.
Each automatically mounted directory has a NetInfo mount record in one of the domains in the login hierarchy. You can view a mount record using NetInfo Manager by selecting the mounts directory, then selecting a computer and share point. Here is one of the mount records for the automatically mounted directories visible under /Network/Servers in the Finder window on the previous page. The value of the “dir” property controls where in the Finder the directory is visible to the user.
Although any user who can log in to a particular Mac OS X computer can view the directories and resources associated with domains in the computer’s login hierarchy, each user’s NetInfo user record determines several aspects of the login environment: m The UID in the record determines the files or operations the user has access to. m The primary group ID associated with the user record also affects a user’s file access privileges.
For example, user records for Tony Smith and Tom Smith contain the short name “tsmith” and the password “smitty.” / Tony Smith (tsmith,smitty) Students Tom Smith (tsmith,smitty) Faculty Tom’s computer Tony’s computer When Tony logs in to his computer with a user name “tsmith” and the password “smitty,” he is authenticated using the record in the Students domain. Similarly, Tom can use the same login entries at his computer and be authenticated using his record in the root domain.
If Tony has a user record in his local domain that has the same names and password as his record in the Students domain, the Students domain’s record for Tony would be masked. Tony’s local domain should offer a name/password combination that distinguishes it from the Students domain’s record. If the Students domain is not accessible (when Tony works at home, for example), he can log in using the local name and continue using his computer.
Managing UIDs The UID is a critical element in ensuring users have full access to the directories and files they create as well as to their home directories. Most of the time, individual users should have unique UIDs. Assigning the same UID to different user records is risky unless you have a specific reason for doing so, such as to support a new short name as described above. Two users with the same UID have identical directory and file access privileges.
Group Data Planning Groups are used to assign directory and file access privileges to collections of users. Here is what a group record looks like in NetInfo Manager. It is a simple record that contains only the name of the group, the group ID (GID), and a list of the short names of users who are members of the group. This section provides information to help you decide how and in which domain(s) to place NetInfo group records.
When a user attempts to access a directory or file the user doesn’t own, group privileges are checked: m First the GID of the user’s primary group is compared with the GID associated with the directory or file. If they match, the user is granted group access privileges. m If they do not match, NetInfo searches through the login hierarchy for a group record with a matching GID, starting with the local domain and proceeding toward the root domain.
Now suppose that a file, MyDoc, resides on a computer accessible to both Tony and Tom. The file is owned by a user with the UID 127. It has read-only access privileges for AllStudents. Tom is not a member of AllStudents, but the short name in his user record, “tsmith,” is the same as Tony’s, who is in AllStudents. When Tom attempts to access MyDoc, NetInfo searches the login hierarchy for user records with short names that match those associated with AllStudents.
C H A P T E R 3 3 Setting Up NetInfo Hierarchies After you have decided what the topology of your NetInfo hierarchy should look like and identified which computers will host shared domains, you are ready to create the hierarchy and populate its domains with records.
Step 5: Populate domains Add user, group, mount, and printer records to the appropriate domains in your hierarchy. See “Populating Domains” on page 60. Setting Up the Root Domain of a Simple Hierarchy The simplest NetInfo hierarchy consists of a root domain and one or more local domains that bind to it. Local / Local Local To create the root domain, use NetInfo Domain Setup on Mac OS X Server: 44 Chapter 3 1 As the root user, log in to the server where the root domain will reside.
6 Click Save, then click OK when a message tells you to restart the computer. It will take a few minutes for your changes to be completed. When changes are complete, click the Close button in the NetInfo Domain Setup window and restart the computer. Setting Up Shared Domains in Deeper Hierarchies When you need to constrain the visibility of some of your NetInfo data, use a hierarchy with more shared domains than just a root domain.
Here is a summary of requirements for machine records in a NetInfo domain: m The machines directory of every shared domain must have a record for every computer where the domain resides. These machine records contain a serves property having the value ./tag, where ./ refers to the current domain and tag is the NetInfo tag of the domain. m The machines directory of every shared domain that has a parent must have a record for every computer hosting its parent.
The English domain, which resides on server2, also needs two machine records—one to identify its parent (the root domain) and one for itself. Here is the English domain’s machine record that identifies its parent. The NetInfo server for the English domain can find the NetInfo server for its parent domain by sending a message to server1 that looks for a netinfod process for “myschool.” The English domain also needs a machine record for each local domain that uses broadcast to find it.
Step 2: Define the root domain and its relationship to the Math domain On server1, you now have a local domain that is configured to bind statically to a root domain. Use the following procedure to create the actual root domain you want and define the Math domain as a child of the root domain: 1 Log in as root to server1. 2 Open the Terminal application, located in /Applications/Utilities/, and enter the following niutil command to create the new root domain.
5 Use nidomain’s list command to verify that you now have three domains on server 1: [server1:~] root# nidomain -l tag=network udp=768 tcp=769 tag=local udp=766 tcp=767 tag=myschool udp=854 tcp=855 You can also list all the netinfod processes running on server1. There is one for each domain: [server1:~] root# ps aux | grep netinfod root 164 0.0 0.4 1784 504 ?? S 0:00.47 netinfod local (master) root 165 0.0 0.3 2684 452 ?? S 0:00.87 netinfod myschool (master) root 166 0.0 0.
Step 3: Create the future English domain In this step, you create a root domain on server2 using NetInfo Domain Setup. Later, this domain will become the English domain. 1 Ensure that server2 has a valid DNS entry in your DNS server. 2 Log in as root to server2. 3 Open NetInfo Domain Setup. Click the lock icon to log in. In the first authentication dialog, enter a server administrator name and password. In the second dialog, enter the root user name and password.
Step 5: Add a machine record for the English domain to the root domain On server1, add a machine record to the root domain to identify the English domain. Use the same process as in step 4, but set up the machine record properties like this: m The name should be server2. m The IP address should be server2’s IP address. m The serves property should be English/network. Step 6: Restart both servers Restart server1, then restart server2 to ensure that all your NetInfo changes take effect.
DHCP Binding When you configure a Mac OS X computer to locate its parent using DHCP binding, the parent’s IP address and NetInfo tag are provided by a DHCP server rather than using information you enter using Directory Setup. To use DHCP binding, you must first configure a DHCP server to provide this information. Use this procedure to configure a Mac OS X computer to use DHCP binding: 1 Configure a DHCP server to provide the IP address and NetInfo tag of the parent domain.
c Select the machines directory in the Directory Browser list. d Choose New Subdirectory from the Directory menu. Double-click new_directory in the e f g h i lower list and enter the DNS name of the child computer. Choose New Property from the Directory menu. Double-click new_property and change it to “ip_address.” Choose New Value from the Directory menu. Double-click new_value and enter the IP address of the child computer. Choose New Property from the Directory menu.
Locating and Using Masters and Clones When a Mac OS X process requests information from NetInfo: m The parent for the local domain is located using the binding information set up in Directory Setup. m Other parent domains are located by searching the machines directory of the domain for records with a serves property of the form ../parent-tag, where parent-tag identifies the NetInfo tag of the parent domain. If the parent has clones, multiple machine records identify computers serving the domain.
This command copies the database tagged “myschool” from its host (server1) to a database having the same tag on the current computer, server2. 5 Restart server2. Now server2 hosts two master domains and a clone: [server2:~] root# ps aux | grep netinfod root 183 0.0 0.4 1784 netinfod local (master) 500 ?? S 0:00.34 root 184 0.0 0.3 2168 netinfod myschool (clone) 404 ?? S 0:00.12 root 185 0.0 0.3 1784 netinfod network (master) 408 ?? S 0:00.16 root 271 0.0 grep netinfod 304 std S+ 0:00.
Setting Up Windows User Authentication To authenticate Windows users using NetInfo so they can take advantage of the Windows services on Mac OS X Server, ensure that all the shared domains in your hierarchy reside on Mac OS X Servers. Mac OS X Server has two ways to validate Windows users’ passwords: m Encrypted password validation is preferred because it is the safest and because it is the default technique supported by Windows computers on a local area network (LAN).
4 Check the Authentication Manager box. 5 Click Save and close NetInfo Domain Setup. 6 Restart the server. Authentication Manager is now enabled for both the local and the root domains. 7 Open Server Admin and use the Users & Groups module to reset passwords of existing users who will be using Windows computers. New users are automatically set up for encrypted password validation.
Set Up Masters Use this procedure for servers hosting masters: 1 Log in as the root user to the server where the master resides. 2 Open the Terminal application, located in /Applications/Utilities.
Set Up Local Domains on Other Mac OS X Computers Use the following procedure to enable Authentication Manager for the local domain on any other Mac OS X computers that will bind into the hierarchy: 1 Log in to the computer as the root user. 2 Open the Terminal application, located in /Applications/Utilities.
Disabling Authentication Manager Follow these steps if you no longer want to use Authentication Manager: 1 In the /etc/hostconfig file, ensure that this line exists: AUTHSERVER=-NO- 2 Remove all files that have a “.tim” extension from /var/db/netinfo. 3 Using NetInfo Manager, remove the /config/authentication_server records from each domain, and remove the tim_password property from all users. 4 Restart the server. 5 Repeat steps 1 through 4 for all other servers that host NetInfo domains.
5 Select an automount option. If you choose “Mount dynamically in /Network/Servers,” share points are listed in the /Network/Servers folder and mount when the user selects them. If you choose “Mount statically in,” share points mount automatically at client startup in the location you specify, usually/Network/Servers, /Network/Applications, /Network/Library, or /Network/Users. 6 If you’ve set up the share point for access using AFP and NFS, select the protocol you want to use to mount the share point.
Sharing Printers Use the Print module of Server Admin to create a record for a printer in a shared NetInfo domain: 62 Chapter 3 1 Open Server Admin on a server that has the domain in its login hierarchy. 2 In the File & Print tab, click Print and choose Show Print Monitor. 3 If the printer you want to add to the domain is not listed, click New Queue to add a queue for it. 4 In the Print Monitor window, select the printer and click Edit.