iMac User’s Guide Includes setup, usage, and troubleshooting information for your iMac computer
K Apple Inc. © 2007 Apple Inc. All rights reserved. Under the copyright laws, this manual may not be copied, in whole or in part, without the written consent of Apple. Mighty Mouse © Viacom International Inc. All rights reserved. The Mighty Mouse trademark is used under license. Intel, Intel Core, and Xeon are trademarks of Intel Corp. in the U.S. and other countries. The Apple logo is a trademark of Apple Inc., registered in the U.S. and other countries.
Contents 7 Chapter 1: Getting Started 8 What’s in the Box 9 Setting up Your iMac 14 Putting Your iMac to Sleep or Shutting It Down 15 16 18 20 22 24 25 26 27 Chapter 2: Getting to Know Your iMac Basic Features of Your iMac Additional Features of Your iMac Ports on Your iMac Additional Components of Your iMac Customizing Your Desktop and Setting Your Preferences Connecting a Printer Keeping Your Software Up to Date Transferring Files to Another Computer 29 30 32 34 39 Chapter 3: Using Your iMac Using Migh
2 Understanding AirPort Extreme Wireless Networking 44 Connecting to an Ethernet Network 45 Using Audio Devices 47 Connecting External Displays, Televisions, and Video Devices 49 Using High-Speed Universal Serial Bus (USB) 2.
82 Laser Information 82 High-Risk Activities Warning 83 Avoid Hearing Damage 83 Understanding Ergonomics 86 Cleaning Your iMac 86 Carrying Your iMac 86 Apple and the Environment 87 89 91 92 Appendix C: Connecting to the Internet Gathering the Information You Need Using Network Setup Assistant to Connect Troubleshooting Your Connection 95 Regulatory Compliance Information 101 Index Contents 5
1 1 Getting Started Congratulations on purchasing your new iMac. This chapter contains instructions for setting up your computer. Your iMac has been designed so that you can set it up quickly and start using it right away. If you have never used an iMac or are new to Macintosh computers, read this section for instructions on getting started. Important: Read all of the installation instructions and safety information (see page 79) before you plug your computer into a wall socket.
What’s in the Box Your iMac comes with an Apple Keyboard, a Mighty Mouse, and an AC power cord.
Setting up Your iMac Follow the steps on the next couple of pages to set up your iMac. Step 1: Pass the power cord through the hole in the stand and plug it into the power port on the back of your iMac.
Step 2: To access the Internet or a network, connect one end of an Ethernet cable to the iMac and the other end to a cable modem, DSL modem, or a network. G If you are joining or setting up a wireless network, see Appendix C, “Connecting to the Internet,” on page 87.
Step 3: Connect the keyboard and mouse cables.
Step 4: Press the power (®) button to turn on your iMac. ® Step 5: Using Setup Assistant The first time you turn on your iMac, Setup Assistant starts. Setup Assistant helps you enter your Internet and email information and set up a user account on your iMac. If you already have a Mac, Setup Assistant can help you automatically transfer files, applications, and other information from your previous Mac to your new iMac.
More Information If you would like more information, see the following: To learn about... See... Shutting down your iMac or putting it to sleep “Putting Your iMac to Sleep or Shutting It Down” on page 14. Using the different parts of your iMac and performing some common tasks Chapter 2, “Getting to Know Your iMac,” on page 15. Using a specific feature of your iMac or connecting a digital device Chapter 3, “Using Your iMac,” on page 29. Installing memory Chapter 4, “Installing Memory,” on page 59.
Putting Your iMac to Sleep or Shutting It Down When you have finished working with your iMac, you can put your computer to sleep or shut it down. Put Your iMac to Sleep If you will be away from your iMac for less than a few days, put it to sleep. When your iMac is in sleep, its screen is dark and a small white light below the lower-right corner of the display pulses. You can quickly wake your iMac and bypass the startup process.
2 Getting to Know Your iMac 2 This chapter gives you some basic information you’ll need to know about your iMac. Read on for an overview of the different parts and features of your iMac. For the Latest Information Because Apple frequently releases new versions and updates to its system software, images shown in this book may be slightly different from what you see on your screen. The Apple website, at www.apple.
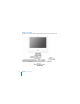
Basic Features of Your iMac Slot-loading optical disc drive Built-in speakers Power indicator light Remote rest - Volume controls C Media Eject key Apple Remote 16 Chapter 2 Getting to Know Your iMac Mighty Mouse
Slot-loading optical disc drive Your iMac has a Combo drive, which can read CD-ROM discs, photo CDs, standard audio discs, DVD discs, and DVD movies. The Combo drive can also write music, documents, and other digital files to CD-R and CD-RW discs. Built-in speakers Listen to music, movies, games, and multimedia. Power indicator light A white light indicates your iMac is in sleep. When your iMac is on, this light is off.
Additional Features of Your iMac Built-in microphone Built-in iSight camera Built-in infrared (IR) receiver Ambient light sensor Built-in speakers d USB ports Apple Keyboard 18 Chapter 2 Getting to Know Your iMac Camera indicator light
Camera indicator light A green indicator light illuminates when the camera on your iMac is displaying video or when Photo Booth is open. Built-in iSight camera Videoconference with friends, family, and colleagues over broadband using the iChat AV application, snap pictures with the Photo Booth application, or capture video with iMovie HD. - Built-in microphone Record sounds directly on your iMac or talk with friends live over broadband using the included iChat AV application.
Ports on Your iMac £ Mini-DVI port G Ethernet port (10/100/1000 Base-T) , Audio in/optical digital audio in port f Headphone out/ optical digital audio out port d USB 2.
£ Mini-DVI video out port Use a Mini-DVI to DVI Adapter to connect your iMac to an Apple flat-panel display or other display that has a DVI connector. Connect to an external monitor or projection device that uses a VGA connector with a Mini-DVI to VGA Adapter. You can also use a Mini-DVI to Video Adapter for composite and S-video support to connect to a TV, VCR, or other video device. Adapters are available at www.apple.com/store.
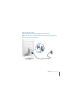
Additional Components of Your iMac Power port Security slot ® Power button Memory access 22 Chapter 2 Getting to Know Your iMac
≤ Power port Connect your iMac computer’s power cord. Security slot Attach a lock and cable to prevent theft (available at www.apple.com/store). ® Power button Turn on your iMac or put it to sleep. Press and hold to reset during troubleshooting. Memory access Your iMac comes with at least 512 MB of 667 MHz, PC2-5300 Double Data Rate 2 (DDR2) SO-DIMMs. You can add more memory to your iMac, up to a total of 2 GB. For more information about installing memory, see “Replacing the Memory” on page 60.
Customizing Your Desktop and Setting Your Preferences You can quickly make your desktop look the way you want using System Preferences. Choose Apple () > System Preferences from the menu bar. As you get to know your iMac, explore the system preferences. System Preferences is your command center for most settings on your iMac. For more information, choose Help > Mac Help and search for “System Preferences” or for the name of a specific preference.
Connecting a Printer You can connect most printers using a USB cable; others require a network connection, such as Ethernet. If you have an AirPort Express or AirPort Extreme Base Station, you can connect a USB printer to the base station (instead of connecting it to your computer) and print wirelessly. Follow the instructions that came with your printer to install any required software and connect the printer. The drivers for most printers are built into Mac OS X.
Keeping Your Software Up to Date You can connect to the Internet and automatically download and install the latest free software versions, drivers, and other enhancements from Apple. When you are connected to the Internet, Software Update checks Apple’s Internet servers to see if any updates are available for your computer. Your iMac is set to automatically check once a week but you can set it to check daily or monthly. You can also check for updates manually.
 For more information, search for “Software Update” in Mac Help.  For the latest information about Mac OS X, go to the Mac OS X website at www.apple.com/macosx. Transferring Files to Another Computer There are several ways to transfer files or documents to or from your iMac.  You can transfer files via the Internet using .Mac or another Internet account. Go to www.mac.com for more information.  If your iMac is connected to an Ethernet network, you can transfer files to another computer on the network.
3 3 Using Your iMac This chapter provides instructions for using the many built-in features and capabilities of your iMac, so you can get the most out of your computer.
To learn what you can do with your iMac, start with the information in this chapter. More information can be found in Mac Help and on the iMac Service & Support website at www.apple.com/support/imac. Using Mighty Mouse Your iMac comes with Mighty Mouse, which has touch-sensitive technology under the top shell to detect where you’re clicking.
Configuring Mighty Mouse Use the Keyboard & Mouse preferences to set up Mighty Mouse as a one-button mouse or configure it as a multibutton mouse. You’ll see pop-up menus for the buttons, plus controls for tracking, scrolling, and double-clicking. You can choose your primary and secondary button designation, reassign which applications you want to open with Mighty Mouse, and customize your scrolling capability. To open Keyboard & Mouse preferences: 1 Choose Apple (K) > System Preferences.
More Information About Mighty Mouse More information about configuring and using your Mighty Mouse is available in Mac Help. Choose Help > Mac Help and search for “Mighty Mouse.” Keyboard Controls Use your keyboard to perform actions such as adjusting the volume or ejecting a disc. Mute key Volume Down key Media Eject key Volume Up key Press the F15 key on your keyboard to increase the brightness of the display; press F14 to decrease brightness. Use Exposé to manage the windows on your screen.
You can use your keyboard to control Front Row (see page 34). The following keys correspond to the buttons on the Apple Remote: Keyboard equivalent Apple Remote button Command (x) - Esc Enter Menu (») Esc Exit Menu (») Space or Return Select/Play/Pause (’) Up arrow (Ò) Volume Up/menu up (∂) Down arrow (¬) Volume Down/menu down (D) Right arrow (˚) Next/Fast forward (‘) Left arrow (k) Previous/Rewind (]) To leave Front Row and return to the Finder, press any alphabetic key on the keyboard.
Using the Apple Remote and Front Row If you have an Apple Remote, it works with the Front Row application and the built-in infrared (IR) receiver. The IR receiver is located behind the Apple () logo on the front of your iMac. Magnet When you are not using the remote, conveniently stow it using the Apple Remote rest, located on the right side of your iMac as shown in the illustration. WARNING: The iMac contains a small magnet to rest your Apple Remote when it’s not in use.
The Apple Remote opens Front Row so you can play music from your iTunes music library, watch photo slideshows and QuickTime movie trailers, play a DVD with DVD Player, and more—all from across the room. Your Apple Remote can: Â Open Front Row. Â Navigate through the Music, Photos, Videos, and DVD menus in Front Row. Â Navigate in iTunes, iPhoto, and DVD Player. Â Sleep or wake your iMac. To use your Apple Remote: Â Press the Menu (») button to open Front Row.
 Hold down the Next/Fast-forward (‘) or Previous/Rewind (]) buttons to fast-forward or rewind within a song or a movie.
When you’ve successfully paired your Apple Remote with your iMac, a chainlink ( symbol appears onscreen. ) To delete a pairing between the Apple Remote and your iMac: 1 Choose Apple () > System Preferences from the menu bar. 2 Click Security and then click Unpair. Turning Off IR Reception You can use Security preferences to turn IR reception on or off. To turn off IR reception: Â Choose Apple () > System Preferences from the menu bar and click Security.
To replace the battery: 1 Open the battery compartment by pressing the button with a small object, as described in the illustration above. 2 Pull the battery compartment out and remove the battery. 3 Insert the replacement battery with the positive (+) side facing up. 4 Close the battery compartment. WARNING: Install the battery correctly to avoid risk of an explosion. Align the battery’s positive pole in the holder and use only the same type of battery as the original.
Using the Built-in iSight Camera Your iMac has a built-in iSight camera that you can use to take pictures with Photo Booth, create movies with iMovie HD, or video chat with your friends and family over the Internet using iChat AV. Microphone Camera indicator light iSight camera Taking Pictures with Photo Booth Use Photo Booth to take pictures and add fun visual effects such as sepia, stretch, pop art, glow, colored pencil, and many more.
2 Click the mode switch to set iMovie HD to built-in camera mode. Mode switch 3 Click the camera icon to the left of the mode switch and choose Built-in iSight from the pop-up menu. 4 Click the “Record With iSight” button in the iMovie monitor to begin recording. The video you see in the iMovie monitor is recorded as a clip in the iMovie Clips pane. 5 Click the “Record With iSight” button again to stop recording. You can record video as long as your iMac has enough disk space to hold it.
 Someone to videoconference with (for example, you can videoconference with other iChat AV, AOL, or AIM users) To start a videoconference: 1 Open iChat AV. 2 Click the Camera button next to a buddy in your buddy list. The green indicator light lets you know you are displaying video. Clicking the camera button sends an invitation to your buddy to accept your video request and lets you preview how you look on camera.
Understanding AirPort Extreme Wireless Networking Your iMac has built-in AirPort Extreme technology, which offers an easy and affordable way to provide wireless Internet access. AirPort uses wireless local area network (LAN) technology for wireless communication between multiple computers. You can access the Internet, transfer files, play multiplayer games, and more.
Note: You need an AirPort Express or AirPort Extreme Base Station and Internet access (fees may apply). Some Internet service providers aren’t compatible with AirPort. Range may vary with site conditions. More Information About AirPort To purchase an AirPort Express or AirPort Extreme Base Station, visit an Apple Authorized Reseller, an Apple Store retail location, or the online Apple Store at www.apple.com/store. More information about AirPort is available in AirPort Help.
Connecting to an Ethernet Network Your iMac comes with built-in 10/100/1000 megabit per second (Mbps) Base-T (twistedpair) Ethernet networking capability for connecting to a network or to a cable modem or DSL modem. G Ethernet port (10/100/1000Base-T) Connecting to a network gives you access to other computers on the network. You may be able to store and retrieve information, use network printers, modems, and email, or connect to the Internet.
Using Audio Devices Your iMac comes with built-in stereo speakers, a headphone out/optical digital audio out (f ) port, and an audio in/optical digital audio in (,) port. Headphone Out/Optical Digital Audio Out Port You can connect external powered speakers, headphones, 5.1 surround systems, and other sound output devices to the headphone out/optical digital audio out (f ) port. The headphone port is also a S/PDIF stereo 3.5 mini-phono jack.
Audio In/Optical Digital Audio In Port You can connect external microphones or other audio equipment to the audio in/ optical digital audio in (,) port. The audio in port does not provide power to a connected device, so you must use self-powered devices. The audio in port is also a S/PDIF stereo 3.5 mini-phono jack. You can use a Toslink cable and a Toslink jack-to-miniplug adapter to connect a Digital Audio Tape (DAT) deck or digital instruments to input and mix your own music.
Connecting External Displays, Televisions, and Video Devices Your iMac has a mini-DVI video out (£) port that you can use with an adapter to connect an external DVI display, an external VGA display or projector, or a TV, video projector, or VCR. Refer to the following chart to find the right adapter for your needs.
To purchase an adapter, visit an Apple Authorized Reseller, an Apple Store retail location, or the online Apple Store at www.apple.com/store. To connect an external display or projector: 1 Turn on the external display or projector. 2 Connect the adapter to the video port on the external display or projector. 3 Connect the mini-DVI end of the adapter to the mini-DVI video out (£) port on your iMac.
Using High-Speed Universal Serial Bus (USB) 2.0 Your iMac comes with five USB (d) ports (three high-speed USB 2.0 ports on the back of the iMac and two USB 1.1 ports on the keyboard), which you can use to connect many types of external devices, including a printer, scanner, iPod, digital camera, game pad, joystick, keyboard, or floppy disk drive. USB makes it easy to connect a peripheral—and once you connect it, it’s ready to use.
Note: Apple has included software to work with many USB devices. When you connect a USB device, if your iMac cannot find the correct software, install the software that came with the device or check the manufacturer’s website for the latest software. Using Multiple USB Devices at the Same Time If all of your USB ports are being used and you want to connect more USB devices, you can purchase a USB hub.
Connecting FireWire Devices Your iMac has two FireWire 400 (H) ports. FireWire lets you easily connect and disconnect external high-speed devices—such as digital video cameras, printers, scanners, and hard disks. You can connect and disconnect FireWire devices without restarting your iMac.
Using FireWire Devices To use a FireWire device with your iMac, simply connect the device to the FireWire (H) port. Apple has already included software to work with many FireWire devices. When you connect a FireWire device, if your iMac cannot find the correct software, you can install the software that came with the device or check the device manufacturer’s website for the latest software. Note: The FireWire (H) port is designed to provide power for FireWire devices (up to a total of 8 watts).
Using Your Optical Drive The optical drive in your iMac is a Combo drive. Use the Combo drive to install software from CDs, play music from audio CDs, and play DVD movies. You can burn music CDs that can play in most CD players, and save documents or other digital files to blank CD-R and CD-RW discs using the Finder. WARNING: The Combo drive in your iMac supports standard circular 12 cm discs. Irregularly shaped discs or discs smaller than 12 cm are not supported.
Inserting a CD or DVD Disc To use a CD or DVD disc, follow these steps: 1 Place the disc into the Combo drive with the label facing you. 2 When the icon for the disc appears on the desktop, the disc is ready to use.
Ejecting a Disc To eject a disc, do one of the following: Â Drag the disc icon to the Trash. Â Press and hold the Media Eject (C) key on the keyboard until the disc ejects. If you can’t eject the disc, quit any applications that may be using the disc and try again. If that doesn’t work, restart your iMac while holding down the primary button on your Mighty Mouse. Playing DVD Discs To play a DVD, insert the DVD disc. DVD Player opens and starts playing the disc.
Recording CD-R and CD-RW Discs You can record music on CD-R or CD-RW discs right from your iTunes library. To record music to a CD-R or CD-RW disc using iTunes: 1 Click the iTunes icon in the Dock. 2 Select the playlist you want to record. 3 Insert a blank disc. (For highest compatibility with CD players, use a CD-R disc.) 4 At the top of the iTunes window, click Burn CD. To copy your files and folders onto CD-R and CD-RW discs using the Finder: 1 Insert a blank disc in the Combo drive.
Securing Your iMac Use a locking cable and the built-in security slot to secure your iMac. Security slot You can purchase a locking cable from an Apple Authorized Reseller, an Apple Store retail location, or the online Apple Store at www.apple.com/store. For more information about the software security features of your iMac, including user passwords and file encryption, see Mac Help. Choose Help > Mac Help and search for “security” or “multiple users.
4 4 Installing Memory This chapter provides information and instructions about installing memory in your iMac. Your iMac comes with at least 512 MB of Double Data Rate 2 (DDR2) Synchronous Dynamic Random Access (SDRAM) memory installed. You can replace the memory in your iMac with two 512 MB or two 1 GB memory modules for a maximum of 2 GB of memory.
Replacing the Memory Replace the memory in your iMac with two 512 MB or two 1 GB memory modules. Remember to install two equal-sized memory modules. You can purchase additional Apple memory from an Apple Authorized Reseller, an Apple Store retail location, or the online Apple Store at www.apple.com/store. WARNING: Always shut down your iMac and remove the power cord before installing memory. Do not attempt to install memory in the computer while it is plugged in.
4 Raise the stand and use a Phillips #2 screwdriver to loosen the two captive screws on the memory access door by turning them counterclockwise. Raise stand Memory access door Phillips screwdriver 5 Remove the memory access door and set it aside.
6 Pull the two levers in the memory compartment to eject the installed memory modules. 7 Remove the memory modules from your iMac.
8 Insert the new memory modules into the slots with the notch facing left as shown in the illustration. 9 Press the memory modules firmly and evenly into the compartment. 10 Push the levers toward the center of the compartment until they are fully closed.
11 Replace the memory access door using a Phillips #2 screwdriver to tighten the screws. WARNING: Remember to replace the memory access door after you install memory. Your iMac won’t function properly without the memory access door. Raise stand Memory access door Phillips screwdriver 12 Holding each side of your iMac, turn the computer right side up, and then reconnect the cables and power cord. 13 Press the power (®) button on the back of your iMac to turn it on.
Making Sure Your iMac Recognizes the New Memory After installing memory, check whether the computer recognizes the new memory. To check the memory installed in your iMac: 1 Start up your iMac. 2 When you see the Mac OS desktop, choose Apple () > About This Mac. For a detailed breakdown of the memory installed in your iMac, open System Profiler by clicking More Info and then Memory.
5 Troubleshooting 5 Occasionally you may have problems while working with your iMac. This chapter gives you some solutions to try when you have a problem. This chapter provides solutions to problems that prevent you from working with your iMac, such as a system freeze or an iMac that won’t start up. You can find more troubleshooting information in Mac Help and on the iMac Service & Support website at www.apple.com/support/imac.
 Any new hardware (such as additional memory or a peripheral) that you connected or installed. WARNING: Do not attempt to open your iMac except to install memory. If your iMac needs service, consult the service and support information that came with your computer for instructions about how to contact an Apple Authorized Service Provider or Apple for service. Your iMac doesn’t have any user-serviceable parts, except the memory.
To get support and contact information for the software that came with your iMac, go to www.apple.com/guide. If the problem occurs frequently, you may need to reinstall your system software (see “Reinstalling the Software That Came with Your iMac” on page 70). If the iMac freezes during startup or you see a flashing question mark  Wait a few seconds. If your iMac doesn’t start up after a brief wait, shut it down by pressing and holding the power (®) button for about 5 seconds, until the iMac shuts down.
 If that doesn’t work, unplug the power cord and wait at least 30 seconds. Plug the power cord back in and press the power (®) button again to start up your iMac.  If you are still unable to start up your iMac, see the service and support information that came with your iMac for information about contacting Apple for service. Reinstalling the Software That Came with Your iMac Use the software installation discs that came with your iMac to reinstall Mac OS X and the applications that came with your iMac.
Installing Applications To install only the applications that came with your iMac, follow the steps below. Your iMac must first have Mac OS X installed. To install applications: 1 Back up your important files. 2 Insert the Mac OS X Install Disc 1 that came with your iMac. 3 Double-click “Install Bundled Software only.” 4 Follow the onscreen instructions. 5 After selecting the destination disk for installation, continue following the onscreen instructions.
Other Problems If you have a problem with an application  For a problem with software from a manufacturer other than Apple, contact the manufacturer. Software manufacturers often provide updates to their software on their websites. You can check for and install the latest Apple software using the Software Update pane of System Preferences. Your iMac is set to check automatically once a week but you can set it to check daily or monthly. You can also check for updates manually.
 For more information about using and troubleshooting AirPort, choose Help > Mac Help, then choose Library > AirPort Help. If you have a problem with your Internet connection  Make sure your network cable is connected and functioning properly.  If you are using a dial-up Internet connection, make sure that your telephone cord is plugged into the port on the external modem (available separately) and not the Ethernet (G) port.
If you have a problem using your iMac or working with the Mac OS Â If the answers to your questions are not in this manual, look in Mac Help for instructions and troubleshooting information. In the Finder, choose Help > Mac Help. Â Check the Apple Support website at www.apple.com/support for the latest troubleshooting information and software updates. If your date and time settings get lost repeatedly You may need to have the internal backup battery replaced. The battery in your iMac isn’t user-replaceable.
Using Apple Hardware Test You can use Apple Hardware Test to help determine if there is a problem with your iMac computer’s hardware. To use Apple Hardware Test: 1 Disconnect all external devices from your iMac except the keyboard and mouse. If you have an Ethernet cable connected, disconnect it. 2 Insert the Mac OS X Install Disc 1 that came with your iMac. 3 Restart your iMac and hold down the “D” key as it starts up.
Specifications A Appendix A You can use System Profiler to find out detailed information about your iMac, such as the amount of built-in memory, hard disk size, devices connected, and the product serial number. To access the information in System Profiler, choose Apple () > About This Mac from the menu bar and then click More Info.
Safety, Use, and Care Information B Appendix B For your safety and the safety of your equipment, follow the rules in this appendix for cleaning and handling your iMac, as well as the guidelines for working more comfortably. Apple products are designed and evaluated to the latest information technology and audio video equipment safety standards. However, it’s important to follow the safety instructions on the product and in the documentation.
 You want to add memory  The power cord or plug becomes frayed or otherwise damaged  You spill something into the case  Your iMac is exposed to rain or excess moisture  Your iMac has been dropped or the case has been damaged  You suspect that your iMac needs service or repair  You want to clean the case (use only the recommended procedure described later)  Your iMac contains magnets. Do not place magnetically sensitive material or devices within 1 inch (25 mm) of the computer.
Important: Electrical equipment may be hazardous if misused. Operation of this product, or similar products, must always be supervised by an adult. Do not allow children access to the interior of any electrical product and do not permit them to handle any cables. WARNING: Never push objects of any kind into this product through the ventilation openings in the case. Doing so may be dangerous and result in fire or a dangerous electric shock.
Laser Information WARNING: Making adjustments or performing procedures other than those specified in your equipment’s manual may result in hazardous radiation exposure. Do not attempt to disassemble the cabinet containing the laser. The laser beam used in this product is harmful to the eyes. The use of optical instruments, such as magnifying lenses, with this product increases the potential hazard to your eyes. For your safety, have this equipment serviced only by an Apple-authorized service provider.
Avoid Hearing Damage WARNING: Permanent hearing loss may occur if earbuds or headphones are used at high volume. You can adapt over time to a higher volume of sound that may sound normal but can be damaging to your hearing. If you experience ringing in your ears or muffled speech, then stop listening and have your hearing checked. The louder the volume, the less time required before your hearing can be affected.
You may have to raise your chair so that your forearms and hands are at the proper angle to the keyboard. If this makes it impossible to rest your feet flat on the floor, you can use a footrest with adjustable height and tilt to make up for any gap between the floor and your feet. Or you may lower the desktop to eliminate the need for a footrest. Another option is to use a desk with a keyboard tray that’s lower than the regular work surface. Shoulders relaxed 45–70 cm (18–28 in.
Display Arrange the display so that the top of the screen is slightly below your eye level when you’re sitting at the keyboard. The best distance from your eyes to the screen is up to you, although most people seem to prefer 18 to 28 inches (45 to 70 cm). Position the display to minimize glare and reflections on the screen from overhead lights and windows. Mouse Position the mouse at the same height as your keyboard and within comfortable reach.
Cleaning Your iMac Follow these guidelines when cleaning the outside of your iMac and its components: Â Shut down your iMac and disconnect all cables. Â Use a damp, soft, lint-free cloth to clean the iMac computer’s exterior. Avoid getting moisture in any openings. Do not spray liquid directly on the iMac. Â Don’t use aerosol sprays, solvents, or abrasives. Cleaning Your iMac Display To clean your iMac screen, do the following: Â Shut down your iMac and disconnect all cables.
Connecting to the Internet C Appendix C You can use your iMac to browse the World Wide Web, send email to friends and family, and conference in real time over the Internet. Use the information that follows to connect to the Internet. When you first start up Mac OS X, Setup Assistant helps you enter your Internet configuration information.
Before you can connect to the Internet, you need to: 1 Set up an account with an ISP. You can find an ISP in your telephone directory. Look under “Internet access,” “Internet service,” or “online.” 2 Gather the connection information you need from your ISP or network administrator. See the next section, “Gathering the Information You Need” on page 89 to find out what information you need for each type of connection.
4 Turn on your computer and enter information in Setup Assistant to configure your Internet connection. If you already started your computer and did not use Setup Assistant to configure your Internet connection, see “Using Network Setup Assistant to Connect” on page 91. Gathering the Information You Need You can write the information you get from your Internet service provider (ISP), your network administrator, or your other computer on these pages, and then enter it in Network Setup Assistant.
To set up a DSL, cable modem, LAN, or AirPort Extreme wireless connection: First, choose your connection method (ask your system administrator or your ISP if you don’t know):  Manually  Using DHCP with a manual address  Using DHCP  Using BootP  PPP If you’re unsure which method to use, “Using DHCP” may be a good choice, because the network supplies most of the required information for you automatically.
If you selected “PPP” (for PPPoE connections), gather the following:  Service provider  Account name  Password  PPPoE service name The information below may be optional. Ask your ISP or system administrator if you need it.
Troubleshooting Your Connection If you have trouble with your Internet connection, you can try the steps in this section or you can use Network Diagnostics. To use Network Diagnostics: 1 Choose Apple () > System Preferences. 2 Click Network and then click “Assist me.” 3 Click Diagnostics to open Network Diagnostics. 4 Follow the onscreen instructions.
PPPoE Connections If you are unable to connect to your Internet service provider using PPPoE, make sure you have the correct information entered in Network preferences. Check System Preferences settings: 1 Choose Apple () > System Preferences. 2 Click Network. 3 Choose Network Port Configurations from the Show pop-up menu. 4 Drag Built-in Ethernet to the top of the Port Configurations list. 5 Choose Built-in Ethernet from the Show pop-up menu. 6 Click PPPoE. 7 Select “Connect using PPPoE.
Network Connections Make sure the Ethernet cable is plugged into your computer and into the network. Check the cables and power supplies to your Ethernet hubs and routers. If you have two or more computers attempting to share an Internet connection, be sure that your network is set up properly. You need to know if your ISP provides only one IP address or if it provides multiple IP addresses, one for each computer.
Regulatory Compliance Information Compliance Statement This device complies with part 15 of the FCC rules. Operation is subject to the following two conditions: (1) This device may not cause harmful interference, and (2) this device must accept any interference received, including interference that may cause undesired operation. See instructions if interference to radio or television reception is suspected.
Responsible party (contact for FCC matters only): Korea Mouse Statement Apple Inc., Product Compliance 1 Infinite Loop M/S 26-A Cupertino, CA 95014-2084 408-974-2000 Wireless Radio Use This device is restricted to indoor use when operating in the 5.15 to 5.25 GHz frequency band. Cet appareil doit être utilisé à l’intérieur. Exposure to Radio Frequency Energy The radiated output power of the AirPort Card in this device is below the FCC radio frequency exposure limits for uncontrolled equipment.
Taiwan Wireless Statements Mouse Class 1 LED Information The Apple Mighty Mouse is a Class 1 LED product in accordance with IEC 60825-1 A1 A2. It also complies with the Canadian ICES-003 Class B Specification. External USB Modem Information When connecting your iMac to the phone line using an external USB modem, refer to the telecommunications agency information in the documentation that came with your modem. Apple and the Environment Taiwan Statement Apple Inc.
Disposal and Recycling Information This symbol indicates that your product must be disposed of properly according to local laws and regulations. Because the backlight lamp in this product contains mercury, the product must be disposed of separately from household waste. When your product reaches its end of life, contact Apple or your local authorities to learn about recycling options. For information about Apple’s recycling program, go to www.apple.com/environment/recycling.
Taiwan: European Union—Disposal Information: The symbol above means that according to local laws and regulations your product should be disposed of separately from household waste. When this product reaches its end of life, take it to a collection point designated by local authorities. Some collection points accept products for free.
A adapters Toslink jack-to-miniplug 46 AirPort Express 45 AirPort Extreme overview 42 problems using 72 setting up a connection 90 ambient light sensor 19 Apple Remote buttons 35 keyboard equivalents 33 replacing the battery 37 using 35 applications freezing 71 assistants Network Setup Assistant 87 Setup Assistant 12, 73 audio 21, 46 audio in/optical digital audio in port 21, 46 B battery Index Index disposal 98 built-in microphone 19 built-in speakers 17, 19 built-in video camera.
Ethernet cable 44 port 21 using 44 external hard disks 51 external microphones 46 F FireWire connecting devices 51 ports 21 floppy disk drives 49 Force Quit 71 freezing up 68 Front Row application 34 opening 35 frozen application 71 G game pads 49 general safety 79 H hard disks 51 headphone 45 headphone out/optical digital audio out port 21, 45, 55 102 installing 71 using built-in iSight 40 videoconferencing 40 iMac back view 22 front view 16, 18 infrared receiver 19, 34 turning off reception 37 insert
N date and time settings lost 74 ejecting a disc 73 Internet connection 73 with an application 72 network connections 94 Network Setup Assistant 87 O optical digital audio in 46 optical digital audio out 21, 45 optical disc drive 17, 53 P Photo Booth taking pictures 39 ports 19, 21 power button 23 power indicator light 17 power port 9, 23 PPPoE connections 91 preferences.
Toslink cable 46 transferring files or documents 27 troubleshooting 67 TV 47 U updating software 26 USB connecting devices 49 hubs 50 ports 19, 21 using multiple devices 50 using DHCP option 90 V video camera.