Setting Up Your Power Mac G4 Includes setup and expansion information for Power Mac G4 and Macintosh Server G4 computers
K Apple Computer, Inc. © 2001 Apple Computer, Inc. All rights reserved. Under the copyright laws, this manual may not be copied, in whole or in part, without the written consent of Apple. The Apple logo is a trademark of Apple Computer, Inc., registered in the U.S. and other countries. Use of the “keyboard” Apple logo (Option-Shift-K) for commercial purposes without the prior written consent of Apple may constitute trademark infringement and unfair competition in violation of federal and state laws.
Contents 1 Setting Up 5 Positioning the Computer and Display 5 Plugging In the Computer 6 Need Help? 10 What’s Next? 11 2 Getting to Know Your Computer 13 Your Computer at a Glance 14 Ports and Connectors—Expanding Your Computer’s Capabilities 16 Inside Your Power Mac—Your Computer’s Internal Expansion Options 18 Sherlock 2—Your Internet Search Detective 20 iTools—Free Internet Services for Mac Users 22 Apple.
Using AirPort Wireless Networking 46 Putting the Computer to Sleep to Save Energy 47 Attaching SCSI Devices to Your Computer 48 Transferring Information Between Two Macintosh Computers 49 Using the Computer as a Server Without a Monitor 49 4 Working Inside Your Computer 51 Opening the Computer 52 Installing Memory 54 Installing Internal Storage Devices 56 Installing a PCI Expansion Card or Replacing the AGP Card 66 Installing an AirPort Card 70 Replacing the Battery 71 5 Troubleshooting Appendix A Speci
C H A P T E R 1 1 Setting Up Congratulations on purchasing your new Power Mac G4 computer. This chapter contains instructions for setting up your computer and display. Positioning the Computer and Display You can pick up the computer by any of its handles. If your monitor is heavy, be sure to use correct lifting techniques when positioning it.
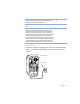
Plugging In the Computer 1 Set the voltage switch on the back of your computer to the correct voltage, if necessary. m If your computer doesn’t have a voltage switch, the correct voltage is set automatically and you can skip this step. m If your computer has a voltage switch, make sure the voltage switch is set for the voltage system in your country. The voltage switch must be set correctly to avoid damaging your computer. Your computer may have a voltage switch on the back.
Country Switch setting Bermuda, Canada, Jamaica, Japan, Mexico, Philippines, Puerto Rico, Saudi Arabia, Taiwan, United States, Venezuela 115 Bahrain, Brazil, France, Indonesia, Italy, Lebanon, Peru, South Korea, Spain1 115 or 230 Argentina, Australia, Austria, Belgium, Bosnia and Herzegovina, Chile, China (People’s Republic including Hong Kong), Croatia, Czech Republic, Denmark, Egypt, Finland, the Former Yugoslav Republic of Macedonia, Germany, Greece, Greenland, Hungary, Iceland, India, Iran, Irelan
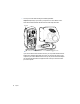
3 Connect your monitor cables according to the following illustration: Important Depending on your monitor, you may have one or more cables to connect. Check the instructions that came with the monitor for further setup information. USB ports ADC monitor port ™ VGA monitor port Monitor cable If your monitor cable has a two-row DB-15 connector, you can purchase a Macintosh-to-VGA adapter from an authorized Apple dealer and connect your monitor to the VGA port on the computer.
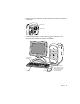
4 If required, connect your computer to your Ethernet network and connect your modem port to a phone line. Modem port Ethernet port 5 Connect the keyboard cable to one of the USB ports ( ) on the computer or on your monitor. Plug the mouse cable into a USB port on the keyboard. USB ports on keyboard (2) Keyboard Mouse Parts of your computer may be covered by clear plastic film that protected it during shipment. You can remove the film.
If you wish, raise the keyboard by lifting it and flipping the foot toward the back. 6 Turn on your computer by pressing the monitor’s power button or the power button (®) on the front of the computer. m If your monitor must be turned on separately, turn on your monitor by pressing its power button.
When You’re Not Using the Computer When you’re not using your computer, you can put your computer to sleep or turn it off. Sleep is a state in which your computer is on but uses very little power. You can put the computer to sleep whenever you want. If you’re not going to use the computer for a few days, you may prefer to turn it off. To put your computer to sleep: m Press the power button on the front of the computer. To turn off your computer: m Choose Shut Down from the Special menu.
C H A P T E R 2 2 Getting to Know Your Computer If you’re eager to get started and want to try out a few things, this chapter is for you. It provides an overview of your computer’s hardware and software features along with the unique Internet services available to Mac owners. Your Power Mac G4 is a full-featured computer that includes the latest in computer technology such as FireWire, USB, and support for AirPort wireless Internet and networking. On top of this hardware runs the Mac OS operating system.
Your Computer at a Glance CD or DVD drive C CD or DVD drive Open button Zip drive (optional) Speaker Power button / Power-on light ¥ Programmer’s button P Reset button 14 Chapter 2
CD or DVD drive Use CD discs to install software and access information. CD and DVD drives work with CDROM discs, Photo CDs, and standard audio discs. DVD drives also read most DVD discs and allow you to play and work with DVD movies and multimedia. Some types of drives, such as CD-RW or DVD-R drives, also enable you to record information on discs. C CD or DVD drive Open button Opens the drive tray. Zip drive (optional) Store and back up information on removable Zip disks.
Ports and Connectors—Expanding Your Computer’s Capabilities f Headphone jack Apple speaker mini-jack FireWire ports (2) Lockable cover latch W Internal modem port (optional) ≤ Power socket G Ethernet port USB ports (2) ™ VGA monitor port (Slot 1: AGP) ADC monitor port F Security lock port 16 Chapter 2 Access covers for expansion slots (Slots 2–5: PCI)
f Headphone jack Connect your Macintosh to headphones, externally powered (amplified) speakers, or other audio output equipment. Apple speaker mini-jack Connect your Macintosh to high-fidelity Apple speakers to play stereo music and sound for multimedia, games, audio CDs, and more. You can adjust speaker volume and balance individually using the Sound control panel. For more information about the kinds of speakers you can connect, go to the Apple World Wide Web site at www.apple.
Inside Your Power Mac—Your Computer’s Internal Expansion Options Drive position 3 Slots 2–5: 33 MHz PCI slots (4) Slot 1: AGP slot (graphics card installed) Drive position 2 SDRAM slots (3) Drive position 1 AirPort Card connector 18 Chapter 2 Battery
Hard disk drive carriers You can install additional hard disk drives in these carriers inside your computer. If you have ATA hard disk drives, you can install up to two drives in a single U-shaped carrier. If your computer came with one or more SCSI hard disk drives, you can install up to three SCSI drives in the drive carriers. AirPort Card connector Connects an AirPort Card, which allows your computer to communicate with a wireless network.
Sherlock 2—Your Internet Search Detective Sherlock channels Search button Search the Internet for people, shopping, news, Apple info, and more. After you type what you are looking for, click this button to start the search. Search sites Search engines that Sherlock uses to search the Internet.
What You Can Do Sherlock 2 is your search detective and personal shopper on the Internet. It provides an easy way to find people, news, and just about anything. Shop for books and music and search auction sites, find the best prices—even check product availability. To Get Started 1 Connect to the Internet. 2 Choose Search Internet from the File menu or double-click the Sherlock icon on the desktop. 3 Select a Sherlock channel. 4 Type what you are looking for and click the Search button.
iTools—Free Internet Services for Mac Users 22 Chapter 2 Email KidSafe Get your own Mac.com email address. It’s easy and free, and it works with your favorite email clients. KidSafe makes the Internet a safer place for your kids. KidSafe gives them access to more than 75,000 educator-approved Web sites and blocks all the rest. iDisk HomePage With your very own 20 megabyte storage space on Apple’s Internet server, iDisk is the easy way to share files over the Internet.
What You Can Do iTools is a new class of Internet services from Apple created exclusively for Mac users. With iTools, you can email your friends, make the Internet safer for your children, and share photos and movies. You can even create your own Web site. To Get Started 1 Connect to the Internet. 2 Go to www.apple.com 3 Click the iTools tab and then click the Free Sign Up button. Tips and Tricks Upload pictures to your iDisk to create custom iCards You can send iCards with your own custom pictures.
Apple.com—Your Starting Place on the World Wide Web iReview www.apple.com/ireview Your personal guide to the Internet, with in-depth reviews and recommendations of sites ranging from news to travel, music, and sports. iCards www.apple.com/icards Use the Internet to send greeting cards to your friends and family. Macintosh Products Guide www.apple.com/guide For great hardware and software products for your Mac, check this Web site or look for the Mac symbol.
Apple Support www.apple.com/support Find the latest troubleshooting information, download software updates, find information on product protection plans, and more. Apple Hot News www.apple.com/hotnews Want the latest Apple news straight from the source? Check out Apple Hot News. You can find information on software updates for your Mac and third-party software, QuickTime hot picks, and information on the next big Apple event. The Apple Store www.apple.
QuickTime—Audio and Video on the Internet Volume control Play button Favorites drawer Quick access to all of your QuickTime TV channels. Pull the tab at the bottom to open and close the Favorites drawer.
What You Can Do In addition to playing video and music files on your Mac, with QuickTime you can watch live and recorded Internet broadcasts. To Get Started 1 Connect to the Internet. 2 Double-click the QuickTime Player icon on the desktop. 3 Open the Favorites drawer. 4 Select a channel. Tips and Tricks Add additional QuickTime TV channels Go to www.apple.com/quicktime and click the QuickTime TV link. There you will find all of the available QuickTime channels.
iMovie 2—Create and Edit Your Own Digital Movies iMovie monitor Preview your movie or view video directly from a connected DV camcorder. Shelf To make clips part of your movie after you import them, drag them from the shelf to the clip viewer. Mode switch Use this to switch between importing from a camcorder and editing. Editing buttons Clip viewer Timeline viewer The clip viewer and the timeline viewer are visual aids for assembling and editing your movie.
What You Can Do iMovie is an easy-to-use digital video-editing software application. With iMovie and a digital video camcorder, you can create and edit your own movies. Import video from the camera, edit clips, add transitions, titles, sound effects, and music. Then copy the movie to a camcorder tape or create a QuickTime movie. You can even share your QuickTime movies by placing them on the Web on your Apple iDisk or HomePage.
Auto Updating—Automatically Keep Your Mac on the Cutting Edge Update Now Instantly check Apple’s Internet servers to see if any updates are available for your software. The Software Update control panel displays all of the updates useful for keeping your computer running smoothly. Set Schedule Set the day of the week and time of day to check automatically for software updates.
What You Can Do Auto updating uses the Internet to download and install the latest updates, drivers, and other enhancements from Apple—automatically. You can even set your Mac to check Apple’s server periodically and download and install updated software for you. To Get Started 1 Connect to the Internet. 2 Choose Control Panels from the Apple menu and then choose Software Update from the submenu. 3 Click the Update Now button. 4 Select the software you want to update and then click Install.
Multiple Users—Turn One Mac Into Many Accounts Set the appearance of the user’s environment. If you want to control the user’s access to certain applications, choose Limited or Panels.
What You Can Do With Multiple Users, you can allow up to 40 users to share a single Mac with their own customized settings and private storage space. For example, users can set their own desktop picture, sort their views the way they like, bookmark favorite Web sites, and do many other things that create, in effect, a personalized Mac for each individual user. You can also specify how much access—and liberty to change things—each individual user can have.
Mac Help—Answers to All Your Macintosh Questions Search Got a question? Type it here and click Search.
C H A P T E R 3 3 Using Your Computer This chapter provides explanations and instructions for using the important features of your Power Mac G4 computer, including your keyboard and mouse, modem, FireWire ports, USB ports, and networking.
Using Your Apple Pro Keyboard and Apple Pro Mouse You can quickly adjust settings such as volume and eject CD or DVD discs using the keyboard. Your Apple Pro Keyboard has customizable function keys that you can set up to open your frequently used applications or documents. For example, you can assign function keys to open your Web browser, word processor, or favorite game. Once applications are open, you can use the customized function keys to switch quickly between them.
Using Your Apple Pro Mouse To position the pointer using your mouse, move the mouse over any suitable surface such as your desktop, mouse pad, or other textured surface. (Some smooth, glassy surfaces provide less pointer control than others.) To click an object, press down once on the mouse body until you feel a click. To double-click an item, press down twice in quick succession.
Using USB Devices Your Power Mac G4 comes with two USB ports, which you can use to connect many types of external devices, including printers, digital cameras, microphones, game pads, joysticks, keyboards, mouse devices, and storage devices. USB makes it easy to connect external equipment. Once you connect the device, it is ready to use. You don’t need to restart your computer.
Connecting Multiple USB Devices Your Power Mac G4 has two USB ports. Your keyboard or monitor may also have an available USB port that you can use to connect devices. If you want to connect more devices, purchase a USB hub. The USB hub connects to an open port on your computer and provides additional USB ports (usually four or seven). USB hub For More Information on USB Additional information on USB is available in Mac Help. Choose Mac Help from the Help menu and search for “USB.
Using FireWire Devices Your computer has two FireWire ports. FireWire is a high-speed data transfer system that lets you easily connect and disconnect external devices—such as digital video (DV ) cameras, printers, scanners, and hard disks. You can connect and disconnect FireWire devices without restarting your computer. FireWire ports (2) These are some of the things you can do with FireWire: m Connect a digital video camera and capture or transfer high-quality video directly to your computer.
FireWire Target Disk Mode You can use FireWire to connect your Power Mac G4 to another computer and then have it appear as an external hard disk on the other computer. You can then share or transfer files. Important The computer you connect your Power Mac G4 to must have FireWire version 2.3.3 or later installed. Use Apple System Profiler, available in the Apple menu, to check the version of FireWire installed. If you have an older version, check for an update at the Apple FireWire Web site at www.apple.
Using Your CD or DVD Drive You can install or run software from CD discs using a CD or DVD drive. You can play multimedia on CD discs and music from audio CDs. If you have a DVD drive, you can also play DVD movies and use most DVD discs. CD-RW and DVD-R drives also enable you to record information on discs.
Playing DVD and Audio Discs If you have a DVD drive, you can use it to play DVD-Video discs on your computer. Insert the DVD disc and then choose Apple DVD Player from the Apple menu. You can also open Apple DVD Player in the Applications folder on your hard disk. To listen to a standard audio CD, use the AppleCD Audio Player program in the Applications folder.
Connecting to an Ethernet Network Your computer comes with built-in 10/100/1000 megabit per second (Mbps) twisted-pair Ethernet networking capability. Connecting to a network gives you access to other computers. You may be able to store and retrieve information, use network printers, modems, and electronic mail, or connect to the Internet. You can also use Ethernet to share files between two computers or set up a small network.
To connect your Macintosh to a centralized 10/100/1000 twisted-pair Ethernet network, follow these steps: 1 Plug one end of an RJ-45 twisted-pair cable into the Ethernet port on your Macintosh. 2 Plug the other end of the cord into an RJ-45 wall outlet or external hub that is connected to a twisted-pair Ethernet network.
Using AirPort Wireless Networking AirPort offers an easy and affordable way to provide wireless Internet access anywhere in the home, at work, or in the classroom. Instead of using traditional cables, AirPort uses wireless local area network (LAN) technology to provide wireless communication between multiple computers. Through a wireless network you can set up access to the Internet, transfer files, play multiplayer games, and more. Your Power Mac G4 is AirPort-ready.
Wireless Network Connections If you install an AirPort Card, you can m connect your computer to a computer network that has wireless access m use your computer to provide network access for other computers using wireless cards m establish a wireless connection and share information with another computer that has an AirPort Card Check with your network administrator for more information about reaching the network’s wireless access point.
To put your computer to sleep, you can m press the power button on the front of the computer m select a sleep mode in the Energy Settings portion of the Control Strip m choose Sleep from the Special menu When the computer is in sleep, the front panel power button light pulses. You wake the computer by pressing the power button on the front panel of the computer or by pressing a key on the keyboard. With some Apple monitors, you can also use the monitor power button to put the computer to sleep and wake it.
Transferring Information Between Two Macintosh Computers If two Macintosh computers are not connected by a network, you can transfer information between them by connecting them with an Ethernet crossover cable (in effect creating a small network of just two computers), which you can buy from an Apple-authorized dealer. You connect the cable to each computer’s Ethernet port and then turn on file sharing on both computers, or configure the computers’ Ethernet settings to create a small network.
C H A P T E R 4 4 Working Inside Your Computer This chapter provides information and instructions for working inside your computer.
Opening the Computer 1 To shut down your computer, choose Shut Down from the Special menu. Wait five minutes to allow the computer’s internal components to cool. Warning Always shut down the computer before opening it to avoid damaging its internal components or the components you want to install. Do not open the computer or attempt to install items inside it while it is turned on. 2 Unplug all the cables from the computer except the power cord.
5 Lift the latch on the side of the computer and gently lower the side panel onto a clean, flat surface, preferably onto a soft, clean cloth. Note: If the latch won’t lift, check that the security lock port and lockable cover latch in the back of the computer are not locked. Lift the latch to unlock the side panel. Gently lower the side panel until it lies flat.
Installing Memory You can install additional dynamic random-access memory (DRAM) in packages called Dual Inline Memory Modules (DIMMs) in the three DRAM DIMM slots on your computer’s main logic board. You can expand your computer’s DRAM to a maximum of 1536 megabytes (1.5 gigabytes). To check the amounts of DRAM and video memory installed, use the Apple System Profiler program. If you install 512 MB DIMMs, they must have 256 megabit (Mbit) devices.
1 Open the ejectors on the DRAM DIMM slots you want to use by pushing down on them. 2 Align a DRAM DIMM in the DRAM slot as pictured and push the DIMM down until the ejectors snap into place. Important Do not touch the DIMM’s connectors. Handle the DIMM only by the edges. DRAM DIMM (Your DIMM’s shape and components may vary.) The DRAM DIMM is designed to fit into Connectors the slot only one way. Be sure to align the notches in the DIMM with the small ribs inside the slot.
Installing Internal Storage Devices Your Macintosh has five internal drive bays. Three are in the lower part of the computer and two are in front on top. In many configurations, a single hard disk drive occupies a lower bay. One of the upper bays contains a CD or DVD drive, and you can purchase and install an optional Zip drive in the other upper bay. You can add SCSI and ATA disk drives to the empty lower drive bays. Drives must meet these specifications: m Width: 3.9 inches (102 mm) m Depth: 5.
Installing Ultra ATA Drives Your Macintosh can accommodate two internal 1-inch-high ATA devices in the U-shaped drive carrier in drive position 3 in the computer. If your computer has one Ultra ATA drive, it sits in the lower portion of this U-shaped drive carrier. You can install a second ATA device in the upper part of the carrier. The drive that came with your Macintosh is designated the “master drive” (sometimes called “drive 0”).
3 Remove the power cord bundle from the drive. Unplug the power cord bundle from the hard disk drive. There is no catch on this plug. The plug is held tightly in place, so pull firmly.
4 Remove the low-profile attachment screw from the drive carrier and tilt the carrier up to remove it from the computer. Remove the attachment screw to release the drive carrier. Tilt the drive carrier up and carefully pull it out of the computer.
5 Install the ATA drive in the U-shaped bracket. Note: The tinted screws illustrated below indicate the four low-profile screws that came in the computer’s accessory kit. The untinted screws show the screws that came with the new drive. Attach an additional ATA drive (1" high) to the upper portion of the drive carrier by screwing it into position on its sides. Attach the two screws on this side first. These two tabs will bend inward as you tighten these two screws.
6 Replace the carrier and drive. Slide the hard disk drive into the computer at an angle, and lower it into position. Make sure the two tabs on the underside of the drive carrier engage the slots on the floor of the computer. Install the attachment screw to secure the drive carrier. 7 Reinsert the low-profile attachment screw you removed from the carrier in step 4.
8 Plug the power cord bundles into the hard disk drives. Plug the power cord bundles into the hard disk drives. Be sure to press them firmly into position. Tuck the excess power cord bundle cable around the side of the hard disk drives.
9 Reconnect the main power cord bundle to the main logic board and the ribbon cable to the drives. Plug the power cord bundle back into the main logic board. 10 Plug the end of the ATA ribbon cable back into the bottom ATA drive. Plug the middle connector into the top ATA drive. Close the computer.
Installing Ultra160 LVD SCSI Drives If your Macintosh has an internal Ultra160 LVD SCSI drive, you can connect up to two more internal Ultra160 LVD SCSI drives to the PCI card and cable inside the computer. This cable has the required connectors and a built-in terminator, so you don’t need to add one. If you have one Ultra160 LVD SCSI drive, it is installed in lower drive position 1. The computer uses the drive in position 1 to start up.
Note: The tinted screws in the previous illustration indicate the four low-profile screws that came with the computer. The untinted screws in the following illustration show the screws that come with the new drive. Attach additional SCSI drives (1" or 1.6" high) to the two flat drive carriers by screwing them into position from the bottom. Position the hard disk drive on the drive carrier so that the ribbon cable connector and the power cord connector are accessible.
Installing a PCI Expansion Card or Replacing the AGP Card You can expand the capabilities of your Power Mac G4 by installing cards in its expansion slots. The computer has five expansion card slots, four of which accommodate peripheral component interconnect (PCI) cards and one that accepts an AGP card. AGP cards and PCI cards have different connectors, so you cannot insert a PCI card into the AGP slot. About AGP Cards Your AGP card, installed in slot 1, provides the computer’s monitor port.
Installing Your Card Install an AGP card in slot 1 only. Install PCI expansion cards in the slots labeled PCI 2, 3, 4, and 5. 1 Remove the screw that holds the port access cover in place, pull out the access cover, and set it aside. m To remove a card that’s installed in the computer, remove the screw that holds the card in place and pull the card from the slot. Remove the screw that holds the port access cover in place.
3 Align the card’s connector with the expansion slot and press down until the connector is inserted all the way into the slot. If you’re installing a 12-inch card, make sure the card engages the appropriate guide at the front of the computer. Reinstall the screw to secure the card in place. Port access opening PCI slot If the PCI card you are installing is full-length (12 inches), make sure it fits in one of these five card guides.
Press the card gently but firmly until the connector is fully inserted. m Don’t rock the card from side to side; instead, press the card straight into the slot. m Don’t force the card. If you meet a lot of resistance, pull the card out. Check the connector and the slot for damage or obstructions, then try inserting the card again. m Pull the card gently to see if it is properly connected. If it resists and stays in place, and if its gold connectors are barely visible, the card is connected.
Installing an AirPort Card 1 Position the AirPort Card with the AirPort ID numbers and bar code facing up and insert the card into the AirPort Card connector. AirPort Card connector Insert the AirPort Card—bar code side up—until it is firmly seated in the connector. Plug the antenna wire into the hole in the end of the AirPort Card. 2 The antenna wire is stowed here when not in use. Carefully attach the coaxial antenna wire to the port on the end of the AirPort Card.
Replacing the Battery Your computer has a 3.6 V lithium battery installed on the main logic board. Some signs that you need to replace the battery are intermittent problems starting up the computer and random changes in its date and time settings. You can purchase a replacement battery from an Apple-authorized dealer. 1 Remove the battery from its holder, noting the orientation of the battery’s positive end. (A plus sign is marked on and near the battery holder.
2 Insert the new battery in the holder, making sure the battery’s positive symbol aligns with the positive symbol on or near the holder. Warning Installing the battery incorrectly may cause an explosion. Be sure the battery’s positive and negative poles are correctly oriented in the holder. Use only the same type of battery or an equivalent recommended by the manufacturer of the original. 3 72 Chapter 4 Close the computer.
C H A P T E R 5 5 Troubleshooting If you have a problem while working with your computer, here are some things you can try right away. If the computer won’t respond or the pointer won’t move: First, make sure the mouse and keyboard are connected. m Unplug and then plug in the connectors and make sure they are firmly seated. Then try to cancel what the computer is doing. m Press the Command (x) and Q keys at the same time to try quitting the current application.
If the computer freezes during startup or you see a continuous flashing question mark for more than a minute: Turn off your system extensions. m Start up your computer while holding down the Shift key. If that does not work, start up using the system software CD. m Insert your system software CD and start up while holding down the C key. (Make sure the Caps Lock key is not engaged.) m After the computer starts up, see the troubleshooting information in the onscreen help. Choose Mac Help from the Help menu.
If you have trouble using AirPort wireless communication: m Make sure you have properly configured the software. m Make sure the computer or network you are trying to connect to is running and has a wireless access point. m Make sure you are within antenna range of the other computer or the network’s access point. Nearby electronic devices or metal structures can interfere with wireless communication and reduce this distance. Repositioning or rotating the computer may improve reception.
No colors appear on the screen or the colors don’t look right. m Make sure the display is connected firmly to the computer. m You may want to calibrate your monitor using the Monitors control panel. For more information on color and your display, see Mac Help. m Open the Monitors control panel and make sure your monitor is set to display colors. For more information on color and your display, see Mac Help. After you change the screen resolution, desktop icons move.
A P P E N D I X A A Specifications Processor and Memory Specifications Processor m PowerPC™ G4 processor, 1 megabyte (MB) backside cache per processor (some configurations have dual processors) Random-access memory (RAM) m Minimum of 64 megabytes (MB) of Synchronous Dynamic Random-Access Memory (SDRAM), maximum of 1536 MB (1.5 GB) m All SDRAM is supplied in removable Dual Inline Memory Modules (DIMMs).
Operating environment m m m m Operating temperature: 10° to 35° C (50° to 95° F) Storage temperature: –40° to 47° C (–40° to 116.6° F) Relative humidity: 5 % to 95 % (noncondensing) Altitude: 0 to 3048 meters (0 to 10,000 feet) CD-ROM and CD-RW Drive Specifications m Disc diameters supported: 12 cm (4.7 in.) Data formats m m m m m m m m m CD-ROM CD-Audio CD-R CD-RW CDI CD Bridge CD Extended CD Mixed Mode Photo CD DVD-R/CD-RW Drive Specifications m Disc diameters supported: 12 cm (4.7 in.
USB Specifications m Two external Universal Serial Bus (USB) Type A ports m Each port is on a separate 12 megabit per second (Mbps) USB channel. m 500 milliamperes (mA) at 5 V are available per port for a total of 1 ampere.
Compatibility m 802.11 Direct Sequence Spread Spectrum (DSSS) 1, 2 Mbps standard m 802.11 HR DSSS 11 Mbps draft standard Audio Output Specifications m 16-bit stereo sound with audio sampling rates of 44.1 kilohertz (kHz) Sound out using the Apple speaker mini-jack m Compatible with only Apple Pro speakers; other speakers should not be used. Sound out using the headphone jack m Full scale output level: 3.
Power Requirements for Devices You Can Connect Expansion cards m Maximum power consumption by the AGP card is 20 watts ( W ). m Maximum power consumption by four cards and the AGP card combined is 55 W. USB devices m Each of the computer’s built-in USB ports is allotted 500 milliamperes (mA). FireWire devices m The computer can provide up to 15 W total to the FireWire ports. System Clock and Battery m CMOS custom circuitry with long-life lithium battery.
A P P E N D I X B B Safety, Maintenance, and Ergonomics This appendix provides important information about safety procedures, routine maintenance, and ergonomic considerations for using your computer and display. Important Safety Information The only way to disconnect power completely from your computer is to unplug the power cord from the main power supply. Similarly, to disconnect your display completely, you must also unplug its power cable from the computer or other power outlet.
To prevent accidents and damage to your computer or display, be sure that you always follow these instructions: m Keep your computer and display away from sources of liquids and moisture. m Don’t set anything on top of the computer or display. m Keep the computer and display vents free from obstruction. m Never remove the case from the monitor, or open your computer when it’s running. You could come in contact with hazardous voltage.
General Maintenance If you need to clean the computer or display beyond wiping them down with a clean cloth, follow these instructions: 1 Turn your computer and display off. 2 Disconnect the computer power cable from the electrical outlet or power strip. If your display has a power cable connected to an outlet, disconnect it as well. 3 Disconnect the display’s cables from the computer. 4 Clean the display screen with soft, lint-free paper or cloth dampened with mild soap and water.
Maintaining Your Display To maintain your display and ensure its long life: m Do not press on the surface of the display screen. m Do not write on the screen or touch the screen with a sharp object. m If you will not be using your display and computer for a day or more, turn off the computer and display or use Energy Saver. m Turn off your monitor, turn down the brightness, or use a screen-saver program that dims or varies the image on the screen when the computer is idle for a prolonged time.
m Position the monitor to minimize glare and reflections on the screen from overhead lights and nearby windows. If possible, use a tiltable monitor stand. The stand lets you set the monitor at the best angle for viewing, helping to reduce or eliminate glare from lighting sources you can’t move. 45–70 cm (18–28 in.
Communications, Telephone, and Modem Regulation Information For information on FCC regulations, radio and television interference, and telephone and modem information as it relates to this product, see the files in the Communications Regulations folder, inside the Documents folder on your hard disk. Laser Information Making adjustments or performing procedures other than those specified in your equipment’s manual may result in hazardous radiation exposure.