Time Capsule Setup Guide
Contents 5 7 8 9 11 Chapter 1: Getting Started About Your Time Capsule About the AirPort Software What You Need to Get Started The Time Capsule Status Light 13 14 17 19 19 21 22 23 Chapter 2: Setting Up Your Time Capsule Using Your Time Capsule to Create Your Wireless Network Using AirPort Utility Creating a New Wireless Network Configuring and Sharing Internet Access Setting Advanced Options Allowing Wireless Clients to Access Your Network Without Entering a Password Using Time Machine with Your Time Ca
28 29 30 30 If Your Printer Isn’t Responding Updating AirPort Software Time Capsule Placement Considerations Items That Can Cause Interference with AirPort 32 Chapter 4: Learning More, Service, and Support 34 Appendix: Time Capsule Specifications and Safety Guidelines 37 Regulatory Compliance Information 4 Contents
1 Getting Started 1 Congratulations on purchasing your Time Capsule. Read this guide to get started. The new Time Capsule offers you the simplicity of fully automated backup for your Wi-Fi network. Using the Time Machine application in Mac OS X v10.5.7 Leopard or later, it’s easy and automatic to back up all the computers on your network to a single Time Capsule. The Time Capsule is also a fully featured AirPort Extreme Base Station that provides simultaneous dual-band wireless networking.
With your Time Capsule, you can: Â Use the Time Machine application in Mac OS X v10.5.7 (or later) to back up all the computers on your wireless network, as well as computers connected to your Time Capsule using Ethernet. Note: Your first backup with Time Capsule and Time Machine could take overnight or longer, depending on how much data you’re backing up. To speed up the initial backup, use an Ethernet cable to connect your computer to the LAN port on your Time Capsule.
 Connect a USB hub to your Time Capsule, and then connect multiple USB devices, such as printers or hard disks. All computers on the network have access to those devices. Important: Install AirPort Utility from the CD that came with your Time Capsule, or download it using Software Update, and use it to set up your Time Capsule. Previous versions of AirPort Setup Assistant and AirPort Admin Utility are not compatible with this device.
 One USB port for connecting a compatible USB printer, hard drive, or hub for connecting several devices Ethernet activity light Status light Internet WAN port Power port Ethernet ports USB port Reset button Security slot Power cord The reset button next to the ports is used for troubleshooting your Time Capsule. The status light on the front shows the current status. About the AirPort Software Your Time Capsule works with AirPort Utility, included on the Time Capsule CD.
Note: You must use AirPort Utility v5.5 (or later) to set up your Time Capsule. This Time Capsule is not compatible with previous versions of AirPort software. AirPort Utility Use AirPort Utility to set up your Time Capsule to create a wireless network, connect to the Internet, and share compatible USB printers and hard disks. You can also connect your Time Capsule to an existing AirPort Extreme wireless network.
 Mac OS X v10.5.7 or later  AirPort Utility v5.5 or later To set up your Time Capsule using a Windows PC, you need the following:  A Windows PC with 300 MHz or higher processor speed and a compatible 802.11a, 802.11b, or 802.11g wireless card, or a wireless card that complies with an IEEE 802.
When you plug your Time Capsule into a power outlet, the status light flashes green for one second and then glows amber while your Time Capsule starts up. After your Time Capsule has started up completely, the status light flashes amber until your Time Capsule has been updated with the correct settings. The status light glows solid green after your Time Capsule is properly set up and connected to the Internet or a network.
Light Status/description Solid blue Your Time Capsule is ready to allow a wireless client access to the network. See “Allowing Wireless Clients to Access Your Network Without Entering a Password” on page 22. What’s Next After you plug in your Time Capsule, use AirPort Utility to set it up to work with your Internet connection, USB printer or hard disk, or an existing network.
2 Setting Up Your Time Capsule 2 This chapter provides information and instructions for connecting your Time Capsule to the Internet, and using AirPort Utility to set it up to create or join a wireless network. This chapter provides an overview of connecting your Time Capsule to the Internet, and using the setup assistant in AirPort Utility to set up your network and other features of your Time Capsule.
Using Your Time Capsule to Create Your Wireless Network When you set up your Time Capsule to provide network and Internet access, the following computers and devices can access the wireless AirPort network to share files, play games, and use Internet applications such as web browsers and email applications:  Macintosh computers with AirPort or AirPort Extreme Cards  802.11a, 802.11b, 802.11g, and IEEE 802.
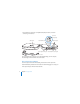
Using Time Capsule to create a wireless network 2.4 or 5 GHz 2.4 GHz Time Capsule Shared printer to USB port < Internet WAN port 2.4 or 5 GHz DSL or cable modem to Internet To set it up: 1 Connect your DSL or cable modem to your Time Capsule using the Ethernet WAN (<) port.
2 If you plan to share a USB printer on the network, connect it to the Time Capsule USB (d) port or to a USB hub, using a USB cable. 3 Open AirPort Utility (located in the Utilities folder in the Applications folder on a computer using Mac OS X, and in Start > All Programs > AirPort on a computer using Windows), select your Time Capsule, and then click Continue. 4 Follow the onscreen instructions to create a new network. To print from a computer using Mac OS X v10.
Wireless computers and computers connected to the Ethernet ports can also communicate with each other through your Time Capsule. Using AirPort Utility To set up and configure your Time Capsule, use the setup assistant in AirPort Utility. AirPort Utility is installed on your computer when you install the software from the Time Capsule CD. On a Macintosh computer using Mac OS X v10.5.7 or later: 1 Open AirPort Utility, located in the Utilities folder in the Applications folder.
3 Follow the onscreen instructions to set up your Time Capsule and your wireless network. The AirPort Utility setup assistant asks you questions about the type of network you want to use and the services you want to set up, and helps you enter the appropriate settings. If you’re using your Time Capsule to connect to the Internet, you need a broadband (DSL or cable modem) account with an Internet service provider (ISP), or a connection to the Internet using an existing Ethernet network.
Creating a New Wireless Network You can use the AirPort Utility setup assistant to create a new wireless network. The setup assistant guides you through the steps necessary to name your network, protect your network with a password, and set other options. If you plan to share a USB printer or USB hard disk on your network: 1 Connect the printer or hard disk to the Time Capsule USB (d) port.
Use the AirPort Utility setup assistant to enter your ISP settings and configure how your Time Capsule shares the settings with other computers. 1 Open AirPort Utility, located in the Utilities folder in the Applications folder on a computer using Mac OS X, or in Start > All Programs > AirPort on a computer using Windows. 2 Select your Time Capsule and click Continue.
Setting Advanced Options Use AirPort Utility to set up your Time Capsule manually if you want to set advanced Time Capsule options such as advanced security options, closed networks, DHCP lease time, access control, power controls, user accounts, and more. To set advanced options: 1 Open AirPort Utility, located in the Utilities folder in the Applications folder on a Macintosh, and in Start > All Programs > AirPort on a computer using Windows.
Allowing Wireless Clients to Access Your Network Without Entering a Password If your network is password-protected using WPA Personal or WPA/WPA2 Personal, you can provide wireless clients access to your network without requiring them to enter the network password. When you allow a client access to your network, the client’s name and wireless MAC address (or AirPort ID) are stored in the access control list of AirPort Utility until you remove the client from the list.
Select “Limit client’s access to 24 hours” if you want to provide just one day of access to your network. If you don’t select this option, the client will have access until you remove the client from the list. Using Time Machine with Your Time Capsule With the Time Machine application in Mac OS X Leopard you can back up everything on your computer, including your photos, music, movies, and documents. After you set up Time Machine, it automatically backs up your computer on a regular basis.
Your first backup with Time Capsule and Time Machine could take overnight or longer, depending on how much data you’re backing up. To speed up the initial backup, connect your Time Capsule to your computer using Ethernet. In each subsequent backup, Time Machine backs up only files that have changed since the previous backup, so the backups don’t take as long. Time Capsule is a great wireless backup solution for portable computers.
3 Tips and Troubleshooting 3 You can quickly solve most problems with your Time Capsule by following the advice in this chapter. If You Can’t Connect to the Internet  Try connecting to the Internet directly from your computer. If you can’t connect, check to make sure your network settings are correct. If they appear to be correct and you still can’t connect, contact your Internet service provider (ISP).  Make sure you’re connecting to the correct wireless network.
2 Select your AirPort network. Â On a Macintosh, use the AirPort status menu in the menu bar to select the network created by your Time Capsule (the network name doesn’t change). Â On a computer using Windows, hold the pointer over the wireless connection icon until you see your AirPort network name (SSID), and choose it from the list if there are multiple networks available.
If Your Time Capsule Isn’t Responding Try unplugging it and plugging it back in. If your Time Capsule stops responding completely, you may need to reset it to the factory default settings. Important: Resetting your Time Capsule to factory default settings erases all of the current settings and resets them to the settings that came with your Time Capsule.
If Your Time Capsule Status Light Flashes Amber The Ethernet cable may not be connected properly, your Time Capsule may be out of range of an AirPort network, or there may be a problem with your Internet service provider. If you’re connected to the Internet with a DSL or cable modem, the modem may have lost its connection to the network or the Internet. Even if the modem seems to be working properly, try disconnecting it from its power supply, waiting a few seconds, and then reconnecting it.
On a Macintosh using Mac OS X v10.5 or later: Â Choose Apple > System Preferences, and then click Print & Fax. Â Click Add (+) and select your printer in the list, and then click Add (+). On a Macintosh using Mac OS X v10.2.7 or later: Â Open Printer Setup Utility, located in the Utilities folder in the Applications folder. Â If the printer isn’t in the list, click Add. Â Choose Bonjour from the pop-up menu, select the printer and click Add (+).
Time Capsule Placement Considerations The following recommendations can help your Time Capsule achieve the best wireless range and network coverage. Â Place your Time Capsule in an open area where there are few obstructions, such as large pieces of furniture or walls. Try to place it away from metallic surfaces. Â If you place your Time Capsule behind furniture, keep at least an inch of space between the Time Capsule and the edge of the furniture.
 The original coaxial cable that came with certain types of satellite dishes. Contact the device manufacturer and obtain newer cables.  Certain electrical devices such as power lines, electrical railroad tracks, and power stations  Cordless telephones that operate in the 2.4 or 5 GHz range. If you have problems with your phone or AirPort communication, change the channel your base station or Time Capsule uses, or change the channel your phone uses.  Nearby base stations using adjacent channels.
4 Learning More, Service, and Support 4 You can find more information about using your Time Capsule on the web and in onscreen help. Online Resources For the latest information about the Time Capsule, go to www.apple.com/airport. To register your Time Capsule (if you didn’t do it when you installed the software on the Time Capsule CD), go to www.apple.com/register. For AirPort support information, forums with product-specific information and feedback, and the latest Apple software downloads, go to www.
Onscreen Help To learn more about using AirPort Utility with your Time Capsule, open AirPort Utility and choose Help > AirPort Utility Help. Obtaining Warranty Service If your Time Capsule appears to be damaged or doesn’t function properly, follow the advice in this booklet, the onscreen help, and the online resources. If your Time Capsule still doesn’t function, go to www.apple.com/support for information about getting warranty service.
Time Capsule Specifications  Frequency Band: 2.4 and 5 GHz  Radio Output Power: Up to 23 dBm (nominal)  Standards: 802.11 DSSS 1 and 2 Mbps standard, 802.11a, 802.11b, 802.11g specifications, and a draft 802.11n specification Interfaces  1 RJ-45 10/100/1000Base-T Gigabit Ethernet WAN (<)  3 RJ-45 10/100/1000Base-T Gigabit Ethernet LAN (G)  Universal Serial Bus (USB d) 2.0  802.
Size and Weight  Length: 7.75 inches (197.0 mm)  Width: 7.75 inches (197.0 mm)  Height: 1.43 inches (36.33 mm)  Weight: 3.5 pounds (1.6 kilograms) Hardware Media Access Control (MAC) Addresses The Time Capsule has three hardware addresses printed on the bottom of the case:  AirPort ID: The two addresses used to identify the Time Capsule on a wireless network.  Ethernet ID: You may need to provide this address to your ISP to connect your Time Capsule to the Internet.
About Operating and Storage Temperatures  When you’re using your Time Capsule, it is normal for the case to get warm. The Time Capsule case functions as a cooling surface that transfers heat from inside the unit to the cooler air outside. Avoid Wet Locations WARNING: To reduce the chance of shock or injury, do not use your Time Capsule in or near water or wet locations.  Keep your Time Capsule away from sources of liquid, such as drinks, washbasins, bathtubs, shower stalls, and so on.
Regulatory Compliance Information Wireless Radio Use This device is restricted to indoor use due to its operation in the 5.15 to 5.25 GHz frequency range to reduce the potential for harmful interference to co-channel Mobile Satellite systems. Cet appareil doit être utilisé à l’intérieur. Exposure to Radio Frequency Energy The radiated output power of this device is well below the FCC and EU radio frequency exposure limits.
This product was tested for FCC compliance under conditions that included the use of Apple peripheral devices and Apple shielded cables and connectors between system components. It is important that you use Apple peripheral devices and shielded cables and connectors between system components to reduce the possibility of causing interference to radios, television sets, and other electronic devices.
Singapore Wireless Certification Taiwan Warning Statements Korea Warning Statements © 2009 Apple Inc. All rights reserved. Apple, the Apple logo, AirPort, AirPort Express, AirPort Extreme, Apple TV, Bonjour, iPhone, iPod touch, Leopard, Macintosh, Mac OS, Time Capsule, and Time Machine are trademarks of Apple Inc., registered in the U.S. and other countries. Finder is a trademark of Apple Inc. Other product and company names mentioned herein may be trademarks of their respective companies.
www.apple.com/airport www.apple.