EN-1
SAFETY INSTRUCTIONS Read through the following Safety Instructions before you start using the device. Place the device on a stable surface. Do not use the device in places that are exposed to oil, water, or dust. Do not wrap the device with clothing. This might cause heat to build up, resulting in fire. Do not place any heavy object on the top of the device. Do not drop the device. Doing so may cause device malfunction. Do not insert any foreign objects into the opening slots of the device.
CONTENTS INTRODUCTION ...................................................................................................... 5 Features ...................................................................................................................... 5 Package Contents ........................................................................................................ 5 Product Overview .......................................................................................................
Advanced Settings ................................................................................................. 30 Setting Single Touch Backup Path ......................................................................... 32 APPENDIX ............................................................................................................. 35 Specifications ............................................................................................................ 35 Charging Other Mobile Devices ....
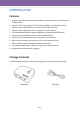
INTRODUCTION Features Supports two-way transfer and sharing data wirelessly between a memory card / USB flash drive. Supports “One Touch Backup” and “Real-time Backup” to backup files from a memory card / USB flash drive to an external hard drive directly. Supports Power Bank feature for charging your mobile devices. Free downloadable APP for data management on Android and iOS devices. Wireless sharing of videos, photos, music, and documents.
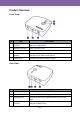
Product Overview Front View No. Item 1 USB 2.0 port (USB-B) 2 Memory card slot 3 Mode switch 4 One Touch Backup button 5 Status LEDs Description Connect USB storage devices such as USB flash drive or external hard disk drive. Insert a memory card. Slide to switch to different mode. Press to transfer data between a memory card / USB flash drive to an external hard drive. Indicate the system operation status. Rear View No. Item 1 Reset hole 2 Micro USB port 3 Ethernet port 4 USB 2.
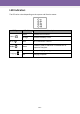
LED Indicators The LED color varies depending on the system and function status. LED Type Power ( ) LED Color Description Green The device is turned on. Orange The device battery is low. Wi-Fi ( ) Blue Wi-Fi connection is active. Media ( ) Green A memory card or USB drive is inserted into its respective slot/port. Red Battery charging in progress. Off Charging complete.
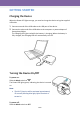
GETTING STARTED Charging the Device When the Power LED lights orange, you need to charge the device using the supplied USB cable. 1. Connect one end of the USB cable to the USB port of the device. 2. Connect the other end of the USB cable to the computer or power adapter of Smartphone/tablet. The Charging LED lights red while the battery is charging. When the battery is fully charged, the Charging LED will automatically turn off. Turning the Device On/Off To power on: Slide the Mode switch to .
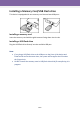
Installing a Memory Card/USB Flash drive This device is equipped with one memory card slot and two USB ports. or Installing a memory card Insert the memory card with the gold contacts facing down into its slot. Installing a USB flash drive Plug the USB flash drive directly into the available USB port. Note: If you plug a USB flash drive to the USB port on the front of the device and install an SD card at the same time, the system will recognize the SD card as the first priority.
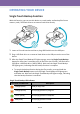
OPERATING YOUR DEVICE Single Touch Backup Function With this function, you can use this device as a card reader and backup files from a memory card / USB flash drive to an external hard drive directly. or 1. Insert an SD card into the card slot or plug USB flash drive to the USB port. 2. Plug a USB flash drive or an external hard drive to the USB port on the rear of the device. 3.
Using Wi-Backup APP Connecting to Your Mobile Devices List of Supported Devices Mobile Device Type Android iOS System Requirements Android OS 2.3~2.x, and 4.0~4.x iOS 5.0 and above Initial Setup Step 1: Install APP Download and install Wi-Backup APP from Play Store / App Store.
Step 2: Power ON Slide the Mode switch to page 8. . Refer to the “Turning the Device On/Off” section on Step 3: Connect to Your Mobile Device 1. On your mobile device, launch Settings. 2. Set the Wi-Fi setting to ON. The available networks are listed. 3. Tap Wi-Backup_xxxxxx to connect to the device.
Viewing Files Supported File Format File Type File Format Video M4V / MP4 / MOV Music MP3 / WAV / AAC Picture JPG / BMP / PNG Document PDF / DOC / PPT / TXT / HTM / XLS / PPTX / DOCX / XLSX Note: To view document file: On HTC/Samsung mobile devices, you can use Polaris Office APP to view the document. On other Android devices, you can install OliveOffice APP or similar applications to view the document.
Note: To access all files directly on your USB flash drive or SD card, tap SD/USB-B or USB-A. 3. Tap the desired folder category and browse the files.
Downloading Files To save the desired file(s) stored in the memory card/USB flash drive into your mobile device, perform the following: Android Device 1. On your mobile device, launch Wi-Backup APP. 2. Select and hold the file that you want to download. 3. Select one of the following options: Save to Device Library: Copy the file into your mobile device. Download to App: Copy the file into Collections tab.
iOS Device 1. On your mobile device, launch Wi-Backup APP. 2. Browse the files and tap Edit. 3. Select the file that you want to download. Then tap and select one of the following options: Save to library: Copy the file into your iPhone/iPad (Camera Roll). Download: Copy the file into Collections tab. [Option1. Select > 1 file] [Option 2.
Note: To rename the selected file, tap Rename. To move the selected file to another folder, tap Move. To delete the selected file, tap Delete. 4. Select the location where you want to save the file and tap Done.
Uploading Files To upload the desired file(s) stored in your mobile device into the memory card/USB flash drive, perform the following: Android Device 1. On your mobile device, launch Wi-Backup APP. Then tap Collections tab. 2. Tap Upload from Smart Device and select the file that you want to upload. [Select option] [Select the files and choose upload location] [Save to SD card/USB flash drive] Note: To select multiple files, tap and select the desired files. 3.
iOS Device 1. On your mobile device, launch Wi-Backup APP. Then tap Collections tab. 2. Tap Upload from Camera Roll or Upload From Music Library and select the file(s) that you want to upload. When finished with the file selection, tap Done. [Select option] [Select file(s) to upload] 3. Then select the location where you want to save the file(s) into the SD card/USB flash drive and tap Done.
Copying Files To copy the file(s) stored in your SD card into the USB flash drive (or vice versa), perform the following: Android Device 1. Insert an SD card or a USB flash drive into its slot and plug a USB flash drive to the USB port on the rear of the device. 2. On your mobile device, launch Wi-Backup APP. 3. Tap USB-A or SD/USB-B. 4. Select and hold the file that you want to copy and then tap Copy. [Select option] [Select and hold the file then select copy] [Save to SD card/USB flash drive] 5.
iOS Device 1. Insert an SD card or a USB flash drive into its slot and plug a USB flash drive to the USB port on the rear of the device. 2. On your mobile device, launch Wi-Backup APP. 3. Tap USB-A or SD/USB-B. 4. Browse the file and tap Edit. 5. Select the file that you want to copy and then tap > Copy. Ex.
Ex. When select multiple files: [Select option] [Select multiple files] [Tap Copy to save to SD card/USB flash drive] 6. Then select the location where you want to save the file into the SD card/USB flash drive and tap Done. Note: After the copy operation is complete, tap Status tab or review Backup_log.txt from the root directory of the target device to check the Backup history. Do NOT remove the memory card or USB flash drive while file transferring is in progress.
Sharing Files To share files via a sharing application, perform the following: 1. On your mobile device, launch Wi-Backup APP. 2. Select the file to share. Android Device Tap and hold the file that you want to share and tap Export. iOS Device Browse the file and tap Edit. Then select the file that you want to share and tap > Export. Android iOS 3. Select the desired sharing application. Note: The available sharing application varies depending on the applications installed in your mobile device.
NETWORK CONFIGURATION Configuring Wi-Fi Hotspot You can configure this device as a gateway and enable you to use this device as a wireless access point. To configure this function, perform the following: 1. Connect one end of the RJ-45 cable to the Ethernet port of the device. 2. Plug the other end of the RJ-45 cable to the Ethernet port on a router or network switch. 3. On your mobile device, launch Wi-Backup APP. 4. Tap Settings tab. 5. Tap Device Setting > Gateway(WAN). 6.
Note: Please contact your local Internet Service Provider (ISP) if you are not sure about the type of network connections you are using and the required parameters to complete the system configuration. 7. Tap Apply. The system will automatically reboot. 8. To use the Wi-Fi connection, simply connect your portable device (i.e. tablet, notebook, or Smartphone) to the device. See “Connecting to Your Mobile Devices” on page 11.
Configuring Wi-Fi Repeater This device also supports Wi-Fi Repeater function. When your mobile device is getting poor Wi-Fi signal from this device, you can connect this device to an available wireless router to extend the range of the Wi-Fi network. To configure this function, perform the following: 1. On your mobile device, launch Wi-Backup APP. 2. Tap Settings tab. 3. Tap Device Setting > WiFi Repeater. The available networks are listed. 4. Tap the desired wireless network.
Note: Some networks require a network security key or a password. Enter the password and tap Connect.
Configuring Other Network Settings 1. On your mobile device, launch Wi-Backup APP. 2. Tap Settings tab. 3. On Device Setting page, you can also configure the Wi-Fi setting connection, change the OSD language, reset to default, and other advanced settings. Note: Tap Home to return to File Server page. The Advanced Settings option is reserved for advanced configuration only. It is recommended not to alter these settings unless instructed by our Customer Service.
Changing OSD Language To change the on-screen display (OSD) language, perform the following: 1. On your mobile device, launch Wi-Backup APP. 2. Tap Settings tab. 3. Tap Device Setting > Multiple Language. 4. Select the desired language and tap Apply to save the settings. Resetting to Default To restore all parameters to the default settings, perform the following: 1. On your mobile device, launch Wi-Backup APP. 2. Tap Settings tab. 3. Tap Device Setting > Reset to Default. 4.
Advanced Settings Setting DLNA 1. On your mobile device, launch Wi-Backup APP. 2. Tap Settings tab. 3. Tap Device Setting > Advanced Settings > DLNA Note: The default setting is Disable, tap Enable > Apply After 5 seconds in rebooting, the DLNA setting is done.
Setting Samba 1. On your mobile device, launch Wi-Backup APP. 2. Tap Settings tab. 3. Tap Device Setting > Advanced Settings > Samba Note: The default setting is Disable, tap Enable > Apply After 20 seconds in rebooting, the Samba setting is done.
Setting Single Touch Backup Path To configure this function, perform the following: 1. On your mobile device, launch Wi-Backup APP. 2. Tap Settings tab 3. Tap Set One Touch Backup Path tab Note: The Set One Touch Backup Path page appears.
4. Tap Choose tab, then select desired backup source path.
5. Select the folder you would like to backup files, then tap OK tab. (Ex: Select SG folder) Android iOS 6. Tap Save tab to save the path settings.
APPENDIX Specifications Item Specifications Hardware Specifications Standard IEEE 802.11b/g/n standards compliant Wireless LAN 1T1R Mode (150Mbps) Antenna Exclusive built-in PCB Antenna Interface Micro USB Port for PC Card Reader Mode / USB Charger Mode RJ45 (WAN Port) Reset (3Sec) button Slide Switch for Wireless Mode & Power Bank Mode Push Button Key for Single Touch Backup Mode USB-A for USB-HDD (Max. 1A) / USB-B for UFD / Power Bank Mode (Max. 2.
Charging Other Mobile Devices You can use this device as a Power Bank to charge another mobile device. 1. Connect one end of the USB cable to the USB port of the device. 2. Connect the other end of the USB cable to the USB port of your mobile device. 3. Slide the Mode switch to . The battery charging will start automatically. 4. Disconnect the USB cable when the charging process is complete.
Contacting Us When you encounter any problem while using this device, try to reset the device as described in the previous section. If the problem still persists, you can contact us by using the Send Feedback option in the Settings (Wi-Backup APP) or by visiting www.apotop.com/tw.