萬國科技 使用手冊 Quick Guide 無線讀卡機 Wi-Reader Copyright © 2012, Carry Technology Co., Ltd.
萬國科技 目錄/Catalog 感謝您的購買/ Thanks for your purchasing…………………2 1 . 1 包 裝 內 容 / P a ck a g e C o n te n t … … … … … … … … … … . 2 1.2 介面與 LED 燈號顯示說明/ Interface & LED Indicators Description..3 主要功能介紹/ Main Function…………………………..……5 2.1 無線讀卡功能/ Wireless Card Reader......................................5 2.2 如何輕鬆將飯店有線網路轉成無線/ Easy create a wireless network at hotel room . . . . . . . . . . . . . . . . . . . . . . . . . . . . . . . . . . . . . . . . 5 2.2 如何設定無線網路環境(插網路線)/ How to Setup a wireless ...................
萬國科技 感謝您的購買/ Thanks for the Purchasing DW09 無線讀卡機整合了讀卡機與無線路由器兩種功能。此產品 專為平板電腦,智慧型手機,以及手持式無線裝置等所設計。藉由內建 的可充電電池提供電源,讓無線裝置不需透過與 PC 的連接,直接經由 SD 記憶卡或是隨身碟,來無線分享及傳輸您的檔案及照片,除此之外, 整合無線路由器的功能,連接網路線後,使用者可以相當方便連接至網 際網路,可在一般房間大小的空間分享無線網路,小型化設計便於旅行 時攜帶且可滿足基本的無線網路使用需求。 產品使用前請先至 App store 免費下載 Wi-Reader App,並完成安裝。 Wi-Reader is a portable wireless storage (USB flash drive or SD card) and wireless router.
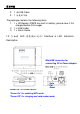
萬國科技 2. 1 條USB Cable 3. 1 份使用手冊 The package contains the following items 1. 1 x Wi-Reader (DW09 has built-in battery, please have it full charged before first usage) 2. 1 x USB Cable 3. 1 x Quick Guide 1.2 介 面 與 LED 燈 號 顯 示 說 明 / Interface & LED Indicators Description Mini-USB connector for connecting PC or Power Adapter Hole For Reset Power On / Off Slide Switch: “Power On” for enabling WiFi mode. “Power Off” for charging and card reader mode.
萬國科技 LED 燈號指示於外殼上方(由右至左依序如下): 1. 電源/低電量(綠色 / 橘色) 1. 指示燈亮綠色表示電力充足以及切換至無線網路模式; 2. 指示燈亮橘色表示電池電力不足,須盡快進行充電。 2. 無線網路啟動(藍色) 3. 顯示目前無線網路已經啟動,可以使用。 3. SD 卡/隨身碟插入與讀寫(綠色) 4. 指示燈亮綠色,顯示 SD 記憶卡或是隨身碟已經插入,燈號閃 爍,顯示進行資料傳輸。 4. 電池充電中(紅色) 5. 指示燈亮紅色,表示連接 USB 線正在對內建的電池進行充電, 紅色燈號熄滅表示已經充電完成(註:電力充足時將不會充電)。 5. 重置按鈕 (位於右側重置按鈕孔內) 操作步驟 : 6. 確認無線分享器的電源已正確供應。 7. 確認無線網路連線之紅色燈號閃爍。 8. 使用迴紋針等尖端的工具插入重置按鈕孔,按壓超過 3 秒, 待紅色燈號熄滅後,請放開重置按鈕孔,即可回復出廠設定。 LED Indicators on top panel: (From R to L): 1.
萬國科技 3. Access LED (Green): Indicates Media In/Out and R/W Access LED. 4. Battery Charger LED (Red): Indicates the External power (USB DC5V) is charging the embedded battery of Wi-Reader. * Charger LED will turn off when charging is finished 5. Reset (3Sec) button on the right side: First, please make sure you had powered on the Wi-Reader and WiFi LED (Blue) is keeping in working stage, then you can use a kit to press the Reset button. After pressing 3 seconds, you will see WiFi LED (Blue) will turn off.
萬國科技 主要功能介紹/ Main Function 2.1 無線讀卡功能/ Wireless Card Reader 如何使用 Wi-Reader 無線讀卡功能/ How to use Wi-Reader Storage Function 1. 請至 App Store 安裝 Wi-Reader 應用程式。 Install Wi-Reader App from Apple App Store on iPhone/ iPad. 2. 插入儲存媒體 (USB 隨身碟或 SD 記憶卡)至 Wi-Reader 本體,開啟 Wi-Reader 電源並等待 35 秒,至藍色 LED 指示燈閃爍。 Plug a storage media (USB Pen Drive or SD Card) into Wi-Reader. Power it on and wait for the blue led flickering (about 35 sec) 3.
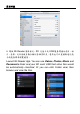
萬國科技 4. 開啟 Wi-Reader 應用程式,SD 記憶卡或 USB 隨身碟裡的影片、相 片、音樂、文件會被自動分類到各個資料夾,當然也可以直接點進記憶 卡或隨身碟來瀏覽檔案。 Launch Wi-Reader App. You can see Videos, Photos, Music and Documents folder and your SD card/ USB flash drive files would be automatically classified. Or you can click Folder view; then browse and view the files.
萬國科技 5. 自 SD Card/ USB 隨身碟傳送檔案到 iPad/ iPhone 請點按畫面右上角的 Edit 可以開始選擇檔案,選擇完畢後再按左下方 的小圖示,便可以進行下載、移動、更名或刪除等動作。 Download files from Wi-Reader. Click Edit at the up-right of the screen and you will be able to select the file(s) to download to Photos App/ download to Wi-Reader App(in Collections section), Move, Rename or Delete. 6. 將相簿裡的相片影片傳送至 SD Card/ USB 隨身碟 請點按收藏區的圖示,再點選從相片膠捲上傳。便可以開始選擇相片/ 影片。選取後請點按 Done,就完成傳送檔案至 SD Card/ USB 隨身碟。 Upload pictures/ videos from Camera roll or files in Collections.
萬國科技 Wi-Reader App 支援的檔案格式如下/ Wi-Reader Supports files format as follows 影片 Video:M4V / MP4 / MOV 音樂 Music:MP3 / WAV / AAC 相片 Picture:JPG / BMP / PNG / GIF 文件 Ducument:PDF / DOC / PPT / TXT / HTM/XLS 2.2 如何輕鬆將飯店有線網路轉成無線網路/ Easy create a wireless network at hotel room 使用飯店網路線(在不需使用者帳號以及密碼的情況下)/ With internet cable (need no User name/Password) 1. 連接網路線至 Wi-Reader 的 WAN Port。 Connect the internet cable to Wi-Reader WAN port. 2.
萬國科技 individual SSID of each Wi-Reader) 5. 打開 iPad/ iPhone 瀏覽器(例如 Safari),你現在應已連上網路了! Open iPad / iPhone Browser – ex. Safari, and you should get on Internet now! 更改密碼/ Password Change 連結至 Wi-Reader(見 2.3 步驟 1-5) 在右邊功能欄點選 Wireless,於下拉選單中的 Security 裡的 Encryption 可選擇加密方式。 開啟 Wi-Reader 密碼保護功能將可預防任何未經授權的連結至無 線網路或讀卡功能,Encryption 中可選擇加密方式,請在 Pre-share Key 欄位設定 Wi-Reader 密碼,更改後請點選 Apply Changes 以 利設定更新。 At “Wireless” - “Security” (See 2.3 step 1 – 5 to enter setup page) Choose the type of Encryption.
萬國科技 更改 Wi-Reader 無線網路名稱/ Change the name of SSID 連結至 Wi-Reader(見 2.3 步驟 1-5) 在右邊功能欄點選 Wireless,於下拉選單中的 Basic Settings 裡的 SSID 欄位可更改 Wi-Reader 網路名稱。更改後請點選 Apply Changes 以利設定更新。 At “Wireless” – “Basic Settings” (See 2.3 step 1 – 5 to enter setup page) You can change the name of SSID for your Wi-Reader. Click Apply Changes while done. 2.
萬國科技 若家中使用 ADSL 寬頻網路(Gateway mode)/ For ADSL (Gateway mode) 1. 開啟 Wi-Reader 電源並等待 35 秒。 Power on the Wi-Reader and wait about 35 sec 2. 3. 4. 5. 6. 在無線網路列表中選擇 Wi-Reader_xxxxxx。 Choose a WiFi Network: “Wi-Reader_xxxxxxxx” 在 iPad/ iPhone 開啟瀏覽器(例如 Safari) 。 Open iPad / iPhone Native Browser – Safari 在瀏覽器地址列中輸入 http://10.10.1.1。 Enter: http://10.10.1.1/ in URL-address 請進入畫面右上角的 Settings。 The following screen will show up and click “Settings” on Up-right corner.
萬國科技 Subnet mask。請直接點按 Next。 In order to use storage function of Wi-Reader, you don’t need to update the IP addresses, subnet mask for Wi-Reader. Please click “Next” directly to skip it. 8. WAN Interface Setup 在此以 ADSL 寬頻網路為例設定,請選擇 PPPoE 撥號網路,並請輸入 網路供應商提供的使用者名稱以及密碼,然後點按 Next。 若是透過網路分享器連網,或只是使用無線讀卡機傳送資料,可以維持 “DHCP Client” 的設定值,可以直接點選 Next。 For Example: Select PPPoE for ADSL on WAN interface. User Name and Password need to be done and click “Next”.
萬國科技 10. 在 Wireless Security 設定中,於 Encryption 可選擇加密方式。 開啟 Wi-Reader密碼保護功能將可預防任何未經授權的連結至無 線網路或讀卡功能,在更新後點選 Finished 並等待約 20 秒,以 連結至您新設定的 SSID 或密碼。 At “Wireless” - “Security” (See 2.3 step 1 – 5 to enter setup page) Choose the type of Encryption. Turning on the Wi-Reader Security will prevent any unauthorized access to the wireless network and storage device. Setup the password of Wi-Reader at Pre-Share Key, after updating it, 2.
萬國科技 5. 在瀏覽器地址列中輸入 http://10.10.1.1。 Enter: http://10.10.1.1/ in URL-address. 請進入畫面右上角的 Settings。 The following screen will show up and click “Settings” on Up-right corner. 6. 請選擇 WiFi Repeater 並點按 Next。 4. Refer to the following Web U/I and click “Next”. 7. 8. 為了同時使用 Wi-Reader 的讀卡功能,在 LAN Interface Setup 中不需要更新 IP Address 以及 Subnet mask。請直接點按 Next。 LAN Interface Setup In order to use storage function of Wi-Reader, you don’t need to update the IP addresses, subnet mask for Wi-Reader.
萬國科技 9. 在 Wireless Basic Settings,你可以更改 Wi-Reader 的 SSID(無 線網路名稱),若不想要變動名稱,也可以直接點按 Next。 Wireless Basic Settings for using different SSID for your Wi-Reader. Also, if you do not want to change it, please click “Next” directly. 10. 在 Wireless Security 設定中,於 Encryption 中可選擇加密方式。 開啟 Wi-Reader密碼保護功能將可預防任何未經授權的連結至無 線網路或讀卡功能,請在 Pre-share Key 欄位設定 Wi-Reader 密碼,更新後請點選 Next。 Wireless Security Setting. The following figure is to show setting up the security of the Wi-Reader.
萬國科技 12. 接著在 Select Wireless Security mode,在 Pre-Share Key 欄位 請輸入現有無線分享器密碼後點按 Finished,等待約 70 秒,即完 成設定變更。 Please input (key in) the password of Wireless Router, then please click “Finished” and wait about 70 seconds to finish setup. 13. 設定完成之後,將可以透過橋接現有的無線網路,同時達成上網 與無線讀卡機之資料傳輸需求。 After that, Wi-Reader will connect to the ISP Router through Wireless. Also, you can use both storage function and Internet by Wi-Reader.
萬國科技 NCC警語 第十二條: 經型式認證合格之低功率射頻電機,非經許可,公司、商號或使用者 均不得得擅自變更頻率、加大功率或變更通原計之特性及功能。 第十四條: 低功率射頻電機之使用不得影響飛航安全及干擾合法通信;經發現有 干擾現象時,應立即停用,並改善至無干擾時方得繼續使用。 前項合法通信,指依電信法規定作業之無線電通信。低功率射頻電機 須忍受合法通信或工業、科學及醫療用電波輻射性電機設備之干擾。 FCC Compliance and Advisory Statement This device complies with Part 15 of the FCC rules.
萬國科技 the instruction manual. Warning: A shielded-type power cord is required in order to meet FCC emission limits and also to prevent interference to the nearby radio and television reception. It is essential that only the supplied power cord be used. Use only shielded cables to connect I/O devices to this equipment. CAUSION: Any changes or modifications not expressly approved by the party responsible for compliance could void your authority to operate the equipment. 19 V1.