
User's Manual

4
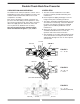
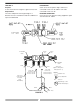
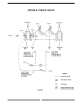
A. Disassembly — Check Valves
1. Close #2 shut off valve, then close #1 shut-off valve.
2. Bleed pressure from the assembly by opening #2,
#3, and #4 test cock.
CAUTION:
Caps are spring loaded and should be removed
carefully to avoid personal injury.
3. Unscrew cap using hex head provided.
4. Remove spring and poppet assembly
from the body.
5. Remove the seat disc from the poppet.
B. Inspection
1. All parts should be carefully inspected for any
damage or excessive wear and thoroughly rinsed
in clean water prior to reassembly. Replace worn
parts as necessary.
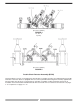
C. Assembly — Check Valve Poppet
1. Install new disc in poppet.
NOTE:
Due to symmetry of the disc, the old disc may be
turned over to obtain an effective seal.
D. Assembly — Check Valve
1. Install the poppet assembly into the body.
2. Install the spring onto the poppet.
3. Apply a thin coat of FDA approved lubricant
on cap O-Ring.
4. Guide cap over spring and poppet stem and
tighten cap.
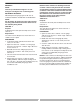
III TROUBLE SHOOTING GUIDE
IV MAINTENANCE INSTRUCTIONS 1/2" (40-103)
SYMPTOM
1. Check valve fails to hold
1 psid.
CAUSE
a. Shut-off valve not closed
completely.
b. Check valve fouled with
debris.
c. Check poppet stem not
moving freely in guide.
CORRECTIVE ACTION
a. Close #2 shut-off valve or
inspect for possible
through leakage.
b. Inspect and clean seat
disc and seat.
c. Inspect for debris or
deposit on poppet stem
or guide.