
Yard Vacuum User Manual


5
Disassembly
1. Close inlet and outlet shut-off valves
2. Bleed pressure from the assembly by opening
#2, #3, and #4 test cock.
3. Unscrew and remove bronze cap.
4. Remove stainless steel spacer using lifting tab.
5. Remove first check module by pulling outward with
fingers (a small screwdriver may aid removal). Be
sure test cock #2 is open so as to prevent
hydraulic lock. Generally, the first check o-ring will
remain in the bore.
6. Remove second check assembly by sliding the
assembly out of its bore (a small screwdriver
placed in the groove provided will aid removal).
Be sure test cock #4 is open as to prevent
hydraulic lock.
Inspection
1. All parts should be carefully inspected for any
damage or excessive wear and thoroughly rinsed
in clean water prior to reassembly.
2. Replace all worn parts as necessary.
NOTE:
Check valve modules are not user serviceable. In
the event of check failure, replacement modules
are sold individually.
Assembly
1. Replace check modules, second check first then
first check. Make sure first check o-ring is installed.
(Tip: push o-ring to the bottom of the bore before
installing check module.) Press check module into
bore. A thin coat of FDA approved lubricant on
o-ring will aid insertion.
2. Replace stainless steel spacer.
3. Apply a thin coat of FDA approved lubricant on cap
o-ring. Replace Cap.
A. Disassembly — Check Valves
1. Close #2 shut off valve, then close #1 shut-off valve.
2. Bleed pressure from the assembly by opening
#2, #3 and #4 test cock.
CAUTION:
Caps are spring loaded and should be removed
carefully to avoid personal injury.
3. Unscrew cap using hex head provided.
4. Remove spring and poppet assembly from
the body.
B. Disassembly — Check Valve Poppet
CAUTION:
Do not use pliers or other tools which may
damage or scratch the plastic stem.
1. Holding the poppet assembly in one hand, remove
screw and retaining washer.
2. Remove the seat disc.
3. All parts should be carefully inspected for any
damage or excessive wear and thoroughly rinsed
in clean water prior to reassembly. Replace worn
parts as necessary.
C. Assembly — Check Valve Poppet
1. Install new disc in poppet and secure with washer
and screw.
D. Assembly — Check Valve
2. Place and center the poppet assembly in the body.
3. Install the spring onto the poppet.
4. Apply a thin coat of FDA approved lubricant on cap
O-Ring.
5. Guide cap over spring and poppet stem and
tighten cap.
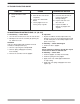
VI MAINTENANCE INSTRUCTIONS 3/4" - 2"
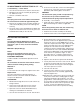
V MAINTENANCE INSTRUCTIONS 1/2" (4S-103)