
User Manual


Mic Pre Module Input Tab
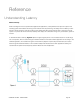
When a Mic Pre I/O module is installed and Analog Level is set to Mic or Instrument, the following additional controls
become available:
1.
Level Trim
- Use this knob to adjust the gain of the mic pre.
2.
Group
- Use this drop down to choose a Level Trim group, for controlling the Level Trim of
multiple inputs simultaneously. Any level offset that exists before inputs are grouped
will be preserved after a group is chosen.
3.
Insert Select
- Use this drop down to insert one of the eight rear panel send/return pairs into the
input signal path. Insert labels may be customized in the Device Settings tab
window. The insert point occurs after the mic pre and high pass filter and before the
A/D conversion stage.
4.
Insert In
- Use this button to enable the Insert Return. The Insert Sent is always active once
an insert is selected. Thus, the Insert Send may be used as an analog direct out
when an insert is selected but the In button isn't depressed.
5.
Polarity
- Use this button to invert the polarity of the input signal.
6.
48
- Use this button to enable 48 volt phantom power on the corresponding Analog IN
channel. Condenser mics require 48 volt phantom power to operate.
7.
High Pass
- Use this button to engage an 80Hz high-pass filter on the input.
SYMPHONY I/O MK II - USER’S GUIDE Page 32
1 2 3 4 5 6 7 8 9 10 11 12 13 14 15 16 17 18 19 20
1 2 3 4 5 6 7 8 9 10 11 12 13 14 15 16 17 18 19 20
1 2 3 4 5 6 7 8 9 10 11 12 13 14 15 16 17 18 19 20
1 2 3 4 5 6 7 8 9 10 11 12 13 14 15 16 17 18 19 20
1 2 3 4 5 6 7 8 9 10 11 12 13 14 15 16 17 18 19 20
1 2 3 4 5 6 7 8 9 10 11 12 13 14 15 16 17 18 19 20
1 2 3 4 5 6 7 8 9 10 11 12 13 14 15 16 17 18 19 20