
User Manual-for windows


Apogee Duet | User’s Guide for Windows
Operation
In this section you’ll find answers to questions that might arise while you’re recording with Apogee
Duet on your Windows PC.
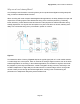
Setting up an Input
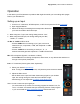
1. Connect a ¼” instrument, XLR Microphone, or XLR Line-Input to the Duet’s input plugs.
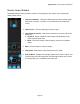
2. Open Apogee Maestro
3. Select the Analog Level setting that corresponds to the device
you have connected to the Duet’s input.
● When
using
the
¼”
input,
the
Analog
setting
must
be
“Instr”
● When
using
the
XLR
input,
the
Analog
setting
may
be
“Mic”,
“+4dBu”,
or
“-10dBV”.
+4 dBu or -10dBV: XLR line level.
˗ Choose +4dBu when connecting to “pro” gear, such as an
external mic pre, compressor, or EQ, with outputs at a +4dBu
nominal level.
˗ Choose -10dBV when connecting to “semi-pro”, hi- , or
musical instrument gear with outputs at a -10 dBV nominal level.
Mic: XLR microphone (dynamic, condenser or ribbon).
˗ Choose Mic when connecting microphones, direct boxes, or any devices that needs to run
through a microphone preamplifier.
Instr: 1/4” Instrument (electric guitar, bass, keyboards)
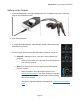
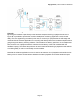
4. Select your desired input settings.
Note:
If
using
a
condenser
microphone,
48V
phantom
power
must
be
activated
5. Adjust the Gain control.
˗ Set the Gain so the input level meter shows strong signal on your loudest
input, but not high enough to cause the Over indicator to light.
˗ Alternatively you can adjust the Input Gain via the Duet’s Knob
Note:
You
will
not
hear
the
input
signal
yet.
- You
must
either
set
up
a
track
in
a
recording
program
like
Ableton
Live,
Pro
Tools,
or
Cubase,
and
activate
the
input
monitoring
function
of
that
program.
- or
you
can
activate
the
direct
monitoring
function
built
into
the
Duet.
Page 21