
User's Instructions

GLOWB
®
User Instructions
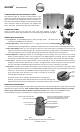
Plug
Jack
Sensor
Cover
Light
Sensor
COMPRESS AND LOCK INTO A SPHERICAL SHAPE
Your Glowb can light up in a tube or spherical shape. If you
prefer the spherical shape simply press against one end of the
light until the lock clips engage with the hub of the light. The
clips will hold the shape of the light until you decide to release
them. Unlock the shape by pinching the clips together (see
photo at far right). Caution: Keep away from small children.
CONNECTING POWER
Insert the power plug into the light jack. Then screw them together to make a
weatherproof connection and prevent the wires from becoming accidentally unplugged.
MANUAL BUTTON CONTROLS
Turn Lights On: Your GLOWB will light up when you apply power. This allows users to
connect their GLOWB to an external timer.
Change Light Effects: When the lights are on, a single short press of the manual button
switches to the next of 6 light effects - Steady On, Twinkle, Fade, Pulse, Chase, Combo (combination of 5 effects)
Switch Lights Off/On: After you cycle through the effects and the combo effect is displaying, you can press the
button one more time to switch the lights off. Another press will turn the lights back on to the Steady-on effect at
the lowest brightness and you can again cycle through the effects by using the manual control button.
Control Brightness: GLOWB Light powers on to low brightness to save energy. Two short presses on the manual
button increases brightness 1 level. You can repeat this until 100% brightness is reached. After you reach 100%,
two short presses will switch to the lowest brightness. There are 4 brightness options: 10%, 25%, 60% and 100%.
5 Hour Timer: The timer turns the lights off after 5 hours so they will not stay on indefinitely. Control the timer by
holding the manual button down for over 3 seconds. The light will flash 5 times if the timer is active or 2 times if
the timer is disabled. If disabled the light will remain on until you turn it off or until power is removed.
Light Sensor: The light sensor enables Glowb Light to turn on when it gets dark and off when it gets light. Glowb
Lights are shipped with the light sensor covered/disabled. Enable the light sensor by removing the cap from the
sensor lens. This will cause your GLOWB to switch the lights off when in bright
light. Use the light sensor with the 5 hour timer to turn lights on at dark and
automatically turn lights off 5 hours later.
If the light sensor is active, the lights will not switch on in a bright room.
However, if you connect power while the light sensor is active then the lights will
flash two times just to let you know that power is connected and the sensor is not active.
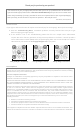
WIRELESS BUTTON CONTROLS
Pressing any button should light the signal indicator light (see below). If the indicator light fails to light up then check the
2032 battery inside the controller. Note: A plastic insulator ribbon prevents button operation to keep your controller
battery strong. Remove this ribbon to allow the controller to function. Also, make sure the GLOWB has power
connected before trying the controller buttons. The diagram below describes controller functions.
“We hope you enjoy your Glowb Light.
Please, Let us know how we can make it even better.”
- Steve Bleile, Inventor
Shown with optional battery
pack.
Short Press changes the light effect or turns lights on.
Hold for over 3 seconds to toggle the 5 hour timer.
It will flash 2 times if disabled or 5 times if active.
Press the plus button
to increase brightness
Pressing the red button
turns the lights off.
The signal indicator light should light
when a button is pressed
Press the minus button
to reduce brightness