
User's Manual


22
TA-500 Badge Reader (DSI Version 2.0-2.3) Confidential – API Healthcare Corporation
Installation and Configuration Guide Copyright © 2006. All rights reserved.
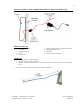
3. MAC Address. Press 3 to display the MAC Address assigned to the device. Press the ENT
key to return to the Network Type menu.
4. IP Address. Press 4 to view the current IP address used by the device. Press the ENT key to
return to the Network Type menu.
5. Subnet. Press 5 to view the current Subnet address used by the device. Press the ENT key to
return to the Network Type menu.
6. Gateway. Press 6 to view the current Gateway address used by the device. Press the ENT key
to return to the Network Type menu.
7. DNS Server. Press 7 to view the current DNS Server IP address used by the device. Press the
ENT key to return to the Network Type menu.
8. Remote Port. Press 8 to view the current Remote Port configured on the device. Press the
ENT key to return to the Network Type menu.
2. Set Network. Press 2 to configure the network settings.
1. Network Type. Press 2 to view the Set Network Type menu.
1. Set DHCP. Press 1 to configure the device to communicate using DCHP.
2. Set Static. Press 2 to configure the device to communicate using a static IP address.
Enter the IP Address, Subnet, Gateway, DNS Server and Remote Port values. All digits
need to be entered including leading zeroes. Press the CLR key to remove the previously
entered digits. Press the ENT key to save the address.
2. IP Address. Press 2 to enter a valid IP address when the Network Type is set to STATIC. All
digits need to be entered including leading zeroes. Press the CLR key to remove the previously
entered digit. Press the ENT key to save the address.
3. Subnet. Press 3 to enter a valid Subnet address. All digits need to be entered including leading
zeroes. Press the CLR key to remove the previously entered digit. Press the ENT key to save
the address.
4. Gateway. Press 4 to enter a valid Gateway address. All digits need to be entered including
leading zeroes. Press the CLR key to remove the previously entered digit. Press the ENT key
to save the address.
5. DNS Server. Press 5 to enter the DNS Server IP address. Add digits need to be entered
including leading zeros. Press the CLS key to remove the previously entered digit. Press ENT
to save the address.
6. Remote Port. Press 6 to enter a valid port number. When 0 is entered, the value configured
from the communication software is updated to the device. The value may be entered manually;
however it must match the value in the communication software. This value must be greater
than 10001 and less than 65535. Ports 14000 to 14009 are reserved and cannot be used. Press
the CLR key to remove the previously entered digit. Press the ENT key to save the address.
7. Renew DHCS. Press 7 to view the current DNS Server configuration. Press ENT to return to
the IP Settings menu.
Enter to Exit. Press the ENT to return to the Supervisors Menu.
Enter to Exit. Press the ENT to return to the Supervisors Menu.