
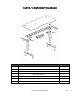
User Manual


Elite Series Assembly Guide 8 | P a g e
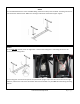
STEP 4 – CONT’D
With axles into the holes, push the handle down with your hand toward the lifting column. You should feel
some pressure while pushing it down. Once the handle is flush with the beam, use a tool such as a flat-head
screwdriver to push it further down. If no pressure is felt while pushing handle down, check whether the top
support bracket is installed and secured properly, and whether the handle is on the left.
Each lifting column requires two locking levers to secure it correctly. It is normal that you feel more
pressure on one handle than the other when pushing levers down. Shake the lift column with your hand when
both levers are down and make sure the lifting column tightly secured and does not wiggle. If the levers are
installed correctly and lift column is still not tight, one simple remedy is to insert a piece of cardboard or plastic
under the lifting column.
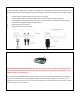
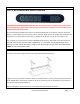
STEP 5
Use Phillips screwdriver to secure control box with two Screw C on one end and one Screw C on the other end.
The above drawing illustrates the mounting position of control box if controller is mounted on the right hand
side. If you want controller to be installed on the left hand, simply reverse the control box. Please note that two
mounting holes for controller are only pre-drilled on the right-hand side not on the left-hand side of the desk
top.