
Instructions / Assembly

Page 2Rev. 062518
DiscountRamps.com • 1-888-651-3431
Assembly
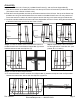
Step 1. Assemble the Left U-Frame (A), Left Main Rack Frame (C), and one Frame Support Bar (E).
A. Slide the rst section of the Main Rack Frame onto the top bar of the U-Frame until it just ts onto the bar.
(The bottom of the U-Frame will have a foot.)
B. Slide the Frame Support Bar onto the top and bottom sections of the U-Frame. The top of the Frame Sup-
port Bar has a wing nut and ts between the two sections of the Main Rack Frame. You may need to ma-
neuver the sections in order to t it into this space. Be sure the wing nut is loose enough to slide the bar.
C. Continue to slide the Main Rack Frame and Frame Support Bar onto the U-Frame, tting the second section
of the Main Rack Frame onto the top bar of the U-Frame.
Step 2. Connect the bottom of the U-Frame to the bottom of
the Main Rack Frame. Fit the Bottom Support Bar (G) into the
brackets and secure with two Clip Pins (H).
(1A)
(2)
(3)
(1B) (1C)
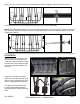
Step 3. Repeat Steps 1 and 2 to assem-
ble the right section of the bike rack. (Use
parts B, D, E, G, and H.)
Step 4. Connect the left and right sections.
A. To connect the back U-Frame sections, t one Spacer Bar (F) between the top bars and one Spacer Bar
between the bottom bars. Secure with two Clip Pins (H) per bar.
(4A)