Safety Precautions The lightning flash with a arrowhead symbol within an equilateral triangle is intended to alert the user to the presence of uninsulated "dangerous voltage" within the product's enclosure that may be of sufficient magnitude to constitute a risk of electric shock to persons. ! WARNING RISK OF ELECTRIC SHOCK DO NOT OPEN AVIS RISQUE DE CHOC ELECTRIQUE NE PAS OUVRIR WARNING: TO REDUCE THE RISK OF ELECTRIC SHOCK, DO NOT REMOVE COVER (OR BACK). NO USER SERVICEABLE PART INSIDE.
Important Safety Instructions CAUTION: PLEASE READ AND OBSERVE ALL WARNINGS AND INSTRUCTIONS GIVEN IN THIS OWNER’S MANUAL AND THOSE MARKED ON THE UNIT. PLEASE KEEP THIS MANUAL FOR FUTURE USE. This product was designed and manufactured to meet strict quality and safety standards. The safeguards incorporated in this unit will protect you if you observe the following procedures for installation, use, and service. There are, however, some installation and operation precautions which you should be aware of. 1.
Important Safety Instructions that objects do not fall and liquids are not spilled into the units openings. Such situations could result in fire or electrical shock. 15. NON-USE PERIODS - The power cord of the unit should be unplugged, when not in use for a long time. 16. DISC - Do not use a deformed, cracked, or heavily scratched disc. Using these disc will limit your viewing pleasure, and/or may damage the internal workings of your machine. 17.
Introduction Your DVD video player is a player for digital video discs conforming to the universal DVD video standard. With it, you will be able to enjoy full-length movies with true cinema picture quality, and stereo or multi-channel sound (depending on the disc, and on your playback setup). The unique features of this DVD video, such as selection of sound track and subtitle languages, and of different camera angles (again depending on the disc), are all included.
Table of Contents Safety Precautions ........................... 1 Playing Disc in Various Ways ........... 21 - 30 Important Safety Instructions ........... 2 - 3 MP3 Operations ................................ 31 - 33 Introduction ........................................ 4 Karaoke ............................................. 33 Identification of Controls .................... 6 Function Settings .............................. 34 - 41 DVD Display .......................................
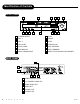
Identification of Controls FRONT PANEL 1 6 2 3 4 5 8 7 9 10 12 13 14 11 1 POWER ON/OFF 8 PLAY 2 MIC 1 9 PAUSE 3 MIC 2 10 STOP 4 MIC LEVEL 11 OPEN/CLOSE 5 ECHO LEVEL 12 SKIP REVERSE 6 DVD DISPLAY 13 SKIP FORWARD 7 DISC LOADING TRAY 14 DIRECT PLAY OR DISC EXCHANGER REAR PANEL 6 1 2 3 6 A P E X D I G I 4 5 1 POWER SUPPLY CORD 2 5.
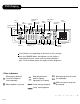
DVD Display Chapter/track indicator Play indicator SUPER-VCD VCD and CD indicator PBC indicator Pause indicator DVD indicator Remain indicator Title indicator Dolby Digital indicator Angle Repeat play indicator indicator Program indicator Lock indicator Title/chapter/track indicator Hour indicator Minute indicator Track calendar Disc recording indicator Second indicator Resume indicator The indicators vary depending on the kinds of discs you play.
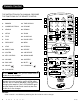
Remote Control THE INSTRUCTIONS IN THIS MANUAL DESCRIBE THE FUNCTIONS ON THE REMOTE CONTROL. 14 1 1. OSD 15 17. DIGEST 2 16 2. DIMMER 18. TIME SEARCH 3. NUMBER BUTTONS 19. RESUME 4. SEARCH 20. REMAIN 5. SETUP 21. ZOOM 6. TITLE 22. SLOW PLAY 4 7. PLAY 23. PAUSE/STEP 5 3 17 18 8. PREV/NEXT 19 20 21 22 23 6 24. MENU 24 7 9. STOP 25. RETURN 8 10. DIRECTIONS 26. REPEAT 11. SYSTEM 27. A-B REPEAT 12. KEY CONTROL 28. AUDIO MODE 13. VOLUME 29. SUBTITLE 14.
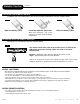
Remote Control Continued PREPARING THE REMOTE CONTROL To operate the DVD video player, you must first place the batteries into the remote control. 1 Open the battery cover. 2 3 Insert two batteries (AAA size). Close the battery cover. Make sure to match the + and - on the batteries to the marks inside the battery compartment. OPERATING WITH THE REMOTE CONTROL Operating DVD video player with the remote control.
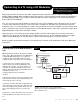
Connecting to a TV using a RF Modulator Note: Not all RF Modulators are compatible with APEX Digital players. Please see our website for recommendations. Many older televisions do not have the newer component-video, composite-video, or s-video connections that optimize DVD technology. While it would be advised to purchase a newer television in order to take full advantage of the digital quality of DVD’s, it is possible to connect an older television to a DVD player.
Continued Connecting to a TV using a RF Modulator Connection 2 Connecting the TV to the DVD through the Figure 2 Cable or Satelite Box DVD (Back) Your TV (Back) 1) Connect the three-terminal composite video cable to the back of your Apex DVD player. This cable has three prongs, one each in yellow, red, and white. The yellow prong will go into the jack labeled "Video Out"; the white prong will go into the jack labeled "Front-L"; the red prong will go into the jack labeled "Front-R".
Preparation Before Operation CONNECTIONS Before preparing this unit for operation, make sure all equipments are turned off. The unit has several types of output modes like A/V output, S-VIDEO output, digital signal output (COAXIAL). You may select as needed. CONNECTED TO A TV Be sure your TV is on the Video Input channel before you press Setup to select your settings. You will see the Setup menu on your TV screen. 1.
Preparation Before Operation CONNECTED TO AN ORDINARY AMPLIFIER • This connection is for Analog Audio only.
Preparation Before Operation CONNECT TO A RECEIVER WITH 5.
Preparation Before Operation CONNECT TO A RECEIVER WITH 5.1 CHANNEL SURROUND SOUND 1. Some discs with Dolby or MPEG AUDIO recorded 5.1 channel track. When connecting a receiver with 5.1 channel input terminal and 5.1 speaker, you can enjoy more realized sound effects at home. “5 channel” means 2 front speakers (L/R), 2 rear speakers (L/R) and a center speaker. 0.1 means bass speaker output. Even if there are no 5.1 speakers, the unit will output signals to each speaker.
What is MP3 and VCD? WHAT IS MP3? MP3 is a compression form (like zip). The name MP3 stand for Mpeg1 Audio layer 3 and its compression algorithm is based on a complicated psycho-acoustic model. This model is based on the fact that the human ear can not hear all the audio frequencies. The human hearing range is between 20Hz to 20khz and it is most sensitive between 2 to 4 kHz.
Basic Operations Continued TV/AUDIO SELECTION Press POWER on the TV and audio system. 1. Press “TV/VIDEO” on the TV, select VIDEO mode (TV). • Select S-VIDEO mode to connect to S-VIDEO (if available). TV/VIDEO 2. Select the correct audio input on the receiver. • Each receiver is different from another, please refer to the manual of the receiver. (e.g., connect the audio output of the DVD to audio input of the receiver.
Basic Operations SYSTEM SETTING According to the system of the TV to be connected, set the system of the unit to make it match the TV. 1. If the system of the TV is PAL: 2. If the system of the TV is NTSC: Press SYSTEM and select PAL. Press SYSTEM and select NTSC. SYSTEM SYSTEM 3. If the system of the TV is multisystem: Press SYSTEM and select AUTO. SYSTEM The screen shows: The screen shows: PAL The screen shows: NTSC AUTO Note: SYSTEM button works only with DVD, SUPER-VCD and VCD discs.
Basic Operations DVD MENU PLAY Some DVDs have title menus and chapter menus. Press , the screen shows the menu. Press or to see the next page, select with number buttons and direction buttons. 1. Press ROOT MENU 1. ................ 2. ................ 3. ................ 4. ................ 5. ................ . . . . 11. ............... to enter the next menu. 2. Press number buttons to select directly. Example: select track 13. +10 ROOT MENU 12. ................ 13. ................ 14. ..........
Basic Operations SELECT WITH NUMBER BUTTONS Load a disc. Press number buttons to select tracks after the unit finishes reading the disc. 1. If the track number is less than 10, just push buttons 1-10. Example: push 8 to select track 8. The screen shows: TRACK08 8 00:21 2. If the track number is over 10, press +10 once and a button among 1-10. Example: if you select track 12, press +10 once and button 2. The screen shows: +10 2 TRACK12 + 00:00 SELECT DISC 1. Press 1, the unit selects disc 1 to play.
Play Discs in Various Ways AUDIO MODE You may select a needed language from a multi-language DVD and SUPER-VCD. You may select the right channel, left channel, or stereo from a multi-channel CD or VCD. WHEN PLAYING DVD Press , the screen shows orderly: AUDIO 1/4: AC-3 2CH ENGLISH AUDIO 2/2: AC-3 2CH SPANISH Different discs differ in languages.
Play Discs in Various Ways Continued FAST PLAY When playing a disc, you may play it forward fast or reverse it fast to find what you need. WHEN PLAYING DVD 1. Press to play forward fast. Each time you press the button, the screen shows orderly: FF 2X FF 4X FF 6X FF 8X PLAY 2. Press to reverse the disc fast. Each time you press the button, the screen shows orderly: FR 2X FR 4X FR 6X FR 8X PLAY 1. Press to play forward fast.
Continued Play Discs in Various Ways REPEAT PLAY This function can be used to repeatedly play a title, chapter, track, disc or some part on a disc. WHEN PLAYING DVD You may repeat a title or chapter. 1. Repeat a chapter Press REPEAT, the screen shows: CHAPTER REPEAT REPEAT 2. Repeat a title Press REPEAT, the screen shows: TITLE REPEAT REPEAT 3. Remove “REPEAT” function Press REPEAT, the screen doesn’t show character referring to REPEAT.
Play Discs in Various Ways Continued REPEAT SOME PARTS You may press A-B to enjoy some parts repeatedly when playing a disc. WHEN PLAYING SUPER-VCD, VCD, CD 1. Set a starting point A by pressing A-B. The screen shows: A-B REPEAT A 2. Set an ending point B by pressing A-B again. Afterwards, the unit plays from point A to point B. A-B REPEAT AB A-B 3. Press REPEAT until “REPEAT AB” disappeared to cancel this function.
Continued Play Discs in Various Ways SELECT ANGLES Some discs have images with different screen angles, you may select among them. For example, when you watch a running train, you may watch it from the front, the left window or the right window without stopping it. Example: A DVD has four screen angles at your option. 1. Press to select ANGLE 1. The screen shows: ANGLE 1/4 TIME SEARCH 2. Press to select other angles, the screen shows respectively: 2/4 3/4 3.
Play Discs in Various Ways Continued WHEN PLAYING SUPER-VCD, VCD, CD To jump to a specific time, use TIME SEARCH to set the time for the desired location. Example: Play from 00:01:38 of track 6. 1. Press button 6 to select track 6. TIME SEARCH 2. Press TIME SEARCH. 3. Press button 0, 1, 3, 8 to enter the time. TIME SEARCH REMAIN The screen shows: TRACK 06 00:00 TRACK 06 GO TO _ _ : _ _ TRACK 06 GO TO 01:38 • The unit plays from 00:01:38 of track 6 after setting. • Press 0/10 to enter 0.
Continued Play Discs in Various Ways RESUME PLAY The unit can memorize the last point where it stops and resumes playback from there. 1. Press to stop playing. RESUME ZOOM 2. Press RESUME to resume playback. RESUME Notes: 1. This function can not work in SHUFFLE mode. 2. The recorded location is erased when the disc is changed or when the power is turned off. ZOOMING A PICTURE This function can be used to watch a motion or motionless picture. WHEN PLAYING DVD, SUPER-VCD, VCD 1. Press ZOOM.
Continued Play Discs in Various Ways PROGRAM PLAY You may program the tracks on a disc and play them in the programmed order. WHEN PLAYING DVD, SUPER-VCD, VCD, CD PLAY MODE 1. After the unit stops, push PLAY MODE to select. The screen shows: PLAY MODE PROGRAM P00:00 2. Press number buttons orderly according to the titles (or chapters) to be programmed. Example: Press 2, 4, 6, 8. 2 PROGRAM P01:02 8 PROGRAM P04:08 Notes: P * * : * * 3. Press to start playing. 4. Press twice to stop.
Play Discs in Various Ways Continued DIGEST PLAY This function can be used to look through the content of the track or a disc. WHEN PLAYING DVD 1. Press DIGEST after the unit stops. The screen shows: DIGEST DIGEST DIGEST The unit begins to look through the titles (or chapters), and shows the starting pictures of each title (or chapter) on the screen. 1 2 3 4 5 6 7 8 9 Each page has nine pictures and their location may be different. 2. Press or to look at the previous or next page. 3.
Continued Play Discs in Various Ways 2. Press number buttons to select a digest mode. • Press button 1 for INTRO. 1 The unit plays the first ten seconds of each track one after another. • Press button 2 for DISC DIGEST. 2 The unit shows ten starting pictures of all the tracks on the screen simultaneously. If the track number is more than 9, press Press number buttons to select a track. • Press button 3 for TRACK DIGEST. Press to view the next page. 3 to select a track.
MP3 Operations SELECT TRACKS WITH NUMBER BUTTONS 1. Load a disc according to the basic operations, the unit begins to read the disc and show the information on the screen. CHP/TRK 2. Select a track number with number buttons. • If the track number is less than 10, push number 1-10 directly. • If the track number is over 10, push +10 and another number 1-10. Example: Select track 105. CHP/TRK +10 5 + 10 times once SELECT TRACKS WITH MENU 1.
Continued MP3 Operations REPEAT PLAY You may use repeat function to enjoy some track. 1. Select tracks to play. 2. Press REPEAT until the screen shows “REPEAT ONE” The screen shows: REPEAT REPEAT ONE RESUME 3. Remove repeat function. Press REPEAT until the screen shows “CONTINUE”. CONTINUE REPEAT REPEAT RESUME PLAY 1. Press to stop playback. 2. Press RESUME to return to the original track.
Karaoke PLAY KARAOKE 1. Load a karaoke disc. 2. Set the microphone volume to the lowest level. 3. Insert the microphone into MIC 1 and MIC 2. 4. Switch on the microphone. 5. Turn knob “ECHO” to obtain the needed echo degree. 6. Press number buttons to select tracks. Note: The microphone audio output is analog and will only produce audio from the Mixed Audio section of the audio output on the back of the DVD player. 7. Remove the lyrics and begin to sing. • When playing a DVD or super-VCD, push .
Function Settings MENU SETTING According to the recorded information and external equipment, set the following functions for the player to obtain the best playing status. 1. Press SETUP to set the main menu. SETUP MENU -- MAIN PAGE GENERAL SETUP SPEAKER SETUP DOLBY DIGITAL SETUP PASSWORD SETUP PREFERENCES EXIT SETUP SETUP 2. Press and The screen shows: , then press SETUP to confirm. Example: Select “DOLBY DIGITAL SETUP” • Press to select.
Function Settings 3. Exit from menu. Press direction button and • Press • Press Continued to select the relevant exit column. and to exit from “DUAL MONO”. to select “MAIN PAGE”, press to exit from the current column and return to the main menu. The screen shows: SETUP MENU -- MAIN PAGE GENERAL SETUP SPEAKER SETUP DOLBY DIGITAL SETUP PASSWORD SETUP PREFERENCES EXIT SETUP • Press and to exit from “EXIT SETUP” then press to exit from the menu.
Function Settings Continued MENU SETTING TV DISPLAY 1. 4:3/PS: Sets the television in normal aspect. PS stands for PAN SCAN which determines if the DVD movie is in either widescreen or Fullscreen format. Most DVD movies today are recorded in Widescreen format.This is selected when the unit is connected with a normal TV. Wide-screen images are shown on the screen, but with some parts cut automatically. 2. 4:3/LB: Sets the movie in Letter Box format.
Function Settings Continued SCREEN SAVER Start the screen saver, the screen saver image appears when the unit stops or the image is freezed for a few minutes. This saver can keep the screen from being damaged. • ON: Start the screen saver. • OFF: Remove the screen saver.
Function Settings Continued SPEAKER SETUP CENTER DELAY 0 1 2 3 msec: msec: msec: msec: REAR DELAY When When When When Df=DC ~ 34 cm B~ ~ 68 cm B~ ~ 102 cm B~ 0 1 2 3 * (A) = Df - Dc Delay time (0, 1, 2, ...., 5) equal A divided 34. msec: msec: msec: msec: When When When When Df=DC ~ 34 cm B~ ~ 68 cm B~ ~ 102 cm B~ * (B) = Df - Dc Delay time (0, 1, 2, ...., 5) equal B divided 34. (A) Dc SW Df Ds SL SR (B) All speakers must be in circularly of R=Df.
Function Settings Continued DOLBY DIGITAL SETUP COMPRESSION >> LINE OUT STEREO DUAL MONO >> STEREO LEFT MONO RIGHT MONO MIXED MONO DYNAMIC RNG >> 5.1 CHANNEL OUT >> ON OFF MAIN PAGE COMPRESSION • LINE OUT: Compress input signals linearly. DUAL MONO This is the output mode of the L and R signals of the set audio output. If it is set to “MIXED MONO”, the function only works when the DVD being played is 5.1-channel.
Function Settings Continued PASSWORD SETUP The setting structure is: -- PASSWORD SETUP PAGE -PASSWORD >> CHANGE PASSWORD MODE >> ON OFF PASSWORD MODE • ON: The password works, “PREFERENCES” is dim and can not be selected. • OFF: The password is locked. “PREFERENCES” can be selected.
Function Settings Continued PREFERENCES COUNTRY/REGION >> CHINA FRANCE HONG KONG JAPAN TAIWAN GBR USA PARENTAL >> 1. KID SAFE 2. G 3. PG 4. PG 13 5. 6. PG-R 7. NC-17 DEFAULTS >> RESET SELECT LANGUAGE If a language mentioned above is recorded on the disc, you can select sounds, subtitles or disc menu language. If not, the language recorded on the disc is shown. PARENTAL When playing disc with parent lock function, you may select an age control grade according to grade of disc and your desire.
Notes on Discs HOW TO HANDLE, CLEAN, AND STORE DISCS. HANDLING DISCS • Do not touch the playback side of the disc. • Do not attach paper or tape to discs. CLEANING DISCS • Fingerprints and dust on the disc cause picture and sound deterioration. Wipe the disc from the center outward with a soft cloth. Always keep the disc clean. • If you cannot wipe off the dust with a soft cloth, wipe the disc lightly with a slightly moistened soft cloth and finish with a dry cloth.
Specifications DVD VIDEO PLAYER/OUTPUTS/SUPPLIED ACCESSORIES DVD VIDEO PLAYER Power supply 120V AC 50 or 60 Hz Power consumption 20VA Mass 3.3 kg External dimensions 430 x 81 x 300 mm (W/H/D) Signal system MULTI/NTSC/PAL Laser Semiconductor laser, wavelength 650 nm OUTPUTS Video output 1.0 V (p-p), 75 Ω, negative sync., pin jack x 1 S video output (Y) 1.0 V (p-p), 75 Ω negative sync., Mini DIN 4-pin x 1 (C) 0.286 V (p-p), 75 Ω Component video output (Y) 1.0 V (p-p), 75 Ω negative sync.
Before Calling Service Personnel Check the following guide for the possible cause of a problem before contacting service. SYMPTOMS AND CORRECTION Cause Symptom • The power plug is disconnected • Connect the power plug into the wall outlet securely. No picture • The TV is not set to receive DVD output • The video cable is not connected securely • Select the appropriate video input mode on the TV so the picture from the DVD video player appears on the TV screen.
Memo DISCS AND OUTPUT SOUNDS DVD Video Discs Sound recording system Dolby Digital MPEG 2 48kHz Linear PCM 96kHz VCD CD MP3 CD MPEG/ PCM44.
Limited Warranty DVD PLAYER 90 DAYS LABOR ONE YEAR REPLACEMENT OF PARTS WHO IS COVERED? A proof of purchase is required to receive warranty service. A sales receipt or other document showing original date of purchase is considered proof of purchase. WHAT IS COVERED? Warranty repair is one (1) year limited warranty coverage: • 90 days from original date of purchase: - Parts and labor are included under warranty repair. • After 90 days up to one (1) year from original date of purchase.