
Instruction Manual

- 12 -
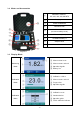
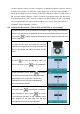
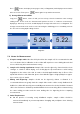
Press button, the display shows progress bar (see Diagram-6). It will display measured value
after 10 seconds. Please press button again for repeated measurement.
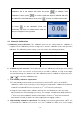
b) Average Measurement Mode
Long press button, release it until you hear a beep, then the instrument enters average
reading mode. In this mode, the instrument will perform 10 times of continuous measurement,
displaying 1 data every 8 seconds, and will display the average value at the end, see diagram 6. The
average measurement mode can be used for observing the stabilizing process of turbidity, and can
also be used for testing rapid-settling solutions.
Diagram 6
5.4 Notes for Measurement
a) Keep the sample stable: After the vial is placed into the sample cell, it is recommended to wait
for 1 to 2 minutes before calibration, as the solution will experience some shaking when the vial
moves, which may affect measurement accuracy.
b) Sample vial cleaning requirement: Sample vials must be rigorously cleaned and free from
smudges or scratches. When wiping, user should grip the cap and bottom to avoid leaving
fingerprints on the surface of the vial. Its surface should be applied with a drop of silicone oil be
wiped with a lint-free cloth. After that, please clean with filter paper or high-quality tissue paper.
See section 4.1(c) for details.
c) Mixing and Degassing: Samples should not be vigorously shaken or vibrated. It is
recommended that users gently shake the sample vial to make solution evenly distributed. Air
bubbles in solution will cause big error to turbidity measurement. So, the vial should be left stand
still for 2 to 5 minutes to eliminate potential air bubbles before measuring. We recommend using
the same mixing procedure and the same waiting time for degassing before comparing
measurements.
d) Other Requirements
⚫ On the premise of ensuring evenly distributed samples, sample solution should be
measured immediately to prevent temperature changing and precipitates from affecting
measurements.