MP511 pH/mV Benchtop Meter Instruction Manual APERA INSTRUMENTS (Europe) GmbH www.aperainst.
v4.1 Contents 1 Brief Introduction ............................................................................................................ - 3 - 2 Technical Specifications.................................................................................................... - 4 - 2.1 2.2 Technical Parameters............................................................................................................ - 4 Other Technical Parameters .......................................................
1 Brief Introduction Thanks for purchasing APERA INSTRUMENTS MP511 pH/mV Benchtop Meter (referred to “meter” as below). Before using this meter, please read this instruction manual cafrefully in order to properly use and maintain it. Features This meter has an outstanding combination of advanced electronic technology, sensor technology and software design. It is suitable for laboratory use to measure pH and ORP value of regular water solutions.
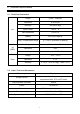
2 Technical Specifications 2.1 Technical Parameters pH Range (-2.00 – 19.99) pH Resolution 0.1/0.01 pH Accuracy ±0.01pH±1 digit Input Current ≤2×10-12 A Input Impedance ≥1×10¹² Ω Stability ±0.01 pH±1 digit/3h Temp. Compensation Range (0 – 100)˚C (Automatic or Manual) Range -1999mV – 0 – 1999mV Resolution 1mV Accuracy ±0.1% FS Range -10˚C – 110˚C Resolution 0.1˚C Accuracy 5 – 60˚C:±0.5˚C±1 digit Other:±1˚C mV (ORP) Temp. 2.
3 Complete Kit 3.1. MP511 pH/mV/Temp Meter 1 unit 3.2. 602 flexible electrode holder 1 pc 3.3. 201T-F pH/ATC three-in-one combination electrode 1 pc 3.4. pH standard buffer solution(pH 4.00, 7.00, 10.01/50ml) 1 set 3.5. 9V power adapter 1 pc 3.6. RS232 data communication cable 1 pc 3.7. MP500 PC-Link software 1 pc 3.8. Operation manual 1 pc 3.9. Quick manual 1 pc 4 The Meter 4.
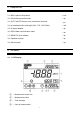
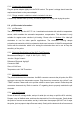
⑤ — Temperature compensation icon: ATC — automatic temperature compensation; MTC — manual temperature compensation ⑥ — Serial number and icon of data storage and recall M+ — icon for measurement storage; RM — icon for reading recalls; Numbers on the left is serial number. ⑦ — emperature measurement and unit ⑧ — RS232 communication icon When this icon appears, the meter has been connected to a computer or laptop.
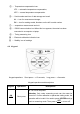
CAL Short press Short press MODE Long Press ⚫ The meter will go to calibration mode. Short pressing again starts calibration. ⚫ To select the parameters: → ⚫ Enter into parameter setting mode P1. Once in this mode, short press to enter P2, P3,P4 and so on. ⚫ In pH measuring mode: press the button to change the UNIT Short press resolution repeatedly: 0.01→0.
4.3.2 Recall measuring information: (a) In measurement mode, long press < M+/RM > key, the meter will recall the previous stored information. The storage serial number, RM icon and the complete measuring information will appear on the lower right corner of the LCD screen; measuring time and date will be displayed on the upper right corner. Then press < ▼ > or < ▲ > key and the measured information will be recalled accordingly.
5.1.2 Connect the power adapter Plug the power adapter tightly into the DC9V socket. The power’s voltage should meet the requirements listed on the power adapter. 5.1.3 Things needed in addition to what’s included in the box A clean cup, distilled water (8-16oz), and tissue papers for rinsing and drying the probe. 5.2 pH Electrode Information 5.2.
after it’s dipped into the test solution and then let it stand still. Wait for the stable measurement (a smiley face appears and stays) and then record the readings. When test is finished, place the electrode in the storage bottle and tighten the cap in order to keep the sensitivity of the pH sensor. 5.3 Calibration: 5.3.1. Switch in power, press < ON > key to turn on. OFF 5.3.2. Short press < MODE > key to switch to mode. 5.3.3.
icon for one-point calibration will appear on the lower left corner of the LCD. When the measuring accuracy is ≤±0.1pH, choose one kind of buffer solution according to the measuring range and then proceed with one-point calibration. (b) When the 2nd calibration finishes, press < ENTER > key to confirm 2 points calibration and enter into measuring mode. Icons or for 2 points calibration will appear on the lower left corner of the LCD. If measurement is within acid range, you can choose pH4.00 and pH7.
2) When testing purified water like spring water or drinking water, it will take longer for the readings to get stabilized (typically 3-5 minutes) because there is very few ions left to be detected by the sensor in those purified water. 3) Purified water such as distilled water and deionized water are recommended for only rinsing the probe for the best result. Never store the electrode in distilled or deionized water, for it could cause permanent damage to the electrode.
5.5.3. Time setting for timing measurement (P2) (a) Short press key in mode P2 to enter into mode P3. See picture (4-3) (b) Press < UNIT > key, the “ ” will move to the right and flash. Press <▲> or <▼> key to change when the number is flashing. (c) Press < MODE > key to enter into next parameter setting or press < ENTER > key to conform and return to measuring mode. (d) Factory setting is 0 second.
5.5.6. Time setting (P5) (a) Short press key in mode P4 to enter into mode P5, see picture (4-6) (b) Press < UNIT > key, the number will move rightward and flash,press < ▲ > or < ▼ > key to alter the number. (c) Press < MODE > key to enter into next parameter setting or press < ENTER > key to conform and return to measuring mode. 5.5.7.
reliable. Buffer solution should be changed after 10-15 times of calibrating. 6) Keep the meter clean and dry; especially the electrode and the socket of the electrode. Failure to do so may lead to an inaccurate measurement or invalidity. Clean stains with medical cotton and absolute alcohol and blow-dry afterwards. 7) The sensitive glass bulb in front of the combination electrode should not come in contact with hard surfaces (they might get broken).
6 mV and ORP Measurement 6.1 Sample Test ON > to turn on the meter, press < MODE > to switch to OFF < UNIT > key to choose or ; 6.1.1. Press < (a) , then press — This is the electrode potential measuring mode. mV value and the temperature will be displayed at the same time; (b) — This is the ORP (redox) measurement mode.
6.3 Parameter Setting 6.3.1. mV and ORP measurement parameter setting (chart (5-1)) Chart(5-1) Mode Contents Code P1 Time set for timing measuring 0 to 99min P2 Restore to factory setting OFF-On 6.3.2. Time set for timing measuring (P1): 6.3.3. Restore to factory setting (P2): 7 Parameters Please refer to 6.5.6. Please refer to 6.5.7 RS232 Communication 7.1 System requirements This meter uses “MP500 PC-Link” communication software for RS232 communication.
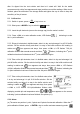
② — Measurements and time curve ③ — Stored value display area ④ — Keys Clear — Press the key to clear data Export — Press this key to export the stored value to Microsoft Excel file Exit — Press this key, PC-Link program exits from the computer interface Select CommID — Press the key to download the data from the meter and upload it to PC ⑤ — Parameters setting:Standard of the buffer solution, time setting etc. ⑥ — Measurements display screen 7.
When the meter is connected with PC and icon appears on the LCD screen, the data stored in the meter will be automatically uploaded to the PC. This program will sort the pH and mV measurement and show the data in category. 7.5.2. Storage during operation When the program is running, press key to store data. All the measurement value will be uploaded to the PC through RS 232 and will not be stored in the meter. Storage data during operation will be the same with which displays on the meter.
9 Warranty We warrant this instrument to be free from defects in material and workmanship and agree to repair or replace free of charge, at option of APERA INSTRUMENTS(Europe) GmbH, any malfunctioned or damaged product attributable to responsibility of APERA INSTRUMENTS(Europe) GmbH for a period of TWO YEARS (SIX MONTHS for the probe) from the delivery.