
Instruction Manual

6. Notes
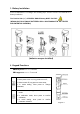
6.1 If it’s first time use or the tester hasn’t been used for a long time, we recommend soaking
the probe in 12.88 mS/cm solution for 15-30 minutes to restore its sensitivity and speed up
the response time.
6.2 The tester adopts 1413 µS and 12.88 mS standard calibration solutions. Users can use
1–2-point calibrations as needed. For most circumstances, calibrating in 1413 µS to
complete 1
st
point calibration will meet testing requirements.
6.3 Unit Information: 1 mS/cm = 1000 µS/cm
Once the readings are greater than 2000µS/cm, the unit will automatically become mS/cm.
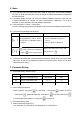
6.4 The tester has self-diagnosis functions:
Symbol
Self-Diagnosis information
How to fix
Wrong calibration solution, which
exceeds the recognizable range of
the meter.
1. Check if calibration solution is
correct
2. Check if probe is damaged.
is pushed before measurement
is stable ( comes up and stays)
Wait for the smile icon to stay, and
then short press
6.5 The tester has already been calibrated after manufacture. Usually, users can use the tester
right away, or test it in the calibration solutions to test its accuracy. When error is large,
calibrate it before using.
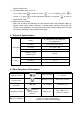
7. Parameter Setting
7.1 Parameter setting reference chart:
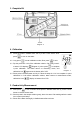
7.2 How to setup parameters:
When turned off, long press to enter setup → short press to switch P1-P2-P3
→ Short press , parameter flickering→short press to choose, short press
to confirm parameter selection→Long press to switch off.
7.3 Parameter setting notes
a) Select conductivity ranges (P1):
Aut-- All ranges: 0~199.9 µS/cm, 20~1999 µS/cm, 2.0~20.0mS/cm;
Symbol
Parameter Setting content
Code
Factory Default
P1
Select conductivity ranges
Aut-µS-mS
Aut
P2
Select Temperature Unit
°C - °F
°C
P3
Restore to factory default
No – Yes
No