Premium Series PH60 pH Tester User Manual APERA INSTRUMENTS, LLC aperainst.com v7.
Thank you for purchasing Apera Instruments PH60 Premium pH Tester. Please read this manual before use in order to properly use and maintain the product. For video tutorials, please go to support.aperainst.com TABLE OF CONTENTS 1 WHAT’S IN THE KIT ................................................................................................................................................3 2 KEYPAD FUNCTIONS ................................................................................................
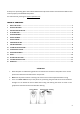
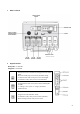
1 What’s in the Kit Calibration Vials 2 Keypad Functions Short press: < 2 seconds Long press: > 2 seconds 1. Short press to turn on the tester and long press to turn off the tester. 2. When turned off, long press to enter parameter setting. 3. In measurement mode, short press to turn on backlight. 4. In calibration mode, short press to cancel calibration. 1. In measurement mode, short press to switch between pH and mV. 2. In settings, short press to change parameters (Unidirectional). 1.
3 Preparation Before Use 3.1 3.2 Pull out the battery insulation slip, and take off the probe cap. Rinse off the probe in pure water (preferably distilled or deionized water. RO water or tap water is the alternative) , then shake off excess water. 3.3 Perform at least a 2-point calibration at pH 7.00 and pH 4.00. For tutorial, refer to Section 5. 3.
4.1.6 To calibrate 2nd point, use 4.00 pH buffer and repeat Step 5.1.3 to 5.1.5 (Do NOT turn off the tester after you finish pH 7 calibration). will display next to , indicating a successful 2-point calibration (low and middle points). 4.1.7 If necessary (target pH>8.00), calibrate 3rd point using 10.01 standard pH buffer and repeat Step 5.1.3 to 5.1.5, will show up next to and , indicating a successful 3-point calibration (high, low, and middle points). 4.
5 5.1 pH Measurement How to take pH measurements Short press to power on the tester. Rinse the probe in pure water, shake off excess water. Dip the probe in your sample solution and make a quick stir, then hold still. Record the reading after it is stabilized ( appears and stays on the screen). 5.2 Pure Water pH Measurement When testing pure water like tap water, drinking water, RO water and distilled water, it will take longer for the readings to get fully stabilized (typically 1-5 minutes).
8 Parameter Setting 8.1 Setup Menu Symbol Contents P1 Select pH buffer solution P2 Low value measurement alarm setting 0 to 14.00pH 0 P3 High value measurement alarm setting 0 to 14.00pH 14.00 P4 Select automatic lock P5 Select backlight Off - 1 - On 1 P6 Select temperature unit ℃-℉ ℉ P7 Restore to factory default No – Yes No 8.
.3.3 Automatic Lock (P4) Select “On” to activate auto lock function. When reading is stable for more than 10 seconds, the tester will lock the value automatically, and HOLD icon will display on LCD. Short press 8.3.4 key again to cancel the lock. Backlight (P5) “Off”-turn off backlight, “On”-always turn on backlight, “1”- backlight will last for 1 minute. 8.3.5 Temperature Unit (P6) Select between C˚ and F˚. 8.3.
11 Other Specifications Screen 3-color LCD screen, Blue: Measurement; Green: Calibration; Red: Alarm Reading Lock HOLD Low-Voltage Warning flashing, reminder of battery replacement needed Auto. Power-Off In 8 minutes without operation Waterproof Rating IP67 Power DC3V, AAA alkaline batteries×4 Battery Life Operation up to 2000 hours Dimension& weight Tester: 40×40×178mm/133g; Case: 255×210×50mm/700g; 12 Probe Replacement 12.
13 Notes a) Avoid testing in very high (>113°F) or very low (<41°F) temperature solutions as it will cause greater measurement error and potential damage to the probe. Test your samples and perform calibration close to room temperature as much as possible. b) NEVER store the probe in pure water like tap, RO, distilled, or deionized water as they could damage the pH probe. If this happens, immediately soak the pH probe Apera 3M KCL soaking solution overnight, then re-calibrate it before using.
15 Troubleshooting Guide Trouble Reason Pressing too soon (showing ) Cannot calibrate Poor quality standard solutions (showing ) Replace with fresh and clean standard calibration solutions made by legitimate scientific instrument manufacturers. Contaminated probe (showing ) Use a soft brush to clean the probe with Apera probe cleaning solution or detergent water. Aged probe (showing ) Replace the probe. Dried-out probe (showing ) Soak in Apera 3M KCL soaking solution for at least 30 minutes.
Warranty 16 We warrant this instrument to be free from defects in material and workmanship and agree to repair or replace free of charge, at option of APERA INSTRUMENTS, LLC, any malfunctioned or damaged product attributable to responsibility of APERA INSTRUMENTS, LLC for a period of TWO YEARS (SIX MONTHS for the probe) from the delivery.