PH20 Value pH Tester Instruction Manual APERA INSTRUMENTS, LLC www.aperainst.com v 3.
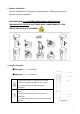
1. Battery Installation Please install batteries according to the following steps. *Please note the correct direction of battery installation: The Positive Side (“+”) OF EVERY SINGLE Battery MUST FACE UP. (WRONG INSTALLATION OF BATTERIES WILL CAUSE DAMAGE TO THE TESTER AND POTENTIAL HAZARDS!) 2. Keypad Functions ■Short press------- < 2 seconds ■Long press-------- > 2 seconds 1.
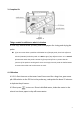
. Complete Kit Diagram - 2 Things needed in addition to what’s in the box A clean cup, distilled water (8-16oz), and tissue papers for rinsing and drying the probe. n If you see some white crystalline solid leaked out of the pH probe, that’s the reference solution (3M KCL) inside the probe. It is NOT a sign of any defective issue. It is a normal phenomenon when the probe is stored dry for a period of time. It proves that the junction of the probe is working well.
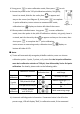
.3 Long press to enter calibration mode; Short press to exit. 4.4 Insert the probe in the 7.00 pH calibration solution; Stir gently; leave it to stand; Wait for the smiley face to appear and stay on the screen (see Diagram 3); short press to complete 1st point calibration, tester returns to measurement mode; calibration icon displays on button left side of the screen. 4.5 Rinse probe in distilled water. Long press Diagram - 3 to enter calibration mode; insert the probe in the pH 4.
value hasn`t been stable, i.e. has not been staying on LCD, pressing will cause LCD to display “Er2”. 5. Measurement 5.1 Short press to turn on the tester. Rinse probe in distilled water, shake the meter in the air and dap it with tissue paper to remove excess water. 5.2 Stir probe in sample solution gently, leave it to stand. Get readings after comes up and stays. ■ Notes n After each test, users should rinse the pH probe thoroughly with distilled water or purified water.
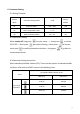
. Parameter Setting 6.1 Setting Schedule Prompt Factory Parameter Setting Items Code P1 Select pH buffer USA – NIST USA P2 Select Temperature Unit ˚F – ˚C / P3 Back to Factory Default No – Yes No Mark Default 6.2 Parameter Setting When turned off, long press P1-P2-P3→ Short press short press to enter setup → short press , parameter flashing→short press to confirm parameter selection→Long press to switch to choose, to go back to measurement mode. 6.
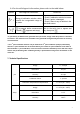
6.4 For the self-diagnosis information, please refer to the table below: Symbol Self-Diagnosis information How to fix 1. Check if calibration solution is correct Wrong pH calibration solution, which 2. Check if probe is damaged. exceeds the recognizable range of 3. Check if there is any air bubble in the the meter.
. Tester Functions 8.1 Calibration points indication: 8.2 Stable Measurement: appears and stays on the screen 8.3 Self-Diagnostic information: Er1, Er2 8.4 Low-Voltage warning: flashes, reminder of battery replacement 8.5 Auto Power-Off in 8 minutes if no operation. Go to support.aperainst.com to find tutorial videos and FAQ articles, or submit a ticket if you have any questions regarding the using meter. 9.