
Installation Guide

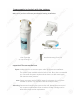
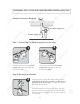


Option: With the appropriate nails or hanger, mount the
system to the wall. Make sure to mount the system close
enough to connect to both the cold water valve and
connector to the faucet. Leave minimum 6 inch of space
underneath the filter for filter change.
4
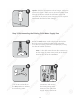
Step 3: Disconnecting the Existing Cold Water Supply Line
Locate the Cold water supply valve under the kitchen
sink (the round or oblong handle on the right side).
Turn off the incoming cold water completely by turning
the shut off handle clockwise.
Note: If the cold water shut off valve cannot turn
off the water, the main water supply to the house
must be shut off for the installation.
5
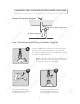
Turn the faucet handle to
the ON position to release
the remaining water.
Disconnect and remove
the existing fittings and
hose from the cold water
supply valve to the faucet.
6
7
4
O
ption: With the appropriate nails or hanger, mount the
s
ystem to the wall. Make sure to mount the system close
e
nough to connect to both the cold water valve and
c
onnector to the
f
aucet. Leave minimum 6 inch o
f
space
underneath the
f
ilter
f
or
f
ilter change.
4
Step 3: Disconnecting the Existing Cold Water Supply Lin
e
L
o
c
ate the
Co
l
d
water supply valve under the kitchen
s
ink (the round or oblong handle on the right side).
Turn o
ff
the incoming cold water completely by turning
the shut o
ff
handle clockwise.
N
ote
:
I
f
the cold water shut o
ff
valve cannot turn
off
the water, the main water supply to the house
m
us
t
be
s
h
u
t
off
fo
r th
e
in
s
t
a
ll
a
ti
o
n.
5
Turn the
f
au
c
et handle to
th
e
ON
position to release
the remaining water.
D
isconnect and remove
the existing
f
ittings and
ho
se
f
ro
m
th
e
co
ld
w
at
er
s
upply valve to the
f
aucet.
6
7