
Installation Guide


1st Line
IN
2nd Line
OUT
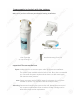
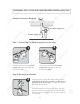
INSTALLING THE SYSTEM WITH NEW PROVIDED WATER SUPPLY LINE
Connect one end of the 1st water
supply line to the side of the cap
that indicate “IN”.
Connect one end of the 2nd water
supply line to the side of the cap
that indicate “OUT”.
Step 1: Connecting The Water Supply Line to the Cap
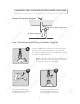
Sample Connection Diagram
2nd Water Supply Line
1st Water Supply Line
1
2
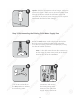
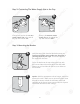
Step 2: Mounting the Bracket
Hold the system with the filter label side facing you.
Look on top of the cap to make sure the arrow is
pointing towards your right. That arrow indicates
the water flow direction.
Screw the bracket to the top of the system cap with
the front end facing the same side as the filter label.
Please use the front holes for the two screw holes on
the backside.
3
6”
OUTIN
3
1st Water Supply Line
1st Li
ne
IN
2nd Line
OU
T
Conne
c
t one end o
f
the
1
st water
supply lin
e
to the side o
f
the cap
that indi
c
ate “I
N
”.
Conne
c
t one end o
f
the 2nd water
supply lin
e
to the side o
f
the cap
that indi
c
ate “
OU
T
”
.
Step 1: Connecting The Water Supply Line to the Ca
p
Sample Connection Diagra
m
2nd Water Supply Lin
e
1
1
2
IN
S
TALLIN
G
THE
S
Y
S
TEM WITH NEW PR
O
VIDED WATER
SU
PPLY LIN
E
Step 2: Mounting the Bracke
t
H
old the system with the
f
ilter label side
f
acing you.
Look on to
p
o
f
the c
ap
to make sure the arrow is
pointing towards your right. That arrow indicates
the water
f
low direction.
Screw the bracket to the top o
f
the system cap with
the
f
ront end
f
acing the same side as the
f
ilter label.
P
lease use the
f
ront holes
f
or the two screw holes on
th
e
ba
c
k
si
de
.
3
6
”
O
U
T
I
N
1st Water Su
pp
y
Line
s
t Water Su
pp
l
y
Lin
e