
Instructions / Assembly


34
OTHER INFORMATION
AirGap Faucet Installation (Optional)
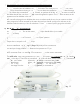
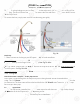
There are 3 colored tubings on your Air-Gap faucet. At the end of each 1/4” tubing there is a “Quick Con-
nect” fitting. The Quick Connect fittings is used to connect the Pure and Drain water line from the RO unit to
the Air Gap Faucet.
To connect the lines, simply insert each line into the fitting port tightly.
Hook-Up:
1. Please connect each tubing to your RO system and drain outlet as follows:
Blue 1/4” tubing: Connect the 1/4” Blue line from the Air-Gap faucet to the RO’s 1/4” Output CLEAR Line
(which is hooked up to the Stage-5 filter output port). See Fig.19 & 20
Red 1/4” tubing: Connect the 1/4” Red line from the Air-Gap faucet to the RO’s 1/4” BLACK Drain Line on
your RO system. See Fig.19 & 20
Black 3/8” tubing: Connect the 3/8” Black line on the Air-Gap faucet to the new 3/8” Drain Saddle pro-
vided. See Fig.20
How drain water is disposed via Air-Gap faucet:
Drain water is routed through the Air-Gap faucet prior to being drained off into the standard drainpipe
outlet. The 1/4” BLACK drain water line from the RO system will discharge through the 1/4” RED line to the
Air-Gap faucet. The drain water will then flow back down the 3/8” BLACK drain water line of the Air-Gap
faucet to your drain pipe.
Pure water output flow:
After the Air Gap faucet is installed, the RO pure water output line will flow from the Stage-5 filter, through
the BLUE line of the Air-Gap faucet, to the dispensing faucet.
* * * End AirGap Faucet Installation * * *
Fig. 19
Fig. 20
34
O
THER I
N
N
F
F
OO
R
R
M
M
ATI
O
N
A
irG
ap
Fau
ce
ce
t
t
InIn
st
st
al
al
lation
(
Op
tional
)
Th
er
r
e
e
ar
ar
e
e
3 colored tubings on your Air-Gap
fa
fa
u
uc
et
. At the end o
f
each 1/4” tu
bibi
ngng
tt
he
he
re is a “Quick Con-
nene
ctct
”
”
fi
fi
tting. The Quick Connect
f
itti
ng
g
s s
is
is
uu
se
se
d
d
to connect the Pure and Drain
wa
wa
tete
r
r
li
li
n
ne
f
rom the RO unit to
th
th
e
A
Ai
r Gap Faucet.
To connect the lines, simply insert each line into the
f
itting port tightly.
Hook-Up:
1. Please connect each tubin
g
to
y
our RO s
ys
tem
an
n
d
d
drdr
ai
ai
n outlet as
f
ollows
:
Blue
1
1
/4
/4
”
”
tu
tu
bing: Connect the 1/4”
/
/
g
Bl
ue
line
fr
fr
om
om
t
t
he Air-Gap faucet to the RO’s
1/
/
4”
4
O
O
u
ut
put CLEAR Line
p
(w
w
hi
hi
chch
i
i
s s
h
ho
oked up to the Stage-5
f
ilter
ou
u
tp
tp
ut
ut
p
p
or
t). See Fig.19 & 2
0
ReRe
d
d
1/4” tubing: Connect the 1/4”
/
g
Re
e
d
d
l
l
inin
e
e
from the Air-Gap faucet to the
R
R
O’O’
s
s
1/
1/
4” BLACK Drain Line on
y
yo
ur RO system. Se
e
F
i
g.19 & 2
0
Black 3/8” tubing: Con
ne
e
ct
ct
t
t
he
he
3
3
/8
/8
”
/
g
Bl
ack
line on the Air-Gap f
au
u
ce
ce
t
t
toto
t
t
he new 3/8” Drain Saddle pro-
k
vi
ded.
S
ee
F
i
g.2
0
How drain water is dispose
d
d
via Air-Gap
f
aucet:
D
rain water is routed through the Air-Gap
f
aucet prior to being drained o
ff
into the standard drai
npnp
ipip
e
e
o
utlet. The 1/4” BL
ACK
drain water line from the RO system will discharge through the 1/4”
K
RE
E
DD
l
l
inin
e
t
o
th
e
Air-Gap
f
aucet. The drain water will then
f
low back down the 3/8” BL
AC
K
drain water line
of
of
t
t
hehe
A
A
ir
-Gap
K
f
aucet to your drain pipe.
Pu
re
e
ww
at
at
er
e
output
f
low:
Af
f
te
te
r
r
thth
e
e
Air Gap
f
aucet is installed, the
R
R
OO
pupu
r
re
water output line will
f
low
f
rom
th
th
e
e
St
St
age-5
f
ilter, through
th
th
e
e
BL
BL
UE
line o
f
the Air-Gap
f
aucet, t
o
o
th
th
e
e
di
d
spensing
f
aucet.
*
*
*
*
*
End AirGap Faucet Installation * *
*
*
F
i
g. 1
9
F
i
g. 2
0