
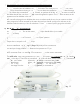
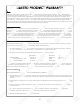
Instructions / Assembly


28
2) No Water at Dispensing Faucet
- Water supply is off —> Turn on the water supply, or open Needle Valve ( turn needle handle
counter clockwise)
- Tank’s valve is closed —> Turn tank valve to an “Open” position
- Output line is crimped —> Remove crimp
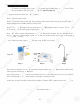
- Incorrect installation —> See Fig.11 (Page 13). Verify all line connections.
- Low tank pre-charge pressure —> Raise tank air pressure to 5-7 psi.
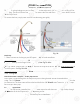
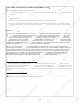
- ASO connection Error —> See Fig. 17 to reconnect ASO to the correct connection.
The ASO valve has 4 lines connected to it, 2 Whites and 2 Clears. C1 is labeled IN and C2 is labeled
OUT on the valve. C3 and C4 are connected to the ends with the 4 screws. Please confirm connections:
Stage 2 Carbon: White tubing (point B) is connected to C1 (IN)
Membrane: White tubing (point D) is connected to C2 (OUT)
Check Valve: Clear tubing (point E) is connected to C3
4th stage Tee inlet: Clear tubing (point F) is connected to C4
1) Air Bubbles: Lots of Air bubbles in cup or bottle when filling
It is quite normal to see air bubbles in a cup of pure water. This mainly occurs when a RO unit is first
installed or when filters are being replaced. When new filters are installed to the unit, the filter housings
are dry. When they are attached onto the RO head, air pockets will fill the housing. As water is turned on
and flows through the unit, the air pockets move throughout the system. This can have an effect on the
appearance of air bubbles in the water.
RO units will self purge the air bubbles that can accumulate inside the unit. As you continue to draw
water, trapped air will be removed by the water flow and you should quickly see a reduction in the
bubbles inside the water cup. You can also drain 1-2 tanks of water to quickly purge the air bubbles.
Fig. 17
Stage 1
Stage 2
Stage 3
Stage 4
28
2
)
N
o
W
ater
a
a
t
DiDi
sp
sp
ensing Fauce
t
pg
-
W
ater
s
s
upup
plpl
y
y
is off
W
—
>
Turn on the water s
up
p
pl
pl
y,y,
o
o
r open Needle Valve ( turn needle
ha
ha
ndnd
lele
c
o
un
n
te
e
r
r
clcl
ockwis
e)
-
T
T
an
k’
’
s valve is closed
T
T
—
>
Turn tank
v
v
al
al
veve
t
t
o
o
an “Open” position
-
Output line is crimped —
>
R
em
m
ovov
e e
crim
p
-
I
n
co
rr
ec
t in
st
allati
on
—>
—>
S
S
eeee
FiFi
g.11
(
Page 13
)
. Veri
f
y all line connection
s.
-
L
o
w tank pre-charge pressure —> Raise tank air pressure to 5-7 psi.
-
A
SO connection Erro
r
—>
See
F
i
g.
17 to reconnect
A
A
SO
SO
to the correct connection.
Th
e
A
SO valv
e
has 4 lines connected to it, 2
Wh
h
itit
es
es
aa
nd
nd
2 Clears. C1 is labeled
IN
a
nd
nd
C
C
2
2
is
i
l
abe
l
ed
OU
T
T
o
o
n the valve. C3 and C4 are connected
t
t
o
o
th
th
e
e
ends with the 4 screws. Please c
on
on
fi
fi
rm
rm
connections
:
StSt
a
ag
e
2
Carbon: Whi
te
tubi
ng
ng
(p(p
o
oi
nt B
)
is connected to
C
1
(
IN
)
M
embrane: Whi
te
tu
u
bi
bi
ngng
(p
(
oint D
)
is connected to
C
2
(
OU
U
T)
T
Ch
ec
k
Va
lv
e:
Cl
ea
r
r
tu
tu
bi
bi
ng
n
(
point E
)
i
s
co
nn
ec
te
d
to
C3
4
t
h
s
tag
e
T
ee
i
nl
e
t:
C
le
e
arar
tutu
b
bi
ng
(
point F
)
is connected to
C4
4
1) Air Bu
bb
bb
lele
s:
s:
Lots of Air bubbles in cup or
b
b
ot
ot
tltl
e e
wh
en filling
p
g
I
t
i
i
s
s
qu
qu
it
it
e
e
normal to see air bubbles in a c
up
up
oo
f
f
pu
re water. This mainl
y
occurs
w
w
he
n
a
a
RO
RO
unit is
f
irst
in
in
st
al
al
led or when
f
ilters are being re
pl
p
ac
ed
d
.
Wh
Wh
en new
f
ilters are installed to
thth
e
e
unun
it
i
,
t
th
e
f
ilter housings
arar
e
e
dry. When they are attached
on
n
toto
t
t
he
he
R
R
O
O
head, air pockets will
f
ill the
ho
o
usus
inin
g.g.
A
s water is turned on
and
f
lows through the unit, the ai
r
popo
ckck
etet
s
s
move throughout the system. This c
an
an
h
h
ave an e
ff
ect on the
appearance o
f
air bubbles in the w
at
at
er
er
.
R
O units will sel
f
purge the air bubbles that can accumulate inside the unit. As you continue to draw
water, trapped air will be removed by the water
f
low and you should quickly see a reduction in the
bubbles inside the water cup. You can also drain 1-2 tan
ks
s
o
o
f
water to quickly purge the air bubbl
es
s
.
Fi
g. 17
F
St
St
age
1
Stage 2
St
ag
e 3
Stage 4