
Instructions / Assembly


18
3. Wait for tank to fill: Before usage, allow the tank to fill. Tank normally takes 2-3 hours to fill.
When the tank is filled, the RO will shut off automatically.
4. Drain Tank: Please do not use the first tank of water. Once the tank has filled, open
the drinking water faucet to drain the tank and filters. It will usually take
about 5 minutes to flush the unit. When the tank is completely empty water will
simply trickle out the faucet. At this time, please close the drinking faucet and allow
the unit another 2-3 hours to refill the tank. The 2nd tank of water will be ready for
use.
Please Note: Water may come out dark for the first few seconds on the initial
flush, and then clear right up. This is due to the GAC (granular activated carbon)
post filter.
5. Clean up area: Allow the system to run while cleaning up tools and work area.
6. Check for leaks! Make sure no leaking at joints, fittings, valves, and tubing connections.
Congratulations! You have successfully installed the Reverse Osmosis System!
* * * End Installation Section * * *
Step 7: System Start-Up
1. Turn on feed water: Slowly, turn on your Cold water supply. Open the Needle Valve (turn counter-
clockwise) to allow the raw water to enter the system. Check for leaks!
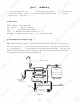
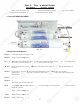
2. Open tank valve: Open the tank’s ball valve to allow water to enter the tank. The tank’s valve is
“On” when the valve handle is parallel (in the same direction) with the valve’s outlet (see Fig. 12
Page 15). Check for leaks!
Tips!
If Point X leaks after you have tightened the brass nut, check to make sure you did put
the plastic “insert” into the tubing. If the insert is already in place, then try applying Teflon
tape from the threaded metal stud all the way to the plastic tubing, wrap the whole connec-
tion with 8-10 rounds of Teflon tape. Smooth out the tape on the threaded part with your
fingers. Tighten brass nut again. This should stop the leak.
If the plastic sleeve is damaged, you can use the metal sleeve, but you need to apply
Teflon tape as described above, this should stop the leak.
If Point Y (tank ball valve) leaks, please make sure there was 6-8 wraps of Teflon tape
applied onto the tank metal stem before screwing on tank ball valve.
1
8
3
.
W
ait for tank to fill:
W
W
Be
e
fofo
rere
uu
s
sa
ge, allow the tank to
f
ill. Tank normally takes 2-
3
h
ou
r
s
t
o
f
ill.
When the tank is
f
illed, t
he
R
R
O will shut o
ff
automatically.
4
. Dr
ai
n
T
ank:
T
T
Please do not use the first ta
nk
k
o
o
f
f
w
wa
ter
. Once the tank has fill
ed
d
,
,
opop
en
en
,
p
rr
the drinking water faucet
to
o
d
d
ra
ra
in
in
the tank and filters.
g
It will u
su
u
alal
ly
ly
t
t
a
ak
e
about 5 minutes to
f
lush t
he
e
u
u
ni
ni
t.
t.
W
W
hen the tank is completely emp
ty
ty
w
w
at
at
er will
s
i
mp
ly
trickle out the
f
au
ce
ce
t.
t.
A
A
t
t
this time,
p
lease close the drinki
ng
n
f
f
au
au
cet and allow
the unit another 2-3
h
h
ouou
rs
rs
t
t
o re
f
ill the tank. The 2nd tank o
f
w
w
a
at
er
er
w
ill be ready
f
o
r
use
.
Please Not
e:
e:
WW
at
at
e
er
may come out dark for the first
f
f
ew
ew
ss
e
ec
onds on the initial
W
W
f
lush, and
t
t
he
he
n
n
cl
c
ear ri
gh
t
up
. This is due to t
he
he
G
G
AC
AC
(
(
gr
anular activated carbo
n)
po
st
t
f
f
il
il
te
te
r.
r.
5
.
C
lean up area: Al
lo
w
w
thth
ee
s
sy
stem to run while cleaning up tools and work area.
6
.
C
h
ec
k
fo
r l
ea
k
s!
Make sure no leaki
ng
at
j
oints,
f
itti
ng
s, valves, and tubin
g
connections.
C
ongratulations! You have succes
sf
sf
ul
ul
ly installed the Reverse Osmosis S
ys
s
te
te
m!m!
* * *
EnEn
d
d
I
In
stallation Section * *
*
Step 7: S
ys
ys
tete
m
m
Start-U
p
1
.
T
ur
ur
n
on
on
feed water:
T
T
Slow
ly
, turn on
yo
ur
C
C
ol
ol
dd
water su
pp
ly
.
Op
en the Needl
e
Va
V
lv
e
e
(t
(t
urn
cou
n
te
r
-
cl
cl
oc
c
kw
k
is
e
)
to allow the raw water to enter
th
th
e
e
system.
Ch
ec
k
fo
r
le
ak
s!
2.
2
O
Op
en tank valve:
Open the tan
k
k
’s’s
b
b
alal
l
l
va
v
lve to allow water to enter the ta
nk
k
.
Th
Th
e tank’s valve is
“
O
n” when the valve handle is par
al
al
le
le
l
l
(i
n the same direction) with the valve’s outlet (see F
i
g. 12
Pa
ge
1
5
).
C
h
ec
k
fo
r l
ea
k
s!
T
i
ps!
If
P
o
int X l
ea
k
s
a
f
ter you have tightened the brass nut, check to make sure you did put
the plastic “in
se
r
t”
into the tubing. I
f
the ins
er
er
t
t
is already in place, then try applying
T
ef
ef
lo
lo
n
n
ta
pe
pe
f
rom the threaded metal stud all the
wa
wa
y
y
to
to
the
p
lastic tubin
g,
wra
p
the whole
coco
nn
nn
ec-
ti
i
on
on
w
w
it
i
h 8-10 rounds o
f
Te
f
lon tape.
Sm
Sm
oooo
thth
out the tape on the threaded pa
rt
w
w
it
it
h
h
y
yo
u
r
fifi
ng
ng
ers. Tighten brass nut again. Th
is
s
s
s
hoho
ulul
d
d
stop the leak.
If
the plastic sleeve is damag
ed
d
,
,
yo
yo
u
u
can use the metal sleeve, but you
nene
eded
t
t
o apply
Te
f
lon tape as described a
bo
bo
ve
,
,
th
h
is should stop the leak.
I
f
P
oi
nt
Y
(
tank ball
va
va
lvlv
e)
e)
l
l
e
ea
ks,
pl
ease make sure there w
as
s
Y
6-
6-
88
wr
wr
ap
s
o
f
Te
f
lon t
ap
e
ap
pl
ied onto the t
an
an
k
k
m
me
tal stem be
f
ore screwing on tank b
al
l
l
l
va
va
lv
lv
e.
e