
Instructions / Assembly


13
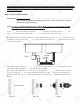
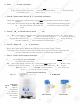
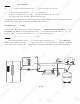
Fig. 11
Summary of Tubing Connections:
There are 4 connections: See Fig. 11 & Fig. 11A.
Point A to X: Connect RO to COLD water supply — Red tubing.
Point G to Y: Connect product water from tee fitting to tank — Yellow tubing. This tubing is a 2-way
line, Product water enters and leaves the tank via this line.
Point H to Z: Connect product water from 4
th
-stage output to RO faucet — Clear tubing.
Drain line to W: Connect drain water from 4
th
-stage membrane to drain outlet — Black tubing.
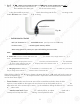
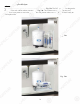
Fig.10E
To Disconnect the Tubing:
See Fig.10B. Push in and hold down on the collet ring square
against the fitting. With the collet held in this position the tube can
be removed. See Fig.10E.
Important for Point X! Insert and sleeve Must be installed to prevent water leaking. Metal compression nut
must be fully tightened! (See Page 7)
1
3
F
i
g. 1
1
Summary o
f
Tubing Connections:
T
h
e
r
e
a
r
e
4
co
nn
ec
ti
o
n
s
:
See
Fig. 11 & Fig. 11
A
.
Po
int
A
to
A
X
:
CoCo
nn
nn
ect RO to COLD water supply
—
Re
Re
d
d
t
t
ubing.
Po
int
G
t
o
Y
Y
:
:
C
Co
nnect product water
f
rom tee
f
f
it
it
ti
ti
ngng
t
t
o tank —
Y
ellow
Y
Y
tubing. This t
ub
b
in
in
g g
is
is
a
a
2-way
w
l
ine
,
Product water enters and
l
l
ea
ea
ve
ve
s the tank via this line.
Po
in
n
t
t
H
H
t
t
o
o
Z
:
Connect product water
fr
r
om
o
4
4
th
-
stage output to RO
f
aucet —
Clea
rr
tt
ub
ub
ing.
r
r
DrDr
aiai
n lin
e
t
o
W
:
Connect drain wa
te
e
r
r
frfr
o
om
4
th
-
stage membrane to drain out
le
le
t t
—
—
B
Bl
ack
tubing.
k
F
i
g.10
E
To Disco
nnnn
ec
ec
t the Tubing:
g
See
FiFi
g.
10
1
B
. Push in and hold down on the
c
ol
ol
lele
t
t
ri
r
ng square
ag
ag
ai
ai
nsns
t
t
t
th
e
f
itting. With the collet held
in
in
t
t
hi
hi
s
s
po
o
si
tion the tube can
bebe
rr
e
em
oved. See F
i
g.
10
E.
I
m
po
rtant
f
or Point X!
I
n
se
se
rtrt
a
a
nd
nd
s
l
le
eve Must be installed to
p
revent water leaki
ng
. Metal co
mp
ression nut
must be
f
ully tightened! (
Se
e
ee
Pa
Pa
ge
ge
7
)