
Instructions / Assembly


12
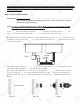
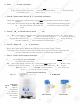
IMPORTANT INSTALLATION NOTICE!
The Quick connect fittings come with an
end plug that needs to be removed before
the tubing can be connected. Please
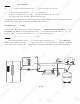
disconnect the end plugs at Points A, G
and H from the Quick connect fittings
before connecting tubing. See Fig.10A
and Fig.10B.
Fig.10A
Fig.10B
Step 6: Connecting The System
Fig.10C
Fig.10D
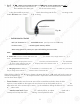
To Disconnect the End Plugs:
Push In and Hold Down on the collet ring square against the
fitting. While holding down the collet ring, pull out the end
plug with your other hand. Only the plug will slide out from the
connection. See Fig.10C.
Depending on your system model, there will be 2 types of protective end
plugs. Both types of end plugs are disconnected the same way. After
disconnecting the end plugs, please discard them as they are not needed for
installation.
Soft Plug Hard Plug
2 Types of End Plugs
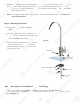
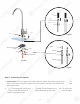
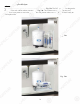
To Connect the Tubing:
Push the tubing all the way into the Quick-
Connect fitting, then gently pull back on the tubing to make sure
the connection is completely secure. See Fig.10D.
- No inserts, sleeve, or nuts are needed to secure the connection.
- No Teflon tape!
H
G
A
1
2
I
M
M
PP
OO
R
R
T
T
ANT IN
S
TALLATI
O
N
N
N
OO
T
T
ICE
!
ThTh
e
e
Q
Qu
ick connect
f
ittings come with
aa
nn
en
e
d plug that needs to be removed
b
b
ef
ef
or
or
e
e
the tubing can be connected. Please
d
isconnect the end plugs at Points A, G
and H
f
rom the Quick connect
f
itti
ng
s
be
f
ore connecting tubing. See Fig.10
A
a
n
d
F
i
g.10B.
Fi
F
g.g.
1010
A
A
F
i
g.10
B
Step 6:
CoCo
nnnn
e
ec
ting The Syste
m
FiFi
g.
g
10
C
F
i
g.
g.
1010
D
D
To Disconnect the End
Pl
Pl
ugug
s:s:
g
g
P
ush In and Hold Down on the collet ring square against the
f
itting. While holding down the collet ring, pull out the end
plug with your other hand. Only the plug will slide out
f
r
om
m
t
t
h
he
c
onnection. See Fig.10C.
D
e
pe
ndin
g
on
on
y
y
ouou
r
r
sy
stem model, there will be 2
ty
y
pepe
s
s
of
of
p
rotective end
plugs. B
ot
h
h
ty
ty
pe
pe
s o
f
end plugs are disconnected
th
h
e
e
sa
sa
me way. A
f
te
r
d
iscon
ne
ne
ctct
inin
g the end plugs, please discard
th
em
em
a
a
s
th
ey are not needed
f
o
r
i
n
s
t
a
l
la
la
ti
ti
o
on
.
So
So
ft
ft
P
lu
u
g
gH
ard Plug
2
Types o
f
End
PP
lu
lu
gs
s
To Connect the Tubin
g:
g
P
ush the tubing all the
wa
a
y y
in
in
to
to
t
t
he Quick-
Connect
f
itting, then ge
nt
ly
ly
p
p
ul
ul
l
l
back on the tubing to make sure
the connection is complete
ly
secure. See F
i
g.10
D.
-
No inserts
,
sleeve
,
or nuts are needed to secure the connection.
-
No Te
f
lon tape
!
H
G
A