
Instructions / Assembly


10
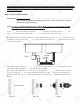
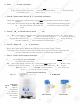
Black Locating Washer
Lock Washer
Lock Nut
Faucet Adapter
Tubing
Counter Top
Counter Top
Opening
Faucet Base
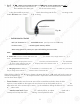
3. For Porcelain Sink: Porcelain enameled sinks can readily be chipped if care is not exercised when
drilling the hole. Before starting the drill motor, apply firm downward pressure on the bit until a
crunching occurs. This will help keep the drill bit from walking when starting the hole. A small pilot
hole will also aid the drill bit.
Note: Immediately after the hole drilling is done, clean up all metal chips, for metal chips will
stain the porcelain!!
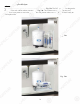
Step 4: Mounting The Faucet
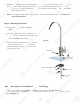
1. Mount the faucet as shown in Fig. 9A
or Fig. 9B.
2. Attach threaded end of faucet adapter to the
faucet metal stem. No teflon tape needed here.
3. Connect the Clear line to the faucet.
4. The faucet handle controls the flow of purified
water exiting the faucet. Turn the handle to
horizontal position to release the water and
vertically to shut off.
Fig. 9A
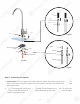
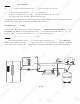
Option: Mounting The Faucet (Metal Compression Fitting)
1. Make sure the tube insert is pushed all the way into the tubing. Fig. 9C (Page 11)
2. Make sure the tubing is inserted inside the faucet stem at least 1/4” deep while screwing the nut.
Fig. 9D (Page 11)
1
0
Bl
a
ck
L
ocatin
g
Wash
er
r
Lo
Lo
ck
ck
Wa
W
sh
sh
e
er
Lo
c
k
Nut
LkNt
Fa
Fa
ucuc
etet
AdAd
a
p
te
r
Tubin
g
Co
un
n
tete
r
r
TTo
p
p
C
ounter To
p
O
penin
g
F
au
c
c
et Bas
e
3
. F
o
r P
o
r
ce
ce
lala
in
in
S
ink
:
Porcelain enameled sinks
ca
a
n
n
rere
adad
il
y be chipped i
f
care is not ex
er
r
cici
sese
d
d
wh
w
en
d
rilli
ng
g
t
t
hehe
hole. Be
f
ore starting the drill mot
or
or
,
,
apap
pl
pl
y
y
f
irm downward pressure on th
e
e
bibi
t
t
u
un
til a
cr
r
un
u
ch
ch
in
in
g
occurs. This will he
lp
kee
p
the
dr
d
il
l
l
bibi
t
t
f
rom walki
ng
when starti
ng
t
he
hol
e.
.
A
A
small
p
ilot
ho
ho
le
e
w
w
ill also aid the drill bit
.
N
No
te
:
Immediately a
f
ter the hole
dd
riri
ll
ll
inin
gg
is done, clean up all metal chips,
f
o
r
m
me
tal chips will
stain the porcelain!
!
Step 4: Mounting The Fauc
et
1. Mount the
f
a
uc
c
et
et
a
a
s
s
shown in Fig. 9
A
or
F
i
g. 9
B.
B.
2
. Atta
ch
h
t
t
hr
hr
ea
ea
d
de
d end o
f
f
aucet adapter to t
he
e
f
au
au
ce
ce
t
t
me
me
tal stem. No te
f
lon tape neede
d
d
he
h
re.
3.
.
Co
Co
nnect the
C
l
ea
r
l
ine to the
f
auc
et
et
.
4.
4
The
f
aucet handle controls the
f
f
lo
o
w
w
o
of
p
uri
f
ied
water exiting the faucet
..
T
T
urur
nn
th
t
e
e
h
a
n
d
l
e
t
o
T
T
horizontal position to r
elel
ea
ea
sese
t
t
he water and
vertically to shut o
ff
.
Fig. 9
A
O
pti
on
on
:
:
Mounting The Faucet
(
Metal C
om
m
prpr
es
es
sion Fitting
)
1.
1.
MM
akak
e
e
sure the tube insert is
pushed
a
a
llll
t
t
he
he
way
into the tubing.
y
Fig. 9C
(
P
ag
g
e
e
11
1
)
2.2.
M
M
ak
e sure the tubin
g
is
i
n
se
rt
ed
i
ns
s
idid
e
e
th
th
e
f
aucet stem at least 1/4” de
ep
w
w
hihi
lele
s
s
crewin
g
the nut.
Fig. 9D
(
Page 11
)