
Instructions / Assembly


9
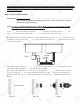
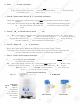
3. See Fig. 8, 8A. Make sure to align the drain saddle hole to the drilled hole perfectly.
Mis-aligning these two holes will block the drain water and cause membrane damage.
Attach the drain saddle to the drain pipe and tighten the two screws evenly.
4. Once the drain saddle is secured, push 1/4” black drain tubing into the Quick Connect fitting on the
saddle. DO NOT use a “Insert” on the drain tubing.
Fig. 8A
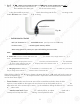
Step 3: Drill A Hole For The RO Faucet
Drill 1/2” diameter hole for standard RO faucet. (Air-Gap faucet: drill 1”D hole.)
For best results use a 1/2” carbide-tipped masonry drill bit.
Wear safety glasses to protect your eyes while drilling the faucet hole.
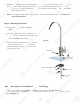
Note: No need to drill a hole if an existing hole is available:
a) Spare hole: If there is a spare hole in the sink covered by a chrome cover, simply remove the chrome
cover and install the RO faucet there.
b) Spray hose: If the spray hose is not in use, remove the hose, and mount the RO faucet there. Remember
to plug up the outlet under the main faucet. If the spray hose uses a diverter at the base of the spout, be sure
to remove it to avoid trouble later on.
c) Hanging faucet: If drilling a hole is not feasible (i.e. rental home, drill tool not available etc.), the faucet
can just hang on the cabinet door or wherever that is convenient. Be creative!
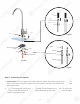
When drilling a hole for the RO faucet, choose a location that looks good, works well, and is most con-
venient for dispensing pure water. An ample flat area is required for the faucet base so that the faucet
can be drawn down tightly.
1. Faucet location: Make sure the faucet stem will be accessible from below when the hole is drilled.
If space is not available on the upper sink area, the faucet can be located on the counter top by the
edge of the sink. If the counter top is ceramic tile, the method for drilling the hole will be the same as
for porcelain sinks.
2. For Stainless Steel Sink: Before using a 1/2” carbide drill bit, an indent should be made with a
center punch to keep the drill bit from walking. A small pilot hole will also aid the drill bit.
9
3
. See Fi
g
.
8,8,
8
8
A
A.
Make sure to align the dra
in
n
s
s
adad
dl
dl
e hole to the drilled hole p
er
r
fefe
ctct
ly
ly
.
.
g p
y
M
is
-
a
li
li
gn
gn
in
in
g these two holes will block the d
ra
a
inin
ww
at
at
er and cause membrane dama
ge
ge
.
.
At
t
ta
ta
ch
ch
t
t
he
h
drain saddle to the drain pipe
an
an
dd
titi
g
gh
ten the two screws evenl
y
.
4.4.
OnOn
ce the drain saddle is secured,
pupu
shsh
11
/4/4
”
black drain tubing into the Qu
ic
ic
k k
CoCo
n
nn
ect
f
itting on the
sadd
l
e
. DO
N
OT
use a “Insert”
on
n
tt
hehe
dd
r
ra
in tubing.
Fig. 8
A
St
t
epep
3
3
: Drill A Hole For The RO
Fa
Fa
ucuc
etet
Drill 1/2” diameter ho
le
e
f
f
oror
s
s
ta
ndard RO
f
aucet.
(
Air-Gap
f
aucet: dri
ll
ll
1
1
”D
”D
hole.
)
For best results
uu
se
se
aa
11
/2
/
” carbide-tipped masonry drill bit.
Wear sa
f
ety glasses to protect your eyes while drilling the
f
aucet hole.
No
te
:
No need to drill a hole if an existing hole
is
s
a
a
vava
il
i
able:
g
a
)
Spare hole
:
I
f
there is a spare hole in the sink
co
o
ve
ve
re
re
d
d
by
by
a chrome cover, simply remove t
he
he
cc
hrhr
o
om
e
c
over
an
a
d install the RO
f
aucet there.
b
b
)
)
SpSp
ray hose:
If
the spray hose is not in
us
s
e,
e,
r
r
em
em
o
ov
e the hose, and mount the RO
f
au
au
c
ce
t
th
ere. Remembe
r
to
o
p
p
lu
lu
g up the outlet under the main
f
au
ce
e
t.t.
I
f
th
h
e spray hose uses a diverter at the
ba
ba
se
se
oo
f
f
th
th
e spout, be sure
to
to
remove it to avoid trouble later on.
c
)
Ha
ng
in
g
f
aucet:
If
drillin
g
a
hoho
lele
is not
f
easible (i.e. rental home, drill
to
o
ol
ol
n
n
ot
ot
available etc.), the
f
aucet
c
an just hang on the cabinet d
oo
oo
r
r
or
or
wherever that is convenient. Be
cc
rere
atat
iviv
e!
e
When drilling a hole
f
or
tt
hehe
RR
O
O
f
aucet, choose a location that loo
ks
ks
g
g
oo
oo
d
d,
works well, and is most con-
venient
f
or dispensing p
ur
r
e
e
wawa
te
te
r. An ample
f
lat area is required
f
or the
f
aucet base so that the
f
aucet
c
an be drawn down tightly.
1
. F
auce
t l
oc
ati
o
n:
M
ake sure the
f
aucet stem will be accessible
f
rom below when the hole
is
is
d
d
riri
llll
e
ed
.
If
space is not available on the upper sink area, the
f
aucet can be located
on
the co
un
tete
r
r
toto
p
p
b
by
the
e
dge o
f
the sink. I
f
the counter top is cera
mi
mi
c
c
titi
le
e
, the method
f
or drilling the hole will
bebe
t
t
h
he
same as
fo
o
r r
popo
rcelain sinks.
2.2.
FF
or
o
S
tainl
ess
S
t
ee
l
S
ink
:
Be
f
ore
us
s
in
n
g
g
a
a
1/2” carbide drill bit, an indent
sh
h
ouou
ld
ld
b
b
e
e
made with a
c
enter punch to keep the drill b
it
f
f
ro
ro
m
m
walking. A small pilot hole will a
ls
s
o
o
aiai
d
d
th
th
e drill bit.