
Specifications

Creating New Storage Configurations
62 Snap Server Administrator Guide
Creating a Share
To create a share, navigate to the
Storage > Shares
screen. Creating a share involves
selecting the volume and directory path for the share and then defining share
attributes and network access protocols. Before you start, make sure you know the
name, volume, and path to the directory to which the share will point.
1
Select a volume.
To begin the process, click
Create Share
. On the screen
that opens, choose the volume you need from the pull-
down menu, and then click
Continue
.
2
Select the path to the directory.
The Current Path field defaults to the root path of the
volume.
• To create a share to the entire volume, simply click
Use Current Path
.
• To create a share to a directory, navigate to and select
the directory in the Select a Different Path area, then
click
Use Current Path
.
The Share Definition screen opens.
3
Define the share.
Use this screen to enter the following:
• Accept the default share name, or enter a new one. If
you change the default, make sure the name is
unique.
• If desired, enter a description of the share. This text appears in Web View.
• To create a create a share to archived Snapshots of the volume, select the
Create
Snapshot Share
check box. Accept the default name or enter a new one. (For
more information on Snapshots and Snapshot shares, see page 98.)
• Select the access protocols for the share: Windows (SMB), Web View (HTTP),
NFS, Apple (AFP), and FTP.
Click
Continue
to review your selections.
4
Create the share.
Review your settings and click
Continue
to create the share. On the confirmation
screen, do one of the following:
• To set access permissions for the share, click
Set Share Access
.
• To return to the Shares screen, click
Exit
.
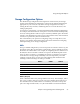
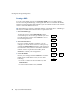
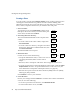
Storage
Ø
Shares
Ø
Select
Volume
Ø
Select
Path
Ø
Define
Share
Ø
Create
Share
Ö
Share
Access
Ø
Exit