
Specifications

Creating New Storage Configurations
Chapter 4 Storage Configuration and Management 61
Creating a Volume
To create a volume, navigate to the
Storage > Volumes
screen. Creating a volume is a
simple process of defining the name, location, and size of the volume. When
finished, you can continue to the Create Share screen or exit to the Volumes screen.
1
Define the volume.
To begin the process, click
Create Volume
. On the screen
that opens, define the volume’s parameters:
• If necessary, select the RAID on which to create the
volume. The screen refreshes to display the options
and information appropriate to the RAID Set's
remaining capacity.
• Accept the default volume name, or enter a new one.
To rename the volume, use up to 20 alphanumeric
characters, including the hyphen, but starting with an
alphanumeric character.
• The capacity of the volume defaults to the total
remaining capacity on the RAID set. If you plan to
have only one volume on the RAID and do not plan
to use Snapshots, accept the default value. If you plan to have more than one
volume, or you need to reserve space for the Snapshot pool, adjust the value
accordingly.
2
Create the Volume.
Review your settings and click
Continue
to create the volume. On the
confirmation screen, do one of the following:
• To create a share for the new volume, click
Create Share
.
• To return to the Volumes screen, click
Exit
.
Tip
When you create a new volume, make sure you create a share to the root of the
volume. This share is important for backup purposes.
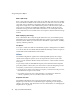
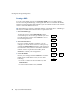
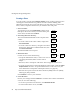
Storage
Ø
Volumes
Ø
Define
Volume
Ø
Create
Volume
Ö
Create
Share
Ø
Exit