
Specifications

Creating New Storage Configurations
Chapter 4 Storage Configuration and Management 59
reinstalls the antivirus software (using default settings) on the largest volume.
The installation process does not preserve custom antivirus configuration
settings. Make a note of any such settings before deleting a RAID or volume.
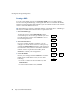
Using the RAID Storage Wizard
To create a storage configuration with the RAID Storage Wizard, navigate to the
Storage > Wizard
screen. The wizard walks you through the storage configuration
process.
Tip
Each RAID type requires a minimum number of available drives. A RAID type
will only be available if its minimum drive requirement is met.
1
Select a RAID type.
To start the wizard, click the RAID type you want to create. A
list of available disk drives appears.
2
Select drives.
Select the drives for the RAID from the list provided. If you
are creating a RAID 1 or RAID 5, you can configure one of the
selected drives as a hot spare by selecting the
Add Hot Spare
check box. Click
Continue
to confirm your RAID
configuration.
3
Create the RAID.
Review the information on this screen to verify the RAID
configuration, and then click
Continue
to open the Create
Volume screen.
4
Create a volume.
The volume capacity defaults to the entire storage space of
the RAID. You can enter a lesser number if you plan to create
additional volumes on the RAID, or you need to reserve some
space for the Snapshot pool. Click
Continue
to create the
volume and open the Create Share screen.
5
Create a share to the volume.
Make a note of the share name and click
Continue
to create a share that allows
access to all users via all protocols. (You can modify the share access definition by
navigating to the
Security > Shares
screen, and clicking the name of the share.)
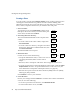
Storage
Ø
RAID
Wizard
Ø
Select
Drives
Ø
Create
RAID
Ø
Create
Volume
Ø
Create
Share
Ø
Exit