
Specifications
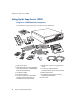
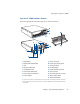
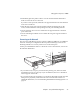

Setting Up the Snap Server 14000
Chapter 2 Setup and Initial Configuration 29
Initializing the Snap Server 14000
To initialize the Snap Server 14000, use the following procedure:
1
Make sure the power switches on both power supplies
are in the on position (the 1 on the toggle switch is
depressed).
2
Depress the front power button until the LCD illuminates
(about three seconds).
3
Wait for the server to initialize (a few minutes).
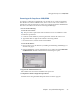
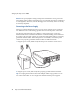
Using the Snap Server 14000 LCD
The LCD provides status information and event logs. When the Snap Server 14000
is turned on, the LCD displays the server name, IP address, and the workgroup or
domain.
Observe the three buttons below the LCD. To view details on any event, press the
center button. Use the right button to scroll down the events. Press the left button to
return to the status information.
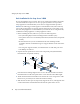
Connecting to the Snap Server 14000
Connecting to the Snap Server 14000 involves obtaining the server’s IP address
from the LCD and connecting to the server via the Administration Tool.
1
Get the Snap Server’s IP address from the LCD.
The LCD panel on the front of the Snap Server 14000 displays its IP address.
Tip
If the LCD shows the default IP address of 10.10.10.10, it means that no
DHCP server was found on the network, and that the Snap Server has not been
assigned an IP address. You may not be able to see the server on your network,
and thus, you may not be able to access the Administration Tool. In this situation,
you must use NASManager as described on page 4 to find the server and assign it
a static IP address.
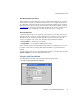
2
Connect to the server using a Web browser:
In a Web browser, enter the server’s IP address using the format:
http://1.2.3.4
, and
press
Enter
. The Enter Network Password dialog box opens.
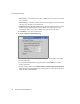
3
Log into the Administration Tool.
Enter
admin
as the user name and
admin
as the password, and then click
OK
.
4
Complete the initial configuration procedures.
Instructions for using the Initial Setup Wizard are found on page 30.
S
y
s
te
m
L
in
k