
Specifications
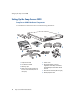

Setting Up the Snap Server 4400
12 Snap Server Administrator Guide
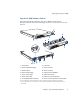
Rack Installation for the Snap Server 4400
The Snap Server 4400 ships with two L-shaped rack mount brackets. You can attach
them in one of two ways: (1) to the front of the server for mounting to the front
posts of a four-post rack; or, (2) to the middle or front of the server for mounting to
both posts of a Telco rack.
Caution
The following procedure applies to standard EIA racks; other racks may
not be able to support the server using only the front posts. If you are using a non-
EIA rack, Snap Appliance recommends that you secure the server using slide rails,
available from Snap Appliance or a Snap Appliance reseller.
1
Make sure you have the following items necessary for rack installation:
• Two (left and right) front rack mounting bracket assemblies
• Four rack ear screws to attach
the brackets to the server
• Four rack mounting screws to
attach the brackets to the rack
posts
• One Phillips screwdriver
2
Attach the L-shaped brackets to
the front or to the middle of the
server using the four screws provided.
3
Insert the server into the rack and attach the server to the posts using the
remaining four screws. You may need a second person to support the server
while tightening down the mounting screws.
Connecting to the Network
The server has dual-Ethernet ports that can connect to 10BaseT, 100BaseTx, or
1000BaseT networks. A dual-port configuration offers added advantages, such as
load balancing and failover. You may connect one or both of the ports.
• If you connect only one port, you must use the primary port (see page 11 for
location).
• If you connect both ports and plan to use a bonded configuration, make sure that
both ports are physically connected to the network on the same subnet. For
additional information, see “Understanding Dual-Ethernet Bonding Options” on
page 39.