
Specifications
eTrust InoculateIT
130 Snap Server Administrator Guide
Subsequent sections briefly describe the main features of the Local Scanner; see the
online Help for detailed descriptions of all of the Local Scanner options and
procedures for using these features.
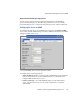
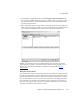
The Local Scanner Window
The Local Scanner window displays a list of items available for scanning on the left
side of the window, and displays the contents of a selected item on the right side of
the window. You can set options for what is displayed, and for how to manage
scanning on the Snap Server.
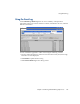
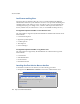
The Scanning Options Dialog Box
To set scanning options, choose the
Scanner > Local Scanner Options
command. The
Scanner Options dialog box that opens consists of five tabs:
•Scan
•Selection
•Display
•Directory
•Log
When you specify options for a scan, you indicate how the scan is performed and
what actions to take if an infection is found. Whether you perform a local scan or a
scheduled scan, you can choose different settings for each type of operation. For
example, file action options control what happens when an infection is found.
When you perform a local scan, you might have the file action set to Report Only.
When you set options for a scheduled scan, you might have the file action set to
Cure File.
Tip
You may not want to include Snapshot shares (see “Using Snapshots” on page
98) as part of your virus scan. Because access to an archived version of the file
system provided by a Snapshot share is read-only, you cannot treat or move any
infected file; you would have to delete the entire Snapshot to effect a cure. A more
useful approach is to always scan your file system for viruses before running a
Snapshot. Adjust your antivirus scan schedule to synchronize with your Snapshot
schedule such that any infected files are cured or removed before the Snapshot is
scheduled to fire.