
Specifications
Using Status Screens
124 Snap Server Administrator Guide
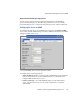
• Private Community — To enable SNMP managers to remotely configure this
server, enter the name of one or more private communities, or accept the
default
private
. Create unique public and private names. As a precaution
against unauthorized access, Snap Appliance recommends that you create
your own public and private community names.
• Server Location — Enter information that helps a user identify the physical
location of the server. For example, you might include a street address for a
small business, a room location such as Floor 37, Room 308, or a position in a
rack, such as rack slot 12.
• Contact Person — Enter information that helps a user report problems with
the server. For example, you might include the name and title of the system
administrator, a telephone number, pager number, or e-mail address.
3
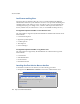
To configure traps, complete the screen parameters as follows:
•Select Yes to enable traps.
• Enter the IP address of at least one SNMP manager in the first field as a trap
destination. You can enter up to three additional IP addresses.
• To verify your settings, select Yes in the Send a Test Trap pull-down menu.
4
Click
Save
.
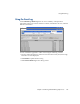
Using Status Screens
Snap Servers provide a number of read-only screens that report on the status of
various components.
•The
Monitoring > Status
screen provides miscellaneous system data.
•The
Monitoring > SCSI
screen displays a list of all SCSI devices found attached to
the Snap Server. Backup applications such as Backup Express for GuardianOS
require you to enter this information as part of the configuration process.
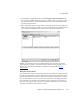
•The
Monitoring > Volume Usage
screen displays summary information about each
volume, including name, RAID level, capacity, free space, utilization, and
volume status.