
Specifications
Using Snapshots
Chapter 6 Data Protection 101
1
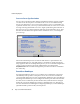
Create the Snapshot definition.
To begin the process, click
Create Snapshot
. In the screen that opens, complete the
following information to define the Snapshot:
• Name the Snapshot.
• Identify the source volume.
• If you plan to create a tape backup from the Snapshot, choose Yes from the
Create Recovery File pull-down menu. (See the next section for information on
coordinating Snapshots and backup operations.)
Click
Continue
to schedule the Snapshot.
2
Run the Snapshot now or schedule it to run later.
Specify the start time as
Now
(the default) and proceed to the next step, or choose
Later
and complete the following fields:
• Schedule a date and time to run the Snapshot.
• To repeat a Snapshot periodically, select
Recurring
and specify the Repeat
Interval in hours, days, weeks, or months.
3
Specify the duration of the Snapshot.
In the Duration field, specify how long the Snapshot is to be active in hours, days,
weeks, or months. The Snap Server automatically deletes the Snapshot after this
period expires, as long as there are no older unexpired Snapshots that are
dependent on it. If any such Snapshots exists, its termination date is displayed at
the bottom of the screen. You must set the duration to a date and time after the
displayed date.
4
Create the Snapshot.
Click
Create
. If you elected to run the Snapshot immediately, it appears in the
Current Snapshots table. If you scheduled the Snapshot to run at a later time, it
appears in the Scheduled Snapshots table.