
Specifications

Rack Access PX-HID Installation 5
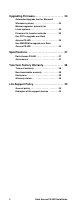
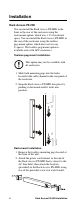
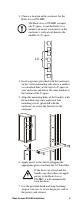
3. Choose a location in the enclosure for the
Rack Access PX-HID.
4. Insert cage nuts (provided with the enclosure)
on the vertical mounting rails above a number
(or a notched hole) at the top of a U-space in
your enclosure and below the same number at
the bottom of the U-space.
5. Align the mounting holes of the brackets with
the installed cage nuts, and insert four
mounting screws (provided with the
enclosure) to secure the brackets to the
enclosure.
6. Apply power to the unit by plugging the
appropriate power cord into the AC Line Inlet.
7. Use the provided hook-and-loop fastening
strap or wire ties to secure the power cord to
the power cord retainer.
The Rack Access PX-HID occupies
one U-space. A notched hole (or a
number, on newer enclosures) on the
enclosure’s vertical rail denotes the
middle of a U-space.
1 U
7
6
5
ns0014a
pdu0080a
If the doors are closed and the
handles are shut when you apply
power to the Rack Access
PX-HID, it will automatically
lock the doors.