
Installation guide


NetBotz Rack Access Pod 170 Installation Guide
3
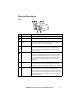
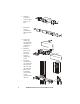
Physical Description
Front
Item Description
1
Handle #1 Port Port for the Handle sensor on Door #1.
2
Door #1 Port Port for the Door Contact sensor on Door #1.
3
Access LED
display
Blinks when a proximity card is swiped near a handle sensor
connected to the Rack Access Pod. See the NetBotz Appliance
User’s Guide for details on blinking patterns.
4
A-Link port (in) Used for connecting the Rack Access Pod to a NetBotz Room
Monitor 455, NetBotz Rack Monitor 550, or NetBotz Rack
Monitor 570. Standard CAT-5 cabling with straight-through
wiring is required.
5
24 VDC Power Connects to an external 24V power supply (AP9505I).
Depending on the NetBotz appliance and number of cascaded
Rack Access Pods attached to the device, you may need one or
more external power supplies to support your configuration.
See page 7 for specific recommendations on power supply
requirements.
6
A-Link port (out) Used for connecting the Rack Access Pod to additional Rack
Access Pods or Sensor Pods cascaded along an A-Link bus.
Standard CAT-5 cabling with straight-through wiring is required.
7
Identifier LED
display
Displays a unique identifier number. The first time a Rack
Access Pod receives power, it obtains a unique Identifier #. This
number is displayed in parenthesis after the name of the Rack
Access Pod in the Device List in Advanced View or Basic View.
The Identifier LED display will blink when an alert occurs on
the Rack Access Pod