
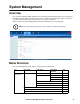
Owners manual


KVM Access Management Software User Manual80
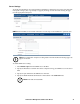
Changing a Self-Signed Certificate. Changing a self-signed certificate allows you to provide
additional information in the certificate that wasn't generated in the installation certificate. The way to
change a self-signed SSL certificate is to create a new one. To create a new self-signed certificate:
1. At the top-right of the Certificate panel, click Update to open the page:
2. Select the Create a new self signed SSL server certificate radio button, then fill in the fields
according to the information in the table below:
3. When you have finished filling in the fields, click Save.
A message opens asking you to wait while the database updates with the new information. The
web page closes and the login sequence opens. Accept the security certificate and log in.
Importing a Signed SSL Server Certificate. In order to avoid making users go through the
certificate acceptance prompt each time they log in, administrators may choose to use a third party
certificate authority (CA) signed certificate.
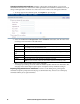
Field Description
Common Name The Fully Qualified Domain Name (FQDN) for which you requested the SSL certificate.
For example: www.yourdomainname.com
Organization Your Full Legal Company or Personal Name as legally registered in your locality.
Organizational
Unit
The branch of your company that is ordering the certificate (accounting, marketing, etc.).
City or Location The full name of the city or location.
State or Province The full name of the state or province.
Country The two letter country code where the organization is located.
Note: If you are not sure of the code, do an online search for ssl+country codes.