
Owners manual


KVM Access Management Software User Manual32
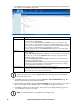
4. Click Next at the top-right of the main panel. If KVM ACCESS was chosen for authentication,
the Add User-Account Status page opens.
Note: If an external authentication server is used, the account status information is
maintained on that server, so this page does not appear. Instead, the Add User-Personal
Information page opens.
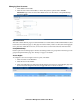
5. Click Next at the right of the panel to open the Add User - Personal Information page. The
fields are optional and may be left blank or filled in.
6. When finished, click Save to open the Add Access Rights page and set the user's access rights to
the devices and ports on the installation. See “Access Rights” on page 33 for details.
7. Click Save to add the user to the Users list, and open the Access Rights Summary page. See
“Access Rights” on page 33, for details.
Note: To add additional users, click Users in the Sidebar to start.
Field Description
Password • Click the checkbox to the left of Use "password" as default to set the user’s
password as the word password.
• If you do not select Use "password" as default, enter the user's password in the
Password field. A maximum of the equivalent of 16 English alphanumeric characters
is allowed. The minimum number of characters is based on KVM ACCESS's account
policy settings (see “KVM ACCESS Authentication” on page 44).
• Entert the password again in the Confirm Password field. The entries must match.
Restrictions • Disable account temporarily cancels a user's account without deleting it. The account
can be reinstated.
•If User cannot change password is enabled, the user can't change his own password.
Otherwise, the user can use the Preferences tab to change his own password. See
“Password” on page 18 for details.
•If User must change password at next login is enabled, the user must change his
password the next time he logs in.
• Enabling Password never expires, prevents the user's password from expiring. This
overrides the system configuration set on KVM ACCESS's account policy settings
(see “KVM ACCESS Authentication” on page 44).
Account Expires • Click the Never radio button so that the account never expires.
• To have the account expire on a certain date, click the Expires on radio button, then
click the calendar icon to select the expiration date.