Installation and Operation G-Type Rack Power Filter G50NETB2 G50NETB-20A2 120 Vac 15 A 20 A
General Information Product Features The APC® AV G-Type G50NETB2 and G50NETB-20A2 Rack Power Filters protect high-performance audio and video system equipment from damage due to power surges, spikes, and lightning strikes. You can manage a Rack Power Filter through the display interface, Web interface, or the command line interface (CLI). • • • • • • • Load and energy monitoring for all connected devices. Voltage, current, and power monitoring. Current monitoring for the outlets.
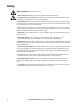
Safety Electrical Hazard: For indoor use only. • Risk of electric shock. Do not plug into another relocatable power tap. • Contains always on receptacles. To reduce the risk of electric shock, disconnect the unit from the power source before servicing the equipment. • Overloading. Do not overload the wall outlet where this device is being connected. Do not overload this device. Ensure the total load to this device does not exceed that which is listed in the Specifications section of this manual. • Power.
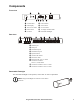
Components Front view Circuit breaker POWER button LCD Display SETUP button ALWAYS ON outlet STATUS button DOWN button 11 display interface LEDs UP button Removable flashlight av005a Rear view Network port Serial port CAN-BUS In port CAN-BUS Out port System Ground UNSWITCHED outlets SWITCHED outlet MASTER outlet / DELAY1 outlet CONTROLLED outlets / DELAY 2 (A & B) outlets CONTROLLED outlets / DELAY 3 outlet CONTROLLED outlets / DELAY 4 outlet Removable
Installation Install the Unit Install the unit on a flat surface Remove the mounting brackets. Attach the stabilizing feet. Attach the stabilizing feet (included) to the bottom of the unit before placing it on a flat surface to avoid scratching the surface and to protect the unit. Install the unit in a rack or enclosure Use four screws to secure the mounting brackets to the rails in the rack or enclosure.
Connect Components to the Unit Power-Saving Master and Controlled outlets The unit reduces power consumption by disconnecting utility power to devices that are not in use. When a device is in sleep or standby mode, it still uses power; when the unit turns off the power to an outlet, it conserves this power. 1. Before connecting components to the unit, determine which components will utilize the Master and Controlled outlets. – Connect a master device such as a TV to the Master outlet.
Operation Basic Functions Note: The LCD display interface screen and LEDs can be dimmed, using the Setup menu. Press any button on the front panel of the unit to illuminate the display screen and the LEDs. Front panel buttons Ut ilit y Sour ce 122V 60Hz Use the display interface on the front of the unit to configure and operate the unit. Power. Push to apply power to the unit or to shut off power to the unit. Status.
Configure the Unit Set the Language Select a language. Push the SETUP button until the Language menu is displayed. Select English, French, or Spanish. Configure the brightness of the display. To alter the brightness of the LCD display screen, push SETUP one time and select a desired brightness level. Sequence Delay outlets Configure the delay options so that the DELAY outlets apply power in sequence, instead of all at one time. Push SETUP until the delay menu screen appears.
Lock the unit The unit can be locked to prevent unwanted access. To lock or unlock the unit, push STATUS and DOWN for three seconds. G50NETB2 LOCKED Shut down the unit Push and hold the POWER button. POWERING DOWN Display Interface Menus Status menu The Status menu shows the overall status of the unit and of each outlet on the unit. Push the STATUS button to move to the next screen. Use the arrow keys to scroll up and down. Note: The menus shown in this manual are for reference only.
Money Saved. MONEY SAVED 12.40 Dollars IP address. IP address 10.177.56.6 MAC address. MAC address 00C0B752B77 Contact Information. 1-888-882-7228 WWW.APCAV.COM Model and Serial Number. G50NETB2 SN: AB1234567890 Firmware version. = FW REVISION: 880.M1a.D Recent Faults. The screen will either display “No fault” or it will report any recent faults on the unit and give a brief description. Contact APC AV Customer support.
LED dimmer. Set the brightness of the LEDs. LED DIMMER: DIM1 Delay1-Delay4. Select the number of seconds for the delay for DELAY outlets 1, 2A, 2B, 3, and 4. DELAY 1: 4SEC (0-255) Power Threshold. The amount of power used by a device in Sleep or Standby mode varies between devices. It may be necessary to adjust the threshold at which the Master outlet signals the Controlled outlets to shut down. 1. Ensure a master device is connected to the Master outlet.
Clear Saved Power. Reset the counter for the amount of power that has been saved by the unit. CLEAR SAVED PWR YES Language. Select the language for the display: English, French, or Spanish. Push SETUP to go to the next screen, RESET TO DEFAULT. MENU LANGUAGE: ENGLISH Restore default settings. Select YES or NO to restore the default settings. RESET TO DEFAULT YES Save screen as default To save a screen as the default, push STATUS for three seconds.
Troubleshooting The unit will not turn on There is no input power, or insufficient input power from the wall outlet. Use a voltmeter to check the output of the wall outlet. Use a device that is known to work properly to check the outlet. Note: The unit will not turn on if the input utility power is out of the acceptable range. A circuit breaker has been tripped. • Check the building circuit breakers and the unit’s circuit breaker.
Specifications G50NETB2 G50NETB-20A2 Nominal 120 V 15 A 50/60 Hz NEMA 5-15R 9 4.34 cm x 24 cm x 43.5 (1.71 in x 9.45 in 17.13 in) 2.4 m (8 ft.) right angle NEMA 5-15P Nominal 120 V 20 A 50/60 Hz NEMA 5-20R 9 4.34 cm x 24 cm x 43.5 (1.71 in x 9.45 in 17.13 in) 2.4 m (8 ft.
APC Worldwide Customer Support Customer support for this or any other APC product is available at no charge in any of the following ways: • Visit the APC Web site to access documents in the APC Knowledge Base and to submit customer support requests. – www.apc.com (Corporate Headquarters) Connect to localized APC Web sites for specific countries, each of which provides customer support information. – www.apc.com/support/ Global support searching APC Knowledge Base and using e-support.