
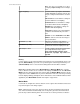
User Manual
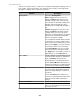
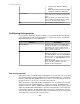

The "NetBotz Appliance Rack Access Settings" display appears the first time you access
the Rack Access Settings option for a selected NetBotz Appliance. This display allows
you to specify the supported card type and auto lock timeout for the selected appliance.
You can access the display again, if needed, from the NetBotz Appliance Settings link
in the "Rack Access Settings" display. When the card type has already been specified, you
can modify the Auto Lock Timeout only. To modify the supported card type, you must first
remove all the cards associated with the appliance.
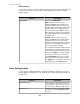
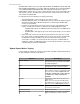
The Show Unregistered Cards link is displayed when one or more rack access cards
swiped at a Rack Access Pod 170 device have not been registered to the associated
NetBotz Appliance. You access the "Unregistered Cards" display from the link to select the
rack access cards you want to register, or remove cards you do not want to register from
the list.
You can add up to 200 rack access cards to the list for the device group, or NetBotz
Appliance or Appliances selected. You identify the Card ID #, the user name, a description,
and whether the card requires an authorization card swipe from another card to access the
door. You can modify the settings for each card, remove cards from the list one at a time,
or copy the scheduled access of one card to another.
Note: When you remove cards from the list, you must press Apply or OK to save the
changes.
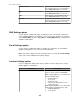
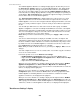
You select a card in the left pane to display its card ID #, user name, description, and
authorization requirement, if any, above the right pane. The right pane allows you to select
the doors on which to enable or disable access for that card, 24 hours a day, 7 days a week
by default. You can select a NetBotz Appliance, a Rack Access Pod 170, or a door, and
press Edit Access to modify the weekly access schedule.
Note: When you enable or disable door access, you must press Apply or OK to save the
changes.
You must configure door access for one card at a time. You can then copy the scheduled
access of one card to another.
Four menus provide access to the Rack Access Settings:
•
NetBotz Appliance Configuration option, accessed from the Device menu.
•
Right-click menu NetBotz Appliance Configuration in the Device View and Map
View of the Monitoring perspective.
•
Right-click menu in the Device Groups view.
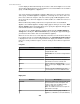
When you access the "Rack Access Settings" display from the right-click menu NetBotz
Appliance Configuration in the Device View and Map View of the Monitoring
perspective, the NetBotz Appliance you selected, and its associated Rack Access Pod 170
devices, are displayed in the right pane.
When you access the "Rack Access Settings" display from the NetBotz Appliance
Configuration option, accessed from the Device menu, the device groups that contain
NetBotz Appliances monitoring Rack Access Pod 170 devices, and their associated
appliances and devices, are displayed in the right pane.
When you access the "Rack Access Settings" display from the right-click menu NetBotz
Appliance Configuration in the Device Groups view of the Monitoring perspective, the
device group you selected that contains NetBotz Appliances monitoring Rack Access Pod
170 devices, and its associated appliances and devices, are displayed in the right pane.
"Rack Access Settings" display
StruxureWare Central 6.3.0
238