Rack Side Air Distribution Unit ACF202BLK Installation and Quick Start
This manual is available in English on the enclosed CD. Dieses Handbuch ist in Deutsch auf der beiliegenden CD-ROM verfügbar. Deze handleiding staat in het Nederlands op de bijgevoegde cd. Este manual está disponible en español en el CD-ROM adjunto. Ce manuel est disponible en français sur le CD-ROM ci-inclus. Questo manuale è disponibile in italiano nel CD-ROM allegato. Instrukcja Obslugi w jêzyku polskim jest dostêpna na CD.
Contents General Information . . . . . . . . . . . . . . . . . . . . . . . . . . . . . . . . . 1 Introduction . . . . . . . . . . . . . . . . . . . . . . . . . . . . . . . . . . . 1 Features . . . . . . . . . . . . . . . . . . . . . . . . . . . . . . . . . . . . . . 1 Safety information . . . . . . . . . . . . . . . . . . . . . . . . . . . . . . . 2 Inventory . . . . . . . . . . . . . . . . . . . . . . . . . . . . . . . . . . . . . 3 Receiving and inspection . . . . . . . . . . . . . . . . . . . . . . . .
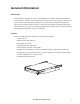
General Information Introduction The Rack Side Air Distribution Unit is a rack mountable fan system that installs within most EIA310-D enclosures. The Rack Side Air Distribution Unit moves air from the front of the rack enclosure to the side intake of the networking equipment. Lowering the inlet air temperature significantly improves the availability and life expectancy of your network equipment.
General Information Safety information Read and save this manual. This manual contains important safety instructions for the proper installation and use of this product. Warning Disconnect power to the enclosure before installing the Rack Side Air Distribution Unit. Failure to do so may result in personal injury or damage to equipment. Do not apply power to the unit until the installation is complete.
General Information Inventory Item Description Quantity Fan assembly 1 Mounting rails 2 Configurable air-turning vane 1 Input power cord (IEC-320-C13) 2 Cage nut installation tool 1 M6 cage nut 15* M6 plastic washer 13* M6×16mm screw 13* Thumb screw 2 Air discharge plate (attached to unit) 1 * one extra has been included Receiving and inspection Inspect the shipping package and its contents for shipping damage and make sure that all parts were received.
Installation Tools required—not provided P2 Phillips screwdriver Equipment placement considerations The Rack Side Air Distribution Unit moves conditioned air from the front of the rack enclosure to the side intake of the networking equipment. Do not block the Rack Side Air Distribution Unit air intake and air discharge vents. Keep network equipment cables secured away from the Rack Side Air Distribution Unit vents.
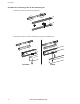
Installation Air-turning vane configurations The Rack Side Air Distribution Unit is configured at the factory to discharge air out the right side of the unit. Check your product airflow needs and, if necessary, adjust the air-turning vane configuration during the installation procedure. Left Right Up Down Change the air discharge to the left side of the unit. 1. Remove the air discharge plate by removing the two screws. 2. Install the discharge plate on the right side of the fan assembly. 3.
Installation Assemble the air-turning vane to the mounting rail 1. Install two caged nuts into the mounting rail. 2. Attach the turning vane to the mounting rails using two thumb screws.
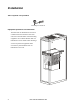
Installation Installing the mounting rails The Rack Side Air Distribution Unit mounts to the rack in a 2U-space with the option of allowing the user to easily pull the unit out on the mouting rails, or to lock it in place with the additional screws provided. 1. Locate a 2U-space where the Rack Side Air Distribution Unit will be installed. The mounting rails will be installed in the upper U of the 2U-space.
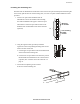
Installation 4. Attach the Rack Side Air Distribution Unit mounting rails to the vertical mounting rails of the enclosure, using four M6 × 16mm Phillips head screws and four plastic washers for each rail. Be sure to place the adjusting screws of the mounting rail towards the rear of the enclosure.
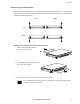
Installation 5. Tighten the two adjustment screws as shown. 6. Loosen the air-turning vane thumb screws to adjust the width of the air-turning vane.
Installation 7. Adjust the width and position of the air-turning vane to direct air flow over the side air intakes of your equipment. Retighten the thumb screws. Air turning vane Side view Install the fan assembly into the mounting rails 1. With the front of the fan assembly facing the front of the enclosure, insert the rails on the sides of the fan assembly into the mounting rails.
Installation 2. Slide the fan assembly towards the rear of the enclosure. Press in the locking tabs on each side of the unit, and slide the unit back as far as it will go. Lock the unit to the enclosure 1. Use four M6 × 16mm Phillips head screws and four plastic washers to lock the fan assembly to the enclosure. Blanking panels Blanking panels are necessary to to prevent hot exhaust air from entering the intake vents of your network and IT equipment.
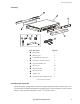
Installation If you are using a U-space for cable routing, use a brush guard panel to reduce air loss through the opening. Note Connect the power supply 1. Using one of the supplied power cords, connect the female end to one of the input sockets on the rear of the unit. Plug the male end into the UPS or other socket that provides protected power. Input A: Primary Input B: Alternate On Fan 1 Front Input: 200-240 VAC 50/60 Hz 0.75A Off On Fan 2 Back Push to Reset Off Automatic Switch 885-0476 2.
Operation Warning Before applying power to the Rack Side Air Distribution Unit, make sure any debris is removed from the fan intake and fan exhaust areas. Failure to remove debris can result in damage to equipment or cause bodily harm. Features and controls The Rack Side Air Distribution Unit has two LEDs on the front that indicate the status of the fans. Each fan is controlled by a switch located on the back of the unit. Each line is protected by a separate circuit breaker.
Operation Start-Up and fan test Warning Before applying power to the Rack Side Air Distribution Unit, remove any debris that may be located in or near the fan rotors. Failure to remove debris can result in damage to equipment or cause bodily harm. • This unit has no serviceable parts. • Never operate the Rack Side Air Distribution Unit with its covers removed. • Do not operate the fan unit in the extended position. 1. Apply power to Fan 1 by pressing the corresponding switch on the rear of the unit. 2.
Warranty and Service Limited warranty APC warrants the Rack Side Air Distribution Unit to be free from defects in materials and workmanship for a period of two years from the date of purchase. Its obligation under this warranty is limited to repairing or replacing, at its own sole option, any such defective products. This warranty does not apply to equipment that has been damaged by accident, negligence, or misapplication or has been altered or modified in any way.
Specifications Electrical Power source 200–240V; 50/60Hz Rated current (both fans) 0.75A Dimensions Shipping carton (H×W×D) 9.5×26×31in (241×660×787mm) Fan assembly (H×W×D) 3.44×16.98 × 26.34in (87.38×431.29×668.99mm) Weights Net weight (unit only) 32lb (14.5kg) Shipping weight 43lb (19.
APC Worldwide Customer Support Customer support for this or any other APC product is available at no charge in any of the following ways: • Visit the APC Web site to access documents in the APC Knowledge Base and to submit customer support requests. – www.apc.com (Corporate Headquarters) Connect to localized APC Web sites for specific countries, each of which provides customer support information. – www.apc.com/support/ Global support searching APC Knowledge Base and using e-support.