Installation, Specifications, and Settings Rack LCD Monitor Keyboard Mouse
This manual is available in English on the enclosed CD. Dieses Handbuch ist in Deutsch auf der beiliegenden CD-ROM verfügbar. Este manual está disponible en español en el CD-ROM adjunto. Ce manuel est disponible en français sur le CD-ROM ci-inclus. Questo manuale è disponibile in italiano nel CD-ROM allegato. 本マニュアルの日本語版は同梱の CD-ROM からご覧になれます。 Instrukcja Obsługi w jezyku polskim jest dostepna na CD. O manual em Português está disponível no CD-ROM em anexo.
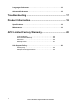
Contents Preliminary Information.................................................. 1 Safety Considerations . . . . . . . . . . . . . . . . . . . . . . . . . . . . . . . . . . . . . 1 General Information . . . . . . . . . . . . . . . . . . . . . . . . . . . . . . . . . . . . . . . 2 Before Installation. . . . . . . . . . . . . . . . . . . . . . . . . . . . . . . . . . . . . . . . . 3 Tool required (not provided) . . . . . . . . . . . . . . . . . . . . . . . . . . . . 3 Please recycle . . . . . . . . . . . .
Languages Sub-menu . . . . . . . . . . . . . . . . . . . . . . . . . . . . . . . . . . . . 16 Advanced Sub-menu . . . . . . . . . . . . . . . . . . . . . . . . . . . . . . . . . . . . . 16 Troubleshooting ............................................................ 17 Product Information ...................................................... 18 Specifications . . . . . . . . . . . . . . . . . . . . . . . . . . . . . . . . . . . . . . . . . . . 18 Maintenance . . . . . . . . . . . . . . . . . . . . . . . .
Preliminary Information Safety Considerations Warning: Mount the American Power Conversion (APC®) Rack LCD Monitor Keyboard Mouse in the enclosure in a manner that avoids the hazards of an uneven mechanical load. Caution: If the LCD is mounted in an enclosed communications rack, the recommended rack ambient temperature should be no greater than 113°F (45°C). Caution: Install the LCD in a rack so that there is the correct amount of air flow required for safe operation of the LCD.
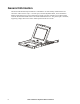
General Information The Rack LCD Monitor Keyboard Mouse is intended for use with industry-standard racks and enclosures. The LCD uses only 1 U of rack space, and with adjustable slides, can be installed in depths ranging from 26 in to 32 in (660 mm to 812 mm). The size of the device provides enough room for an APC Rack KVM switch to be installed behind the device. The power input is universal, supporting voltages from 100 to 240 V and frequencies from 50 to 60 Hz.
Before Installation Tool required (not provided) #2 Phillips screwdriver Please recycle The shipping materials are recyclable. Please save them for later use, or dispose of them appropriately. Disclaimer American Power Conversion is not responsible for damage sustained during reshipment of this product. Receiving inspection Inspect the package and contents for shipping damage. Report any damage immediately to the shipping agent.
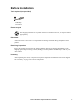
Inventory 4 LCD monitor keyboard mouse Cable arm Slides Left and right threaded and non-threaded hole mounting adapters Power cord Communication cable Phillips screw M6 x 12 mm screws Rack LCD Monitor Keyboard Mouse Installation
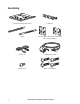
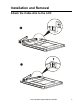
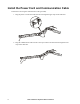
Installation and Removal Attach the Cable Arm to the LCD Rack LCD Monitor Keyboard Mouse Installation 5
Install the Power Cord and Communication Cable Connect the LCD using the communication cable (provided). 1. Plug the power cord into the LCD and route it through the upper clips of the cable arm. 2. Plug the communication cable into the correct port on the LCD and route it through the lower clips of the cable arm.
Install the Slides Installation using square holes Rack LCD Monitor Keyboard Mouse Installation 7
Installation using round or threaded holes Left and right threaded hole mounting adapters Left and right non-threaded hole mounting adapters 1. Remove two Phillips screws from each mounting adapter using a #2 screwdriver. 2. Remove the square-hole mounting adapter from each end of the outer slides. 3. Attach the appropriate mounting adapters using the previously removed screws.
Install the LCD Note: Support the cable arm during installation of the LCD. 1. Insert the LCD into the rack using the slides attached to the LCD and those already installed in the rack. 1. Push the LCD into the rack until it stops. Pull the release keys (located on the outside of each LCD slide) while pushing the LCD into place. 2. Ensure that the LCD is installed on its rails properly by pulling the LCD in and out of the rack several times.
Attach the Cable Arm to the Slide Secure the cable arm to the slide using the slotted thumbscrew. Caution: Do not overtighten thumbscrews if you are using a screwdriver.
Remove the LCD 1. Pull the LCD out until it stops. 2. Disconnect the power cord and communication cable. 3. Remove the cable arm from the slides by removing the slotted thumbscrews. 4. Gently pull the tabs toward the front of the LCD, while pulling outward on the LCD to remove it from the enclosure.
On-screen Display Component Identification 12 Exit key Caps Lock LED Left arrow key Scroll Lock LED Right arrow key Power LED Menu key Touch pad Auto Setup key Left/right mouse keys Num Lock LED Rack LCD Monitor Keyboard Mouse Installation
Using the On-screen Display To adjust the LCD, use the five control keys above the keyboard. Exit Menu Auto 1. Press the Menu key to display the main menu. 2. Use the Left and Right arrow keys to move among the function icons. Press the Menu key to select a function. 3. Use the left or right arrow keys to make changes to a function, or to move to a sub-menu. a. To change a function when there are no sub-menus, press the Menu key once after you have completed your changes.
Icon Function Description Languages Access the Languages sub-menu. Advanced Access the Advanced sub-menu. Exit Exit the On-screen Display. Image Adjust Sub-menu Icon 14 Function Description Clock Adjust the clock setting of the screen so that no dark vertical bands are visible. Phase Adjust the phase setting of the screen so that no dark horizontal bands are visible. H Position Adjust the horizontal position of the screen. V Position Adjust the vertical position of the screen.
Icon Function Description Autosetup Automatically center, sharpen, and adjust the clock and phase settings of the screen. Resets the LCD to its default settings. Back Go back to the main menu. Colors Sub-menu Icon Function Autolevel Function Descriptions Automatically adjust the color levels displayed on the screen. Color Mode Change the mode in which the screen displays color. Available modes are Manual, Native, sRGB, and TV.
Languages Sub-menu Icon Function Function Descriptions English Change the language of the On-Screen Display to English. French Change the language of the On-Screen Display to French. Advanced Sub-menu Icon Function OSD Position Half Tone OSD Timeout Position the On-Screen Display in one of the four corners of the screen or in the center of the screen. Turn a semi-transparent background on or off. Adjust the number of seconds before the On-Screen Display shuts down due to inactivity.
Troubleshooting If you have a problem setting up or using the monitor, use the following troubleshooting actions to try to solve the problem before contacting APC Worldwide Customer Support at a phone number listed at the back of this manual. What is seen... Suggested Action Reference The screen is blank, and the power indicator is off Ensure that the power cord is firmly connected and that the monitor is on.
Product Information Specifications Electrical AP5015 AP5017 Power input 100–240 VAC, 1 Amp† 100–240 VAC, 1 Amp† Input frequency 50/60 Hz 50/60 Hz Dimensions (without rails) (H×W×D) 1.75 × 18.75 × 21.88 in (44.45 × 476.25 × 555.75 mm) 1.75 × 18.75 × 21.88 in (44.45 × 476.25 × 555.75 mm) Shipping dimensions (H×W×D) 9.50 × 23.75 × 32.50 in (241.30 × 603.25 × 825.50 mm) 9.50 × 23.75 × 32.50 in (241.30 × 603.25 × 825.50 mm) Weight 31.50 lb (14.32 kg) 32.50 lb (14.77 kg) Shipping weight 42.
Maintenance Warning: To avoid risk of electrical shock, do not disassemble the monitor cabinet. Users cannot service the monitor. User maintenance is restricted to cleaning as explained below. Unplug the monitor from the power outlet before cleaning. • To clean your monitor screen, lightly dampen a soft clean cloth with water or mild detergent. If possible, use a special cleaning tissue or solution suitable for the anti-static coating.
APC Limited Factory Warranty The limited warranty provided by American Power Conversion (APC®) in this Statement of Limited Factory Warranty applies only to Products you purchase for your commercial or industrial use in the ordinary course of your business. Terms of Warranty American Power Conversion warrants its products to be free from defects in materials and workmanship for a period of two years from the date of purchase.
IN NO EVENT SHALL APC, ITS OFFICERS, DIRECTORS, AFFILIATES OR EMPLOYEES BE LIABLE FOR ANY FORM OF INDIRECT, SPECIAL, CONSEQUENTIAL OR PUNITIVE DAMAGES, ARISING OUT OF THE USE, SERVICE OR INSTALLATION, OF THE PRODUCTS, WHETHER SUCH DAMAGES ARISE IN CONTRACT OR TORT, IRRESPECTIVE OF FAULT, NEGLIGENCE OR STRICT LIABILITY OR WHETHER APC HAS BEEN ADVISED IN ADVANCE OF THE POSSIBLY OF SUCH DAMAGES.
Life-Support Policy General policy American Power Conversion (APC) does not recommend the use of any of its products in the following situations: • In life-support applications where failure or malfunction of the APC product can be reasonably expected to cause failure of the life-support device or to affect significantly its safety or effectiveness. • In direct patient care.
Radio Frequency Interference Warning: Changes or modifications to this unit not expressly approved by the party responsible for compliance could void the user’s authority to operate this equipment. USA—FCC This equipment has been tested and found to comply with the limits for a Class A digital device, pursuant to part 15 of the FCC Rules. These limits are designed to provide reasonable protection against harmful interference when the equipment is operated in a commercial environment.
APC Worldwide Customer Support Customer support for this or any other APC product is available at no charge in any of the following ways: • Visit the APC Web site to access documents in the APC Knowledge Base and to submit customer support requests. – www.apc.com (Corporate Headquarters) Connect to localized APC Web sites for specific countries, each of which provides customer support information. – www.apc.com/support/ Global support searching APC Knowledge Base and using e-support.