
User manual


5. Start-up and use
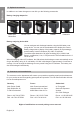
Red left-hand LED (light-emitting diode)
If the device is connected to the power net-
work, the LED illuminates permanent red, the
battery charger is ready for use.
Ifthereisafault,theLEDashesred.
This indicates a battery charger malfunction -
no further charging is possible!
6. Charging process
Voltage, temperature, short-circuit and polarity
checks are made on inserted batteries. Before
charging is started, the safety elements (Bi-
matal or NTC) will be checked over the tem-
perature contact.
Continuous green (right-hand LED) The bat-
tery is charging.
The chargers also have intelligent charging
technology, charging state detection is a special
feature of this charging method. By modifying
the charging current, it is possible to prevent ex-
cess internal battery pressure and a rise in the
charging voltage.
Flashing green (right-hand LED) The battery
is fully charged. Because of this charging versi-
on the battery will be protected and always fully
charged.Thebatterycanbeleftindenitelyinthe
charger without sustaining any damage. Over-
charging is impossible.
Flashing red (right-hand LED) The LED indi-
tes that the battery temperature is not within the
rapid charging temperature range of 5°C - 40°C.
As soon as the allowable temperature range is
reached, the battery charger automatically swit-
ches to rapid charging.
Continuous red (right-hand LED) The battery
is defective.
ENGLISH
English | 6
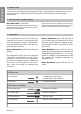
4. AC-line connection
Before connecting the charger, check that the AC supply voltage and frequency are the same as
those indicated on the charger. The charger is ready for operation when the power cord is con-
nected to the AC line outlet.
LED left red
red LED continuous Charger is connected to the AC line
and ready for operation
redLEDashing Chargerisdefective
LED right, multi-coloured
green LED continuous
Charging started
geenLEDashing Batteryisfullycharged
red LED continuous Battery is defective
redLEDashing Batteryistoohotortoocold