
User Manual


8
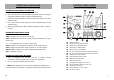
A. Main Power
1. Plug power cord into receptacle found at the back of the unit.
2. Switch on the main power switch to turn unit ON.
B. Soldering Iron
1. See 2660 Soldering Iron stand assembly guide.
2. Attach the Soldering Iron to the main unit via the 6-pin output
terminal, D1, found at the left side of the control panel.
3. Place the Soldering Iron to the Soldering Iron stand.
C. Smoke Absorber
Attach the smoke absorbing pen to the Smoke Absorber output
terminal, D2, on the control panel. Make sure that the cord
connections are free from any tangles.
D. Hot Air Gun
Place the Hot Air Gun in the stand to prepare for usage.
Power
Switch
ASSEMBLY and PREPARATIONS
13
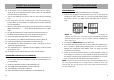
● The Soldering Iron display A2 will turn to “-##” or “0##” ,
indicating it is now on digital calibration mode.
● Turn the Soldering Iron adjustment knob to set calibration to “-00”.
This resets the calibration to zero.
● let system save the calibration value into the memory by waiting for
a few seconds until the system automatically jumps out of the
calibration mode.
3. Set Soldering Iron to desired working temperature.
4. Wait a few minutes for the temperature to stabilize before checking
the temperature difference with an external calibrated probe.
5. If external calibrated probe shows a higher number than the 968A+
Soldering Iron displayed actual temperature we input a positive
calibration number. If external calibrated probe shows a lower
number than the displayed 968A+ Soldering Iron actual temperature
we input a negative calibration number.
6. Again access the calibration mode of the Soldering Iron:
● Ensure that the SMD and Smoke Absorber function switch is off.
● Ensure that Soldering Iron function switch is on.
● Press and hold the hot air temperature increase button A6.
● The Soldering Iron display A2 will turn to “-##” or “0##” ,
indicating it is now on digital calibration mode.
● Turn the Soldering Iron adjustment knob to set the desired
calibration value.
● Let system save the desired calibration value into the memory by
waiting for a few seconds until the system automatically jumps out
of the calibration mode.
7. Calibration numbers can be adjusted from negative 50 to positive
50. If the digital calibration number is insufficient for calibration.
OPERATING GUIDELINES