
User Manual


14
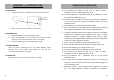
SOLDERING IRON MANUAL CALIBRATION
1. Set Soldering Iron to desired working temperature.
2. Wait a few minutes for the temperature to stabilize before checking the
temperature difference with an external calibrated probe.
3. Access the manual calibration hole by removing the rubber cover of the
calibration hole.
4. Use a small screw to slowly adjust the trimmer potentiometer thru the
calibration hole.
5. When tip temperature has been recalibrated. Replace rubber cover into
position.
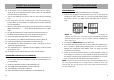
SOLDERING IRON DISPLAY GUIDE
“Pen”— Soldering Iron is not detected.
“OFF”— Soldering Iron function is currently off.
“Hot”— Soldering Iron function is currently off but the Soldering Iron tip is
still very hot.
“- - - - ”— Soldering Iron is currently in sleep mode.
“t00”— Soldering Iron sleep timer adjustment mode, sleep timer off.
“t60”— Sleep timer adjustment mode, sleep timer set at 60 minutes.
“001 or –00”— Soldering Iron digital calibration adjustment mode.
“Err”— Soldering Iron error.
SOLDERING IRON SMOKE ABSORBER
1. Turn on Soldering Iron function and set to desired working
temperature. Wait for Soldering Iron to reach set temperature.
2. Turn on the Smoke Absorber function switch.
Note: Smoke Absorber function cannot be enabled if the SMD rework
function switch is turned “ON”. To utilize the Smoke Absorber function the
OPERATING GUIDELINES
7
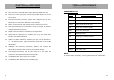
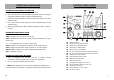
A1 Air pressure knob
A2 Soldering Iron temperature display
A3 Soldering Iron temperature knob
A4 Soldering Iron calibration hole.
A5 Reset Hot Air Gun temperature
A6 Hot Air Gun increase temperature adjustment button.
A7 Hot Air Gun decrease temperature adjustment button.
B1 Soldering Iron function switch
B2 Smoke Absorber function switch
B3 SMD rework function switch
C1 Air pressure indicator
C2 Set temperature display (Hot Air Gun)
C3 Actual temperature display (Hot Air Gun)
D1 Soldering Iron terminal
D2 Smoke Absorber / Vacuum outlet
D3 Hot Air Gun output
A1
A2
A3
A5 A4
A6
B1
B2
B3
C1
C2 C3
D1
D2
D3
A7
CONTROL PANEL GUIDE