USER’S MANUAL
Thank you very much for choosing the LCD TV. We suggest that you spend several minutes to read carefully this manual before you install and turn on the TV. Note: Since this product is being continuously improved, changes may be made to this manual without notice. *In case of discrepancy between the graphics attached herein and the ones shown on the physical screen, the latter shall prevail.
USER’S MANUAL Table Of Contents ........................... .....3 Read before operating equipment..................... ....3 Connection and preparation of the TV set.................... ....5 Packing list...... ............................. ....5 Attaching the base.... ............................. .....6 Removing the base ......................... .... ....6 Place the TV on a solid surface.. ... ................ ....7 Mounting the TV set to a wall ....................... .....8 Power connection .........
Function setting........... .................. .......21 Tuning............. ..................... ........22 PC images............ .................... .......23 Tips............... .......................... .......24 Product specification............ ................... ......25 Supported resolution........... ................... .......26 Before calling service.......... ................... .......28 Glossary............... ....................... .......
IMPORTANT SAFETY INSTRUCTIONS Read before operating equipment 1. Read these instructions。 2. Keep these instructions。 3. Heed all warnings. 4. Follow all instructions. 5. Do not use the monitor near water, e.g. near a bathtub, washbowl, kitchen sink, laundry tub, swimming pool or in a wet basement. In case the unit accidently becomes wet, pull out the power plug immediately and then contact the authorized dealer. 6. Clean only with a dry cloth. Cut off the power before cleaning the TV. 7.
IMPORTANT SAFETY INSTRUCTIONS 19. Tilt/Stability – All televisions must comply with recommended international global safety standards for tilt and stability properties of its cabinets design. y Do not compromise these design standards by applying excessive pull force to the front, or top, of the cabinet, which could ultimately overturn the product. y Also, do not endanger yourself, or children, by placing electronic equipment/toys on the top of the cabinet.
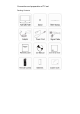
Connection and preparation of TV set Packing Contents
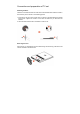
Connection and preparation of TV set Attaching the Base Take the TV set and the base out of the carton and assemble them with the screws in the accessory box as shown in the following picture: 1. Place the TV set on a piece of soft cloth or cushion on the desk with the front side facing down. Tighten the screws on the base to attach the pin base and the bracket. 2. Insert the base into the hole in the bottom of the TV set.
Connection and preparation of TV set Place the TV on a solid surface 1. 2. 3. 4. 5. Ensure that the TV is placed in a position to allow free flow of air. Do not cover the ventilation openings on the back cover. Leave at least 15cm around the TV set. Otherwise, air-circulation may be inadequate and cause overheating, which may cause a fire or damage to the TV set. Never place the TV set in hot, oily humid or excessively dusty places.
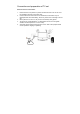
Connection and preparation of TV set Mounting the TV set to a wall This unit conforms to VESA standards for wall mounting. Please refer to the specification page for the wall hanging dimensions. In case of wall mounting, use the OEM wall hanging bracket and have specialized personnel carry out mounting in order to ensure your safety and to prevent damage to the TV set. To hang the TV set on the wall, all connecting wires must be inserted into the interface of the TV set first.
Turn On/Off the LCD 1. Turn on the LCD: Switch on the AC power supply on the back of the TV set and press the Power key on the remote controller or press the Power key on the panel. The indicator will turn blue and the LCD TV will enter normal operating mode several seconds later. 2. Turn off the LCD: Press the Power key on the remote controller or press the Power key on the panel to turn off the LCD. 3. Indicator status ①.Normal, the TV indicator turns blue. ②.Standby, the TV indicator turns orange. ③.
Searching Press the “TV” key on the remote controller to switch to the TV signal source, then press the “Menu” key on the remote controller or the “Menu” key on the right side of the panel to enter the main menu page. Press the Searching key or enter the searching page to search channels automatically. Suggestion: select Auto for the color system and DK for the sound system. To select automatic searching: It will search for all TV programs and save them to the memory.
About the control panel and interface PANNEL CONTROL KNOBS Input: Menu: CH▲/ : Vol ▲/ : Press this button to change input source. Press this button to display or exit the OSD menu. When the OSD menu appears, press these two buttons to select the item you want to execute; when no OSD menu appears, use to change channels in TV mode. When the OSD menu appears, press these two buttons to select or adjust the selected item; when no OSD menu appears, use to adjust the volume.
SOURCE INTERFACE Several signal source devices can be connected to your TV set. The following diagram shows how to connect them. Tips: If you want to hang the TV set on the wall, all connecting wires must be inserted into the interfaces of the TV set first. Whenever a peripheral device is connected to the TV set, ensure that the TV set is turned off. When connecting a peripheral device, connect the cable to the connecting terminal that is the same color as the cable color.
SOURCE INTERFACE Antenna Input: Insert the antenna connector into the antenna jack of the TV. The interface is a 75 Ω coaxial cable input. Video/S-terminal input: Connect the video signal source or S-terminal cable to a device such as a DVD, laser disc player, video recorder or camera. Audio input: Connect the audio signal source (computer, DVD, laser disc player, video recorder or camera, etc.) to the audio input port.
SOURCE INTERFACE Component Input: Connect the sound and picture of the component signal source (DVD, laser disc player, video recorder or camera, etc.) to the component signal input port. HDMI: HDMI (High-Definition Multimedia Interface) can be used to connect the HDMI signal cable to the DVD player and other devices.
SOURCE INTERFACE Computer signal and computer audio input: Connect the host signal to the computer input port at the back of the TV via the VGA signal cable. Connect one end of the PC audio cable to the PC audio input port of the TV, and connect the other end to the audio cable port of the PC host. Headphone jack: The user can use headphones by inserting the plug into the headphone jack.
OPERATING INSTRUCTIONS TO USE THE REMOTE CONTROL POWER Press to power ON/OFF (standby) TV. (Note:TV is never completely power off unless physically unplugged.) CH Press to change TV channel up or down “∧”,“∨”,“<”,“>”, Press to adjust the various function items on the menu. TV Press to choose TV source mode directly. OK Press to display the submenu VIDEO Press repeatedly to toggle between AV and S-VIDEO source modes MENU: Press to open or exit MENU. WIDE Press to choose the display aspect.
OPERATING INSTRUCTIONS To install the remote control batteries 1. Remove the battery cover. Insert two AAA batteries into the battery compartment. Make sure that you match the + and – symbols on the batteries with the + and – symbols in the battery compartment. 2. Point the remote controller directly to the remote receiving window on the front casing of the main unit. In case of any barriers between the main unit and the remote controller, the remote controller may not work.
TO USE THE MENU 1. 2. 3. 4. Press the Menu button to display Main Menu. Use the V- or V+ to select the function to be adjusted. Use the P- or P+ to enter into the submenu, or to enable or adjust the selected function. Press the Menu button to exit the Main Menu. SOURCE MENU Press the Source button to enter the Source Menu: PC, HDMI, AV, S-Video, Component, TV.
TO USE THE MENU Picture Setting Brightness Contrast Saturation Sharpness Color Temp. DNR Picture Mode DCR Reset Adjustable between 0-100, set the backlight brightness of the picture. Adjustable between 0-100, set the contrast of the picture. Adjustable between 0-100, adjust the color concentration of the picture. (unavailable for PC and Component Signal modes) Adjustable between 0-100, set the sharpness of the picture. Provides three options – Cold, Normal and Warm.
TO USE THE MENU Sound Setting (the same for all modes) Sound Mode Bass Treble Balance Reset Switch between the five preset sound modes Adjust the intensity of the bass Adjust the intensity of the treble Adjustable between 0-60. While adjusting in the range of 30-0, the sound of the right channel fades out to zero. While adjusting in the range of 30-60, the sound of the left channel fades out to zero. Restore the sound settings to the default setting.
TO USE THE MENU Function Setting MENU language Image Ratio Sleep Timer OSD Position OSD Transp. Timeout Power Saver Power On Recall Reset Select the OSD language between English/Simplified Chinese/Russina/Portuguese/French/Spanish. 4:3 16:9 Movie (unavailable for PC mode) Panorama (unavailable for PC mode) Set the time for the TV set to enter the standby state (unavailable for PC mode) Change the display position of the OSD menu. There are a total of 9 positions.
TO USE THE MENU Tuning (the following menus appear only in TV mode) Channel Nr. Frequency Color System Sound System Update Search Auto Search Manual Fine Tune Channel Skip Display the number of the current TV channel. Display the frequency of the current TV channel. Display the color system of the current TV signal. (displayed as Auto after automatic saving) Display the sound system of the current TV signal.
TO USE THE MENU PC Setting (the following menus appear only in the PC mode) Auto Config H. Position V. Position Clock Phase Reset Automatically config the optimal position of the picture to the optimal time sequence position.
Tips Care of the screen Do not rub or strike the screen with anything hard as this may scratch, mar, or damage the screen permanently. Unplug the screen before cleaning the screen. Dust the TV by wiping the screen and the cabinet with a soft, clean cloth. If the screen requires additional cleaning, use a clean, damp cloth. Do not use liquid cleaners or aerosol cleaners.
Product Specification Model Display area V22t 546mm (21.5”) V24t 598mm (23.6”) Recommend frequency Visual angle 1920 x1080 Horizontal:170° Vertical:160°(Typ.) 250cd/m² 60000:1 2Wx2 PAL/NTSC (D/K,B/G,I)/(D/K,B/G,I ,M) 75Ω AC100-240V 50/60Hz 1920 x1080 Horizontal:170° Vertical:160°(Typ.) 300cd/m² 60000:1 2Wx2 PAL/NTSC (D/K,B/G,I)/(D/K,B/G,I, M) 75Ω AC100-240V 50/60Hz Power Consumption Power Consumption (Stand by) Dimensions (W)x(H)x(D) (mm) (with stand) ≤35W ≤1W ≤60W ≤1W 551.6x456x220.2 599.4x485.
SUPPORTED RESOLUTION PRRESET PC MODE STANDARD RESOLUTION HORIZONTAL FREQUENCY (kHz) VERTICAL FREQUENCY (kHz) VGA 640×480 @60Hz DMT 31.469 59.940 VGA 640×480 @67Hz MAC 35.000 66.667 VGA 640×480 @72Hz DMT 37.861 72.809 VGA 640×480 @75Hz DMT 37.500 75.000 Dos-mode 720×400 @70Hz DOS 31.469 70.087 SVGA 800×600 @56Hz DMT 35.156 56.250 SVGA 800×600 @60Hz DMT 37.879 60.317 SVGA 800×600 @72Hz DMT 48.077 72.188 SVGA 800×600 @75Hz DMT 46.875 75.000 SVGA 832×624 @75Hz 49.
SUPPORTED RESOLUTION WSXGA 1680X1050 @60Hz CVT16:10 65.290 59.954 WSXGA 1680X1050 @60Hz RB CVT16:10 64.674 59.883 HD 1920×1080@60Hz 67.500 60.000 SD 480P@60Hz for SDTV Digital only 31.469 59.94 SD 576P@50Hz for SDTV Digital only 31.250 50.000 HD 720P@60Hz for HDTV Digital only 45.000 60.000 HD 720P@50Hz for HDTV Digital only 37.500 50.000 HD 1080i@60Hz for HDTV Digital only 33.750 60.000 HD 1080i@50Hz for HDTV Digital only 28.125 50.
Before Calling Service Please make these simple checks before calling service. These tips may save you time and money since charges for receiver installation and adjustments of customer controls are not covered under your warranty.
Before Calling Service Snowy picture and noise Horizontal dotted line Television not responding to remote control VGA mode doesn't work Black stripes appear on the top and bottom of the screen in VGA mode *Check the antenna connection *This may be caused by electrical interference (e.g. hairdryer, nearby neon lights, etc.) *Turn off the equipment. *Check whether the batteries are working. Replace if necessary *Clean the remote control sensor lens on the TV.
GLOSSARY Audio / Video Inputs Located on the rear and the front of the receiver these connectors (RCA phono type plug) are used for the input of audio and video signals. Designed for use with VCRs (or other accessories) in order to receive higher picture resolution and offer sound connection options. S-Video Input Allows direct connection of high-resolution video sources, such as a Super VHS videocassette recorder, Laser Disc player, etc. Provides improved picture resolution, sharpness, and clarity.