SMART All-in-One User Manual A2272PW4T/A2472PW4T www.aoc.com ©2013 AOC. All Rights Reserved.
TABLE OF CONTENT SAFETY ....................................................................................................................................4 National Conventions....................................................................................................................4 Power ................................................................................................................................................5 Installation ...................................................
DRIVER ................................................................................................................................. 34 Monitor Driver ............................................................................................................................ 35 Windows 8 ............................................................................................................................. 35 Windows 7 ................................................................................
SAFETY NATIONAL CONVENTIONS The following subsections describe notational conventions used in this document. Notes, Cautions, and Warnings Throughout this guide, blocks of text may be accompanied by an icon and printed in bold type or in italic type. These blocks are notes, cautions, and warnings, and they are used as follows: NOTE: A NOTE indicates important information that helps you make better use of your monitor..
POWER The monitor should be operated only from the type of power source indicated on the label. If you are not sure of the type of power supplied to your home, consult your dealer or local power company. The monitor is equipped with a three-pronged grounded plug, a plug with a third (grounding) pin. This plug will fit only into a grounded power outlet as a safety feature.
INSTALLATION Do not place the monitor on an unstable cart, stand, tripod, bracket, or table. If the monitor falls, it can injure a person and cause serious damage to this product. Use only a cart, stand, tripod, bracket, or table recommended by the manufacturer or sold with this product. Follow the manufacturer’s instructions when installing the product and use mounting accessories recommended by the manufacturer. A product and cart combination should be moved with care.
CLEANING Clean the cabinet regularly with cloth.You can use soft-detergent to wipe out the stain, instead of strong-detergent which will cauterize the product cabinet. When cleaning, make sure no detergent is leaked into the product. The cleaning cloth should not be too rough as it will scratch the screen surface. Please disconnect the power cord before cleaning the product.
OTHER If the product is emitting a strange smell, sound or smoke, disconnect the power plug IMMEDIATELY and contact a Service Center. Make sure that the ventilating openings are not blocked by a table or curtain. Do not engage the LCD monitor in severe vibration or high impact conditions during operation. Do not knock or drop the monitor during operation or transportation.
SETUP CONTENTS OF THE BOX 1. 2. 3. 4. 5. 6. 7. 8. 9. 10. 11. LCD Monitor CD Manual Power Cord Power Adapter D-SUB Cable Audio Cable USB Cable (upstream) HDMI Cable MHL Cable USB Keyboard USB Mouse v Not all signal cables (D-SUB, Audio, USB, HDMI, MHL cables) and Keyboard , Mouse will be provided for all countries and regions. Please check with the local dealer or AOC branch office for confirmation.
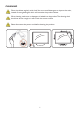
v Do not touch the LCD screen when you change the angle. It may cause damage or break the LCD screen. v It is recommended to stabilize with a fixed point in order to lock the stand if the tilted angle is equal to or over 20°. v Do not adjust the tilted angle less than 20°. The monitor may fall caused by instability. v Pay attention not to bounce back the stand while adjusting the tilted angle.
CONNECTING THE MONITOR Cable connections at the back of monitor: 7 8 9 10 11 12 6 5 4 1 2 3 1. D-SUB Signal Input 7. 2. 3. HDMI/MHL Signal Input Power Input SD Card Slot (SD/SDHC/SDXC/ MMC/MS/MS-Pro) USB Port RJ45 (10/100Mbps) 8. 9. Micro USB Port (OTG: only support device function) USB Port USB Port 10. Audio In 11. 12. Earphone Out Kensington Lock 4. 5. 6. To protect equipment, always turn off the PC and monitor before connecting. 1.
USING “MHL(MOBILE HIGH-DEFINITION LINK)” “MHL” (Mobile High-Definition Link) This feature allows you to enjoy videos and photos (imported from a connected mobile device that supports MHL) on the screenof the product. v To use the MHL function, you need an MHL-certified mobile device.You can check if your mobile device is MHL certified on the device manufacturer’s website. To find a list of MHLcertified devices, visit the official MHL website (http://www.mhlconsortium.org).
firmware of the mobile device to the latest version. v If MHL mode is not activated even though the mobile device supports MHL, check if mobile device MHL port is MHL standard port otherwise an additional MHL-enabled adapter is required.
MULTI-TOUCH SCREEN User can use Display Multi-touch(2 points) Function under Android system. While you under XP, win7, win8 system, before using Display Multi-touch(2 points) Function, user need to connect basic wires ( power cable,VGA cable, USB cable). Then user can fully enjoy Multi-touch (2 points) Function. Part of specific use, please see the following drawings.
CONNECTING USB KEYBOARD & MOUSE To use this monitor for Android system, you need to connect USB keyboard/mouse to the USB port at the back of monitor: To use this monitor as a normal monitor for D-SUB and HDMI input controlled by the same USB keyboard/mouse connected to the USB port at the back of monitor, you need to connect a B-type USB cable from this monitor to your PC.
Select default keyboard type and back to OOBE page. Press “Next” button to complete keyboard setting.
ADJUSTING SETTING OPTIMAL RESOLUTION Windows Vista 1. Click START. 2. Click CONTROL PANEL. 3. Click Appearance and Personalization. 4. Click Personalization.
5. Click Display Settings. 6. Set the resolution SLIDE-BAR to 1920 x 1080. Windows 8 1. Right click and click All apps at the bottom-right of the screen. 2. Set the “View by” to “Category”.
3. Click Appearance and Personalization. 4. Click DISPLAY. 5. Set the resolution SLIDE-BAR to 1920 x 1080. Windows ME/2000 1. 2. 3. 4. 5. 6. Click START. Click SETTINGS. Click CONTROL PANEL. Double click DISPLAY. Click SETTINGS. Set the resolution SLIDE-BAR to 1920 x 1080.
OPERATING INSTRUCTIONS HOTKEYS v Connect the power cord and the video cable. v Press the POWER key to turn on the monitor. The power indicator will light up. 8 7 6 5 4 3 2 1 For menu control 1. POWER 5. SOURCE / AUTO / EXIT 2. MENU / ENTER 6. 1.0 Megapixel Webcam 3. + / VOLUME 7. Webcam activity light 4. – / CLEAR VISION 8.
OSD SETTING Basic and simple instruction on the control keys. Luminance Image Setup Color Setup Picture Boost Contrast 50 Gamma Brightness 50 DCR Off Overdrive Off Eco mode Standard OSD Setup Extra Exit Gamma 1 1. Press button to display the control menu. 2. Press or button to navigate through the menu items. Once the desired item is highlighted, press button to activate it. If there is a sub-menu, press or button to navigate through the sub-menu functions. 3.
Luminance Luminance Image Setup Color Setup Picture Boost Contrast 50 Gamma Brightness 50 DCR Off Overdrive Off Eco mode 1. Press Standard OSD Setup Extra Exit Gamma 1 button to display menu. 2. Press or 3. Press 4. Press 5. Press or button to select submenu, and press or button to adjust. button to exit. Main Menu Luminance button to select Sub Menu Item Brightness Contrast button to enter. button to enter. 0~100 0~100 Description Backlight Adjustment.
Image Setup Image Setup Color Setup Picture Boost OSD Setup Extra Clock 50 H. Position 50 Phase 50 V. Position 50 Sharpness 50 1. Press Exit Luminance button to display menu. 2. Press or 3. Press 4. Press 5. Press or button to select submenu, and press or button to adjust. button to exit. Main Menu Image Setup button to select Sub Menu Item Clock Phase Sharpness H.Position V.Position (Image Setup), and press button to enter. button to enter.
Color Setup Color Setup Picture Boost Color Temp. Warm DCB Mode DCB Demo 1. Press OSD Setup Extra Exit Red 50 Off Green 50 Off Blue 50 Luminance Image Setup button to display menu. 2. Press or 3. Press 4. Press 5. Press or button to select submenu, and press or button to adjust. button to exit. Main Menu button to select (Color Setup), and press button to enter.
Picture Boost Picture Boost Bright Frame Frame Size 1. Press OSD Setup Extra Off 50 Exit Luminance Image Setup Color Setup Brightness 50 H. Position 50 Contrast 50 V. Position 50 button to display menu. 2. Press or 3. Press 4. Press 5. Press or button to select submenu, and press or button to adjust. button to exit. Main Menu Picture Boost button to select Sub Menu Item Frame Size Brightness Contrast H. position V. position Bright Frame (Picture Boost), and press button to enter.
OSD Setup OSD Setup Extra Language Exit English Timeout 120 S.Power On Sync 1. Press Luminance Image Setup Color Setup H. Position 50 Transparence V. Position 0 Break Reminder Picture Boost 25 Off Off button to display menu. 2. Press or 3. Press 4. Press 5. Press or button to select submenu, and press or button to adjust. button to exit. Main Menu button to select Sub Menu Item H. Position V.
Extra Extra Exit Luminance Image Setup Color Setup Picture Boost Input Select Auto Image Ratio 4:3 Resolution : 1024(H)X768(V) Auto Config. Yes DDC/CI Yes H. Frequency : 60KHz Off Timer 00 Reset No V. Frequency : 60Hz 1. Press button to display menu. 2. Press or 3. Press 4. Press 5. Press or button to select submenu, and press or button to adjust. button to exit. Main Menu button to select (Extra), and press Sub Menu Item Input Select Extra OSD Setup Auto Config.
Exit Exit 1. Press 2. Press Luminance Image Setup Color Setup Picture Boost OSD Setup button to display menu. or button to select Main Menu Exit (Exit), and press Sub Menu Item Exit Description Exit the main OSD. LED INDICATOR Status Full Power Mode Power Saving Mode Active-off Mode button to enter.
STARTING WITH ANDROID This Smart Monitor is embedded with Android operating system, that it can work individually without connecting a PC. button to display the source list. 1. Press button to confirm the selection. 2. Select [Android] and press 3. Press button to display the selections.
CUSTOMIZING YOUR HOME SCREEN Adding application icons, shortcuts, or widgets to the home screen as your preference.You can also change the wallpaper. v Add an item to the Home Screen: icon to view the application gallery. 1. Click on the 2. Select [APPS] or [WIDGETS]. 3. Click and hold the item until it enlarged. Drag the item to the place you preferred on the Home Screen. v Move an item on the Home Screen: 1. Click and hold the item until it enlarged. 2.
USING THE ON-SCREEN KEYBOARD v Enter text: 1. Click on a text field. The on-screen keyboard opens. 2. Click on the keys to type. Key Description Key Switch to upper or lower case letters for English input. Description Press to enter expression symbol. Long press to select from all expression symbols. Enter a space. Close the on-screen keyboard. Enter your text.. Back to Android Home Screen Single press to go backspace and delete one character.
ADJUSTING THE SETTINGS FOR ANDROID Click on the at the bottom-right of the screen. Click on the [Settings] to open the sub-menu. Main Menu Sub Menu Item WIRELESS & NETWORKS Wi-Fi ON/OFF Bluetooth ON/OFF Ethernet Ethernet configuration More VPN Tethering &portable hotspot Description Turn on or off the Wi-Fi. Manage the Wi-Fi network. Search and connect to the available networks. Set the connection type and connect to the available Ethernet.
Main Menu Users Sub Menu Item You Other users Add users Description Users information Users information Add users PERSONAL Location access Location access Location sources, Screen security Backup&Restore Set the screen lock. Check for displaying the password while entering the password. Allow or not allow installation of apps from unknow sources Display the certificates. Select the display language for your device and set the keyboard settings.
ANDROID SOFTWARE UPDATE You can upgrade system by Local update mode. v Local update support upgrade from SD card device. v During system update, DONOT pull out SD card device or power off Smart Monitor. Local update 1. Copy updates file on SD card device. Insert SD card device. The SD card device should not be write-protected, and Smart Monitor can read it. 2. Start system updates as below path: Settings About System updates Local update. Click ‘Next’ to continue update process. 3.
MONITOR DRIVER Windows 8 1. Start Windows® 8 2. Right click and click All apps at the bottom-right of the screen. 3.
4. Set the “View by” to “Large icons” or “Small icons”. 5. Click on the “Display” icon.
6. Click on the “Change display settings” button. 7. Click the “Advanced Settings” button.
8. Click the “Monitor” tab and then click the “Properties” button. 9. Click the “Driver” tab.
10. Open the “Update Driver Software-Generic PnP Monitor” window by clicking on “Update Driver... “ and then click the “Browse my computer for driver software” button. 11. Select “Let me pick from a list of device drivers on my computer”.
12. Click the “Have Disk” button. Click on the “Browse” button and navigate to the following directory: X:\Driver\module name (where X is the drive letter designator for the CD-ROM drive). 13. Select the “xxx.inf” file and click the “Open” button. Click the “OK” button. 14. Select your monitor model and click the “Next” button. The files will be copied from the CD to your hard disk drive. 15. Close all open windows and remove the CD. 16. Restart the system.
3. Click on the “Display” icon. 4. Click on the “Change display settings” button. 5. Click the“Advanced settings”button.
6. Click the “Monitor” tab and then click the “Properties” button. 7. Click the “Driver” tab.
8. Open the “Update Driver Software-Generic PnP Monitor” window by clicking on “Update Driver... “ and then click the “Browse my computer for driver software” button. 9. Select “Let me pick from a list of device drivers on my computer”.
10. Click the “Have Disk” button. Click on the “Browse” button and navigate to the following directory: X:\Driver\module name (where X is the drive letter designator for the CD-ROM drive). 11. Select the “xxx.inf” file and click the “Open” button. Click the “OK” button. 12. Select your monitor model and click the “Next” button. The files will be copied from the CD to your hard disk drive. 13. Close all open windows and remove the CD. 14. Restart the system.
Windows Vista 1. Click “Start” and “Control Panel”. Then, double-click on “Appearance and Personalization”. 2. Click “Personalization” and then “Display Settings”. 3. Click “Advanced Settings...”.
4. Click “Properties” in the “Monitor” tab. If the “Properties” button is deactivated, it means the configuration for your monitor is completed. The monitor can be used as is. If the message “Windows needs...” is displayed, as shown in the figure below, click “Continue”. 5. Click “Update Driver...” in the “Driver” tab. 6. Check the “Browse my computer for driver software” checkbox and click “Let me pick from a list of device drivers on my computer”. 7. Click on the “Have disk...
8. Select your monitor model and click on the “Next” button. 9. Click “Close” “Close” “OK” “OK” on the following screens displayed in sequence. Windows 2000 1. 2. 3. 4. 5. 6. 7. 8. 9. 10. 11. Start Windows® 2000. Click on the “Start” button, point to “Settings”, and then click on “Control Panel”. Double click on the “Display” icon. Select the “Settings” tab then click on “Advanced...”. Select “Monitor”. - If the “Properties” button is inactive, it means your monitor is properly configured.
I-MENU Welcome to “i-Menu” software by AOC. i-Menu makes it easy to adjust your monitor display setting by using on screen menus instead of the OSD button on the monitor. To complete installation, please follow the installation guide.
E-SAVER Welcome to use AOC e-Saver monitor power management software! The AOC e-Saver features Smart Shutdown functions for your monitors, allows your monitor to timely shutdown when PC unit is at any status (On, Off, Sleep or Screen Saver); the actual shutdown time depends on your preferences (see example below). Please click on “driver/e-Saver/setup.exe” to start installing the e-Saver software, follow the install wizard to complete software installation.
SCREEN+ Welcome to “Screen+” software by AOC. Screen+ software is a desktop screen splitting tool; it splits the desktop into different panels, and each panel displays a different window.You only need to drag the window to a corresponding panel when you want to access it. It supports multiple monitor display to make your task easier. Please follow the installation software to install it.
TECHNICAL SUPPORT (FAQ) TROUBLESHOOT Problem & Question Power LED is not on No images on the screen Picture Is Fuzzy & Has Ghosting Shadowing Problem Picture Bounces, Flickers Or Wave Pattern Appears In The Picture Monitor Is Stuck In Active Off Mode” Missing one of the primary colors (RED, GREEN, or BLUE) Possible Solution v Make sure the power button is ON and the Power Cord is properly connected to a grounded power outlet and to the monitor.
Problem & Question Screen image is not centered or sized properly Picture has color defects (white does not look white) Horizontal or vertical disturbances on the screen Possible Solution v Adjust H-Position and V-Position or press hot-key (AUTO). v Adjust RGB color or select desired color temperature. v Use Windows 95/98/2000/ME shut-down mode to adjust CLOCK and PHASE. v Press to auto-adjust. CLOCK (pixel frequency) controls the number of pixels scanned by one horizontal sweep.
APPENDIX PLUG AND PLAY Plug & Play DDC2B Feature This monitor is equipped with VESA DDC2B capabilities according to the VESA DDC STANDARD. It allows the monitor to inform the host system of its identity and, depending on the level of DDC used, communicate additional information about its display capabilities. The DDC2B is a bidirectional data channel based on the I²C protocol. The host can request EDID information over the DDC2B channel.
KVM BEHAVIOR Android Interface This monitor is equipped with USB MTT Hub Controller which is premium 4-port hub solution which fully complies with Universal Serial Bus Specification Revision 2.0. that provide dedicated TT* to each downstream (DS) ports, which guarantee Full-Speed(FS) data passing bandwidth when multiple FS device perform heavy loading operations. One Webcam port and One Touch Panel Port are dedicated for system usage. IO Interface USB 2.0 x2 to meet the requirement with minimum effort.
Part of the keys are not compatible with Windows OS and Android OS, please refer to the table below: OS Keys Windows OS Android OS × x x x x x x x x x x x x x x x x x x 55
SPECIFICATIONS A2272PW4T LCD Panel Driving system 21.5” WLED Size 54.7cm diagonal Pixel Pitch 0.24825mm(H) × 0.24825mm(V) Video Input R, G, B Analog Interface Digital Separate Sync. H/V TTL H-Frequency 30kHz ~ 83kHz V-Frequency 50 ~ 76Hz Display Colors 16.7M Colors Dot Clock 148.5MHz Max. Resolution 1920×1080@60Hz Plug & Play VESA DDC2B™ LAN Speed 10/100Mbps RF Module M/N BCM94330LGA Built-in Webcam 1.
A2472PW4T LCD Panel Driving system 23.6” WLED Size 59.8cm diagonal Pixel Pitch 0.2715mm(H) × 0.2715mm(V) Video Input R, G, B Analog Interface Digital Separate Sync. H/V TTL H-Frequency 30kHz ~ 83kHz V-Frequency 50 ~ 76Hz Display Colors 16.7M Colors Dot Clock 148.5MHz Max. Resolution 1920×1080@60Hz Plug & Play VESA DDC2B™ LAN Speed 10/100Mbps RF Module M/N BCM94330LGA Built-in Webcam 1.0 megapixel camera with microphone and LED indicator Power Consumption ON Mode 30W (Typ.
Touch screen specifications Touch technology Input Method Touch stylus diameter Resolution Touch accuracy Operating Systems Microsoft Windows 8 Microsoft Windows 7 Infrared Optical Structure Finger, gloved hand, or any other opaque stylus t7 mm 32767 x 32767 < ± 2.5 mm 95% coverage Multi-Touch (2 points) Multi-Touch (2 points) Microsoft Windows Vista Microsoft Windows XP Single Touch Single Touch+Action PRESET DISPLAY MODES HORIZONTAL FREQUENCY (KHz) VERTICAL FREQUENCY (Hz) 640x480@60Hz 31.469 59.
MAC MODEVGA 640x480@75Hz 35 66.667 MAC MODESVGA 832x624@75Hz 49.725 74.
For HDMI Horizontal Frequency (kHz) Vertical Frequency (Hz) Dot Clock (MHz) 480P@60Hz for Digital only 31.469 59.940 25.175 480P@60Hz for Digital only 31.469 59.940 27.000 576P@50Hz for Digital only 31.250 50.000 27.000 720P@50Hz for Digital only 37.500 50.000 74.250 720P@60Hz for Digital only 45.000 60.000 74.250 1080P@50Hz for Digital only 56.250 50.000 148.500 1080P@60Hz for Digital only 67.500 60.000 148.500 1080i@50Hz for Digital only 28.130 50.000 74.
PIN ASSIGNMENTS 1 5 6 10 11 15 15 - Pin Color Display Signal Cable PIN NO. 1. 2. 3. 4. 5. 6. 7. 8. 19 17 15 13 11 18 16 14 12 10 DESCRIPTION Red Green Blue Ground Detect Cable R-Ground G-Ground B-Ground 9 7 8 5 6 3 4 PIN NO. 9. 10. 11. 12. 13. 14. 15. DESCRIPTION +5V Ground Ground DDC-Serial Data H-Sync V-Sync DDC-Serial Clock PIN NO. 11. 12. 13. 14. 15. 16. 17. 18. 19. DESCRIPTION TMDS data Shield TMDS data ckCEC N.
REGULATION EUROPE EU Declaration of Conformity This device complies with the essential requirements of the R&TTE Directive 1999/5/EC.
TAIWAN մѓ౦ႬݱᒮৣܓႬᐡᆔ౪ᒳݳȈ 䬓⌨ṳ㢄 䵺 ❲婴嬰⏯㠣Ḳἵ⊆䍮⯫栢曢㩆Ə杅䵺娘⏖Ə⅓⏟˚┭噆ㇽὦ䔏俬✮ᷴ⽾㒬凑 孱㛛栢䍮˚⊇⤎⊆䍮ㇽ孱㛛⎆娔姯Ḳ䉠『⎱⊆僤˛ 䬓⌨⛂㢄 ⊆ 䍮⯫栢曢㩆Ḳὦ䔏ᷴ⽾⽘柦棂刑⭰⅏⎱⹙㓥⏯㲼态Ὲƞ䵺䙣䏥㛰⹙㓥䏥屈㘩Ə ㆰ䪲⍚⁃䔏Əḍ㔠╫凚䄈⹙㓥㘩㖠⽾乣乳ὦ䔏˛ ∴柬⏯㲼态ῈƏ㋮ᾄ曢Ὲ㲼奶⮁ὃ㥔Ḳ䄈䷁曢态Ὲ˛ ἵ⊆䍮⯫栢曢㩆柯⾴⎾⏯㲼态Ὲㇽⷌ㥔˚䦸⭟⎱憒䘩䔏曢㳉弢⯫『曢㩆娔₀Ḳ⹙ 㓥˛ ✏ 䧔嵒栢⸝ⅎ㒴ὃḲ䄈䷁岮姱ₚ弟娔₀Ə昷㖣⮋ⅎὦ䔏˛ USA Federal Communication Commission Interference Statement This device complies with Part 15 of the FCC Rules.
CANADA Industry Canada statement: This device complies with RSS-210 of the Industry Canada Rules. Operation is subject to the following two conditions: (1) This device may not cause harmful interference, and (2) this device must accept any interference received, including interference that may cause undesired operation. Ce dispositif est conforme à la norme CNR-210 d’Industrie Canada applicable aux appareils radio exempts de licence.
MEXICO Cofetel notice is: (Mexico COFETEL aviso:) “La operación de este equipo está sujeta a las siguientes dos condiciones: (1) es posible que este equipo o dispositivo no cause interferencia perjudicial y (2) este equipo o dispositivo debe aceptar cualquier interferencia, incluyendo la que pueda causar su operación no deseada.
guarantee that interference will not occur in a particular installation. If this equipment does cause harmful interference to radio or television reception, which can be determined by turning the equipment off and on, the user is encouraged to try to correct the interference by one or more of the following measures: Reorient or relocate the receiving antenna. Increase the separation between the equipment and receiver.
WEEE DECLARATION FOR INDIA This symbol on the product or on its packaging indicates that this product must not be disposed of with your other household waste. Instead it is your responsibility to dispose of your waste equipment by handing it over to a designated collection point for the recycling of waste electrical and electronic equipment.
SERVICE WARRANTY STATEMENT FOR EUROPE LIMITED THREE-YEAR WARRANTY* For AOC LCD Monitors sold within Europe, AOC International (Europe) B.V. warrants this product to be free from defects in material and workmanship for a period of Three (3) years after the original date of consumer purchase. During this period, AOC International (Europe) B.V. will, at its option, either repair the defective product with new or rebuilt parts, or replace it with a new or rebuilt product at no charge except as *stated below.
This limited warranty does not cover any of the product firmware or hardware that you or any third party have modified or altered; you bear the sole responsibility and liability for any such modifications or alteration. All AOC LCD Monitors are produced according to the ISO 9241-307 Class 1 pixel policy standards.
WARRANTY STATEMENT FOR MIDDLE EAST AND AFRICA (MEA) AND The Commonwealth of Independent States (CIS) LIMITED ONE to THREE YEARS WARRANTY* For AOC LCD Monitors sold within the Middle East and Africa (MEA) and the Commonwealth of Independent States (CIS), AOC International (Europe) B.V. warrants this product to be free from defects in material and workmanship for a period of One (1) to Three (3) years from the manufacture date depending on sale country. During this period, AOC International (Europe) B.V.
or Authorized Service Center v Improper environments like humidity, water damage and dusts v Damaged by violence, earthquakes and terrorist attacks v Excessive or inadequate heating or air conditioning or electrical powers failures, surges, or other irregularities This limited warranty does not cover any of the product firmware or hardware that you or any third party have modified or altered; you bear the sole responsibility and liability for any such modifications or alteration.
AOC International (Europe) B.V. Prins Bernhardplein 200 / 6th floor, Amsterdam, The Netherlands 7HO v )D[ AOC PIXEL POLICY ISO 9241-307 CLASS 1 July 25th, 2013 AOC strives to deliver the highest quality products. We use some of the industry’s most advanced manufacturing processes and practice stringent quality control. However, pixel or sub pixel defects on the TFT monitor panels used in flat panel monitors are sometimes unavoidable.
WARRANTY STATEMENT FOR NORTH & SOUTH AMERICA (EXCLUDING BRAZIL) WARRANTY STATEMENT for AOC Color Monitors Including those Sold within North America as Specified Envision Peripherals, Inc. warrants this product to be free from defects in material and workmanship for a period of three (3) years for parts & labor and one (1) year for CRT Tube or LCD Panel after the original date of consumer purchase. During this period, EPI ( EPI is the abbreviation of Envision Peripherals, Inc.
This three-year limited warranty does not cover any of the product’s firmware or hardware that you or any third party have modified or altered; you bear the sole responsibility and liability for any such modification or alteration.
v v v v v PARAGUAY: http://py.aoc.com/support/find_service_center PERU: http://pe.aoc.com/support/find_service_center URUGUAY: http://pe.aoc.com/support/find_service_center VENEZUELA: http://ve.aoc.com/support/find_service_center IF COUNTRY NOT LISTED: http://latin.aoc.com/support/find_service_center EASE PROGRAME Only for AOC branded monitors sold within the continental United States. All AOC branded monitors are now covered by the EASE Program.